Web Design/JavaScript Challenges
< Web Design|
Web Design → JavaScript Challenges
|
Are you ready for the Javascript challenges? These challenges aim to build your Javascript skills with practical activities that can be immediately useful for your own websites!
Please make sure you are familiar with the window and document objects in Javascript before taking on these challenges (see the activities Getting to know Javascript events and Getting to know the Document Object Model with Javascript.)
Challenge 1: Peekaboo Elements
Paste the following code into a new HTML document and view it in your browser.
<!DOCTYPE HTML PUBLIC "-//W3C//DTD HTML 4.01//EN" "http://www.w3.org/TR/html4/strict.dtd">
<html lang="en">
  <head>
    <title>JavaScript Challenges</title>
  </head>
  <body>
    <form action="">
      <fieldset>

        <legend>Email subscriptions</legend>

        <p id="Ross">
          <label>
            <input type="checkbox" name="subscribe" id="subscribe">
            Yes! I would like to receive all of your free candy!
          </label>
        </p>

        <p id="emailpara">
          <label>
            Email Address:
            <input type="text" name="email" id="email">
          </label>
        </p>

      </fieldset>
    </form>
  </body>
</html>
The aim of this challenge is to only display the email paragraph when the checkbox is checked, but we'll break that down into smaller tasks!
Step 1: Hiding the email fields by default
Add some plain old CSS style so that the "emailpara" paragraph isn't displayed when the page first loads (using the CSS 'display' property). Test to make sure this works.
Step 2: Adding a function template
Create a new function called toggleEmail() that simply displays an alert, ie. window.alert("Yep, my function is being called");
Add an event so that when the checkbox is clicked your function is called and test that it works!
Step 3: Display the email fields
Now we'll replace that alert() code so that our function actually does something useful! Using JavaScript, we can change the style of any element on our page using the style object. Every element has a style object and we can access it like this:
document.getElementById("subscribepara").style.backgroundColor = "blue";
In plain English, the above JavaScript statement says:
- Get the element on my document that has the id of "subscribepara",
- Grab its style object,
- and set the backgroundColor of this style to "blue".
Try copy-n-pasting the above code into your function and see what it does! Notice that the style property names are slightly different to those that we use in CSS (backgroundColor vs. background-color). W3Schools has a great reference for the HTML DOM Style object that outlines all the property names and values.
Now see if you can modify your function so that it unhides your "emailpara" paragraph when it runs.
Step 4: Making the email field toggle
When you test your form at the moment, you'll notice that you can click on the checkbox and the email field displays, but when you un-check the checkbox the extra paragraph doesn't hide itself again!
Our challenge is to add an if-else statement to our toggleEmail() function that checks to see if the checkbox is currently checked. If it is, we want to display our "emailpara" paragraph, otherwise we want to hide it.
To do this, we need to know how we can find out if a checkbox is currently checked... luckily for us, W3Schools's HTML DOM Checkbox reference tells us that a checkbox element has a property called 'checked' that is either true or false (ie. we can use, document.getElementById("idofinputelement").checked to find out the value of a checkbox, either true or false).
Step 5: When Javascript is disabled
At the moment if a user views the page with CSS enabled but Javascript disabled they will never see the email field. Add another CSS code to show the email field inside an element that fires when Javascript is disabled. <noscript></noscript>
You may want to take a look at your earlier if-else statements from your input validation to see how you might complete this challenge! When you get it working, yell out "JavaScript is way cool" and stand up and point to yourself (and take a break!)
Challenge 2: 'Same as above' Postal Address boxes
Add the following fieldset to a form of your own (the one from Challenge 1 is fine) and preview it in your browser:
<fieldset>

  <legend>Billing Information</legend>

  <p>
    <label>
      Postal Address:<br>
    <textarea name="postaladdress" id="postaladdress"></textarea>
    </label>
  </p>

  <p>
    Home Address:<br>
    <label>
       <input type="checkbox" name="homepostalcheck" id="homepostalcheck">
       Same as above
    </label>
    <br>
    <textarea name="homeaddress" id="homeaddress"></textarea>
  </p>

</fieldset>
The aim of this challenge is to automatically copy the postal address to the home address field if a user checks the "Same as above" checkbox. In addition to this, we'll disable the home address field when the checkbox is checked.
Step 1: Adding a function template
Add a JavaScript function to your page called setHomeAddress() that simply displays an alert, ie. window.alert("Yep, my function is being called");
Add an event so that when the checkbox is clicked your function is called and test that it works!
Step 2: Getting the Postal Address
Before we can copy the address over, we need to know how to read it using JavaScript. In Challenge 1 we used the .checked property to test whether a checkbox was checked; it contained either a true or false. If we're typing text into a <textarea> then .checked isn't going to help much.
Instead, we'll use the .value property of the textarea. It contains the text typed into a form field. In your setHomeAddress() function, write a line of code to display the Postal Address textarea's value in an alert box. W3Schools Textarea value page has a useful example close to what you'll write.
Step 3: Setting the value for the Home Address
Now that we know how to find the value of any element in our document, the trick is to set our "homeaddress" element's value equal to the "postaladdress" element's value. To set the homeaddress we could do something like:
document.getElementById("homeaddress").value = "Hi there";
Test and see if it works! You should find that when you click on your checkbox, the homeaddress is set to the text "Hi there".
Now see if you can modify the above line so that instead of placing "Hi there" in the box, it puts the value of the postaladdress field.
Step 4: Disabling the Home Address field
Use the W3Schools page about the HTML DOM TextArea object and see if you can find a property that will allow us to disable our textarea.
Try setting this property for your "homeaddress" element in your setHomeAddress() function. Make sure you test it out!
Step 5: Toggling the Home Address
Now when you test your form, you'll notice that when you un-check your checkbox, the home address field isn't enabled.
Have a go at adding an if-else statement to your setHomeAddress() function so that when the checkbox is un-checked the Home address field is re-enabled (you may want to review your solution to Challenge 1!)
Challenge 3: Radio Buttons
As you saw in Challenge 2, some form fields work differently than others when we're getting information about their contents. <input type="checkbox"> uses .checked, <input type="text"> and <textarea> use .value.
Luckily for us there's not many other variants to learn, and we can use very similar code to check whether a user has left a field empty, eg.
  if (document.getElementById("firstname").value == "")
  {
     window.alert("Please type something in the First Name field.");
     return false;
  }
First Name is a text input, so we're testing .value. But how do we do this for radio buttons? They don't take a value that our user types in... a radio button is either checked or not checked! Sound familiar?
Paste the following form into a file of your own (Challenge 2's is fine) and view it in a browser:
<form action="mailto:me@fakeemail.com">
  <fieldset>
    <legend>Radio buttons and Check Boxes</legend>
    <p>
      What's your favourite berry?:
      <label>
        <input type="radio" value="male" name="favfruit" id="optstraw">
        Strawberries
      </label>
      <label>
        <input type="radio" value="female" name="favfruit" id="optblue">
        Blueberries
      </label>
    </p>
  </fieldset>

  <input type="submit" value="Check it out!">
</form>
Step 1: Setting up your input validation
First, create a blank checkForm() function for your form and make sure that your function is being called when the form is submitted (using a simple window.alert). Hopefully we're starting to see why we always do this! W3Schools' Events page will help with using the submit event.
Step 2: Finding out if a radio button has been checked
Once you're convinced that your checkForm function is being called, fill out your checkForm function so that it looks like this:
function checkForm()
{
  // First, create our own variable so we don't have to keep typing
  // all that document.getElementById crap
  var optStrawberry = document.getElementById("optstraw");

  if (optStrawberry.[what property should go here?] == false)
  {
    window.alert("Please select your favourite berry!");
    return false;
  }

  return true;
}
Note that this function is not complete. We need to find out what the radio button's property is that will tell us whether the radio button has been checked or not. Take a look at W3Schools' HTML DOM Radio Object and see if you can find out what that property is. When you find it, replace the [what property should go here?] in the code above accordingly!
Test out your code and see if it does what you expect.
Step 3: Getting it to work properly!
You might have noticed that our code is not really doing what we want, even though it's doing exactly what we've asked it to! It currently forces the user to select the strawberry option.
We need to modify our code so that it alerts the user only if the strawberry option is false and the blueberry option is false (ie. neither radio button has been checked). Looking at the logical operators on W3Schools' Javascript Comparison and Logical Operators page, see if you can find out how to make sure that both radio buttons are un-checked before alerting the user.
Step 4: Halting progress
You might have noticed that our program tries to send an email regardless of whether we've filled the form in correctly. Not exactly ideal!
Since this is our first Challenge using the onsubmit event, you may not have seen return false before. Take a look at the two return statements in the code above. See how return false is used when we have an error, and true at the end if everything's ok?
JavaScript's return statement lets you immediately drop out of a program if there's no reason to continue. In our case, when we find that the user hasn't selected an option we want to cancel submitting the incomplete form. return false will tell JavaScript to cancel submitting, but there's one little chunk of code missing.
Take a read through JavaScript Kit's Accessing and Validating Forms page to find what you're missing to complete this puzzle.
Challenge 4: Better input validation
So far our form input validation has consisted of some annoying window.alert() boxes when users enter in the wrong information, but surely there's a more user-friendly way?!
This challenge will help you create in-line error messages that only appear when they need to! Paste the following form into a page:
<form action="mailto:me@fakeemail.com" onsubmit="return checkForm();">
  <fieldset>

    <legend>Personal details</legend>
    <p>
      <label>
        Full name:
        <input type="text" name="fullname" id="fullname">
      </label>
    </p>
    <p class="errormsg" id="nameerrormsg">Please enter your name above</p>

    <p>
      <label>
        Street Address:
        <input type="text" name="streetaddr" id="streetaddr">
      </label>
    </p>
    <p class="errormsg" id="addrerrormsg">Please enter your street address</p>

  </fieldset>
  <input type="submit" value="Submit it!">
</form>
Step 1: Some plain old styling
First, just some plain old CSS! Add some style so that the error messages use red text, and make them dramatic! Note how the error messages have been given a class="errormsg".
Once they look the way you want them, use CSS to hide them by default.
Step 2: Setting up your checkForm() function
Just a blank function that simply displays a window.alert so that you know it's connected ok! You'll need to add an event so that your function is called when you press the Submit button.
Step 3: Displaying your error messages
This step will be similar to the Peekaboo challenge above (Challenge 1). When the form is submitted, our checkForm() function is called. If the "fullname" field is empty, then we want to display the "nameerrormsg" paragraph.
After you've got that working, add a similar check for the street address.
Step4: Changing our program's logic
You might notice at the moment two issues that are not ideal:
- When you submit the form with blank fields, only the first input's error message appears.
- When you add text to one field and re-submit, the error message doesn't go away!
To fix this, you'll need to change the logic of your function... this can be tricky (so ask for help!), but here's some hints:
- Are you using
return falsestraight after showing the first error message? This means your program will never run the second check if the first one gives an error. - You'll need a variable, such as "is_valid" that will be set to
trueorfalsedepending on the outcome of your checks. You'll then return this variable at the end of your function, rather than returning true or false as soon as you find an error. - You're showing the message if there's an error, but you'll also need to hide the error message if everything's ok!
Challenge 5: Making sure a number is entered
So far we've worked out how to check whether a field is empty or not. Now we want to take this one step further and verify that whatever was entered is actually a number. Imagine you've got a Quantity field where the visitor specifies how many of a certain product they want to buy. You don't want them to enter 'a' or 'Hi there'.
Step 1: Updating your form
Add an input field to your form that has the name "quantity" and modify your checkForm() function so that the value can't be empty.
Step 2: Checking for a number
Javascript has a special function called isNaN(), short for "is Not a Number", that can be used to test whether a value can be understood as a number. For example, isNaN(1.5) will return false (as it *is* a number), whereas isNaN("hi there") will return true (as it is not a number).
Take a few minutes to experiment with the W3Schools demo of isNaN() until you are comfortable that you understand what it does.
In your checkForm() function, right after you've made sure that the quantity field isn't empty, add another if-statement as follows:
  // you only need the following line if you don't already
  // have a variable for your quantity field.
  var quantity = document.getElementById("quantity");

  // Now check if the value of the quantity field is not a number
  if (isNaN(quantity.value))
  {
    // if quantity wasn't a number, then we want to let the
    // user know that they need to correct the error!
    // Add your code below:


    // Lastly, return false so that the form won't be submitted.
    return false;
  }
Step 3: Adding a postcode field
Now add a another field to your form named 'postcode'. Update your checkForm() function so that:
- the postcode cannot be left blank.
- the postcode field must contain numbers only (see step 2 above).
Step 4: Checking the length of the postcode field
Everything in JavaScript that can have a length has a special length property. This can be used to tell us how many characters a user has typed into a field. For example, the following JavaScript code gets the "fullname" input element from the document and then displays an alert message telling the user how many characters were entered into it:
  var fullname = document.getElementById("fullname");
  window.alert("The length of the fullname field is: " + fullname.value.length);
Take a few minutes to see how the length property is used in this W3Schools Example.
- Modify the W3Schools example so that the field can have up to 8 characters.
- Now modify your checkForm function so that the postcode field can only contain 4 characters.
Time for a re-cap
So far, you've managed to:
- Test whether a checkbox or radio button is checked;
- Test whether a text field is empty;
- Test whether entered text is a number using the
isNaN()function; - Test the length of the entered text in a field (ie, how many characters have been entered) using the length property;
- Improve your input validation so that it displays error messages within the page (rather than the rather ugly window.alert() message box) by hiding and showing your own error messages with the style object.
Not bad! If you feel that you need more practice with the above, try adding some of those features to another existing form (such as the one created in the HTML Challenges). This can help you catch areas that you've struggled with and build your confidence with the syntax of JavaScript.
If you use Firefox and haven't yet tried Firebug, take some time out to play with it's awesomely helpful JavaScript debugger.
Challenge 6: Getting started with email validation
Checking to see if a postcode is valid required us to check that:
- the entered postcode was a number
- the entered postcode had exactly 4 digits (depending on your country!)
What can we check to make sure that an entered email address is actually a valid email address? Take a piece of paper and see if you can come up with two or three things that email addresses always need to contain to be valid.
Step 1: Adding an email field
Add a new input to your form named 'email' (make sure to set 'name' and 'id' attributes). What type of form field is best for email addresses?
Step 2: Making sure that the '@' symbol is present
Every email address contains one, and only one, "at" symbol (@). The email address entered into your form is just a bunch of characters strung together inside quotes, such as "Hi there". All programming languages refer to this bunch of characters as a String.
The great thing about Javascript is that every string has a whole bunch of built-in properties and methods that we can use. In fact, we've already used the length property back in Challenge 5 to work out how many characters our postcode contained.
Take a few minutes to read through the Quirksmode Strings overview. As you read through it, test some examples from the W3School JS String page.
One of the methods that you should have seen there is the indexOf() method. We can use it to find out where the "@" symbol appears in our email address, if at all! Note that the indexOf() method returns a number corresponding to the index or position of the text you are looking for. If the text isn't in the string, indexOf() will return -1. For example:
  var myString = "Hi there!";

  window.alert("Position of H is: " + myString.indexOf("H")); // position will be 0

  window.alert("Position of i is: " + myString.indexOf("i")); // position will be 1

  window.alert("Position of the is: " + myString.indexOf("the")); // position will be 3

  window.alert("Position of ! is: " + myString.indexOf("!")); // position will be 8

  window.alert("Position of Z is: " + myString.indexOf("Z")); // position will be -1
If you want to test the above, try the example of indexOf() at W3Schools.
Add the following code to your checkForm() function, then have a go at modifying it to get it to work.
  // create a variable to reference your email field (saves typing later!)
  var email = document.getElementById("email");

  // First, create a variable to remember the position of the "@" symbol
  var atPos = email.value.indexOf("@");

  if (atPos == ??) // you need to replace the question marks with
  {
    // Then there wasn't any @ symbol within the email address!
    // Let the user know that they need to correct the error!
    // Add your code below:


    // Lastly, return false so that the form won't be submitted.
    return false;
  }
Step 2: Ensuring there's something before the @
Now we're sure that there's an @ inside the email, but there's an outstanding problem: what if the user doesn't put anything before the @?
Write an extra if-else statement into checkForm() that ensures that the @ doesn't come right at the beginning of the string. Remember, indexOf() will give you the position starting from 0.
Step 3: Ensuring there's a full stop (.) after the @
Another required part of an email address is the server name (the bolded part in someone@somewhere.com) which always comes after the @. To ensure the user enters a server name, we can check whether a full stop is part of the email.
An additional complication is that some email addresses include a dot as part of the user name (the bolded part in james.smith@somewhere.com). We can't use indexOf() to search for the full stop because it'll pick up the first one instead of the second.
JavaScript gives us an easy way around that with lastIndexOf(), which works just like indexOf() except that it finds the last occurrence instead of the first.
Write an extra if-else statement into checkForm() that ensures that the last full stop in the email address comes after the @. You might like to create variables to hold the two positions to make the if-else statement easier to read.
Step 4: Ensuring there's at least two characters after the dot
With our current validation checks a user can't enter something silly like "@." or "some.one@" as their email address, but they could get away with "someone@somewhere." What's missing at the end?
We used lastIndexOf() to get the position of the last full stop. How can you tell if there's more characters after it? What other property will you need to compare?
Write some extra code into checkForm that ensures there's at least two characters after the last full stop.
Advanced: doing it all with a Regular Expression (regex)
As you can see, writing validation code can get very long and messy, even for something that appears simple like an email address. For validating complicated fields that need to be exactly right, a technique called Regular Expressions can be much shorter and faster to write.
If you've ever typed "*.*" to find all files in DOS, or selected "*.doc" in the File Type box in Windows, you've already used a simplified Regular Expression. They're a way to match words based on a pattern; in the case of "*.doc" we're looking for any word, followed by a full stop, followed by "doc".
Regular Expressions (Regex) are found in almost all programming languages, and what you learn in JavaScript will work in other programming languages such as PHP and Perl with only minor adjustments.
Aivosto's introduction to Regular Expressions is a good read to get acquainted with the basics of Regex, and also includes an email validation example. When you're ready to try them in JavaScript, check out the Dev Articles Regex in JavaScript guide. Page 5 onwards demonstrates how to use them in JS with examples, whereas pages 1 to 4 are an overview of Regex features.
Challenge 7: Unobtrusive Javascript
So far we've been mixing our JavaScript throughout our HTML... and this is the way Javascript has been done for years because it's a bit simpler (just as using <font> tags in HTML is a little simpler than using CSS!) But it's not the best way!
Just like we separate our HTML content and our CSS presentation of our web page, it's also worthwhile separating our Javascript behaviour. Why? You can find out more in the Digital Web Magazine article Separating Behaviour and Structure, but if you think about how separating our CSS means that we can re-use the same stylesheet very easily, it's the same with Javascript! By separating our Javascript from the actual page, we can apply the same Javascript code to lots of pages (usually) without having to modify the page itself.
Here's how it works: Normally we connect our Javascript code (like our checkForm function) to a specific HTML element with an attribute like onsubmit:
  <form method="post" onsubmit="return checkForm()" id="userfeedbackform">
    ...
  </form>
And it does the job. Now what we want to do is remove that 'onsubmit="return checkForm()"' chunk completely. Do it! Delete it from your own page!
How then are we going to link our form to our checkForm function? Well, we can actually set events for our HTML elements using Javascript itself like this:
document.getElementById("userfeedbackform").onsubmit = checkForm;
This piece of Javascript code will replace the 'onsubmit="return checkForm()"' that we've included in our HTML up until this point! We've probably got two questions now:
- Why does our checkForm() function here not have the brackets after it??
- Where do I put this code?
The easiest answer to the first question is just "it doesn't" - it's an exception where you'll see a function without the () after it! (still curious? When you omit the brackets you're passing a pointer to the function, rather than calling the function). As for the second question, let's try putting it inside our script at the start of our document as follows:
  <script type="text/javascript">
    function checkForm()
    {
      window.alert("Example Input Validation");
      // Your normal form validation code is here
    }

    document.getElementById("userfeedbackform").onsubmit = checkform;
  </script>
Reload your page and see what happens. In your browser's error console, you should see an error message along the lines of not being able to find an element with the id="userfeedbackform" - even though you may definitely have one! (If not, add the id to your form now!)
The problem now is that our Javascript is in the head of our HTML document and is run before the rest of the document has even been read by the browser!
So, we need a way to make sure our new bit of code is only run after the document has fully loaded... any ideas? Hopefully you're thinking something along the lines of:
<body onload="our code would go here">
and you're half right! We do want to use the onload event, but not written in HTML or we're back at square one! Instead we'll pack our new line of JavaScript into its own function:
  //
  // This function sets up all the events used by my Javascript
  //
  function initMyEvents()
  {
    document.getElementById("userfeedbackform").onsubmit = checkForm;
  }
and then link this function with the onload event with the special line of code:
window.onload = initMyEvents;
So our final Javascript code will look something like:
<script type="text/javascript">
  //
  // checkForm()
  // Checks all the required fields on my form.
  //
  function checkForm()
  {
    window.alert("Example Input Validation");
    // Your normal form validation code is here
  }

  //
  // This function sets all the events used by my Javascript
  //
  function initMyEvents()
  {
    document.getElementById("userfeedbackform").onsubmit = checkform;
    // Any other events you use can be added here in the same form.
  }

  window.onload = initMyEvents;
</script>
Try it out with your own form now!
The last step to separate our Javascript is to remove the whole shebang to a separate file, so that our script tag points to the JS file instead:
<script type="text/javascript" src="my_javascript_file.js"></script>
Voila! Now you're on your way to learning Javascript the Unobtrusive way! Take some time to read the Digital Web Magazine article Separating Behaviour and Structure, as it might explain things with more clarity than you found here!
Challenge 8: Mapping Application
Google has provided a tool that enables you to include their rich Map functionality on your own website - all you need is a little bit of Javascript! (OK, to do some of the more useful things you'll need to learn a bit more Javascript, but that's a good thing!)
If you would like to use an open alternative, such as OpenStreetMap, try this step-by-step guide to OpenLayers.
Start by looking at the Hello World example for Google Maps. As you read through their JavaScript examples, you'll notice that some parts will look familiar (if-statements, functions, events etc), but other bits will be new (variables beginning with google.maps).
- The first part of this challenge is to get the map working on your own page. You'll need to copy-and-paste the code provided, and change the statement sensor=set_to_true_or_false to sensor=false Then open in your web browser and/or upload to your web server.
- Modify the code so that it displays a map of your local area instead of the default Australian map (if you're from Australia, center on a major city in another country). To do this, you'll need to find latitude/longitude coordinates. ( Try http://geohash.org )
- Modify your code to customize map controls and/or add a marker.
That's just scratching the surface, but has hopefully started you thinking about the possibilities!
Challenge 9: An intro to YUI - A Calendar Control
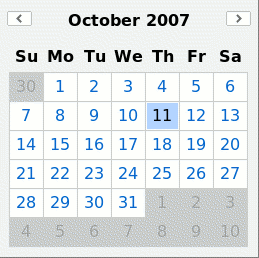
Imagine that you've got an HTML form that requires the user to enter a date. There are a number of different formats that could be used by the user, some which are ambiguous, such as 08/06/2007 (is that the 8th of June 2007 or the 6th of August 2007? Depends where you live!)
These days, there's lots of Javascript solutions that allow your users to click on a calendar control to choose the date instead of typing it, which is a much safer way to get user input! We're going to get started using the Yahoo! User Interface libraries Calendar control.
Now the YUI library is very extensive, and very extensively documented. For the moment we'll just use the Calender control without going into too much YUI detail, but if you want to know more, there's documentation galore (with lots of cheat sheets too!) and videos such as YUI Basics and DOM hacking.
To get started:
- Create a new blank HTML file with your doctype, html, head, title, body tags, as well as an appropriate h1 header and intro paragraph (such as, "A test of the YUI calendar control").
- Add a small form with one field, including a label "Enter the name of your event:" followed by a text input field and a submit button.
- Read through the introduction at YUI Calendar control and follow the Getting Started instructions point-by-point. If you get stuck and are unsure of a certain step, check the code below to find out what to do, but resist the urge to cut-n-paste!
Once you have your calendar control displaying on your page:
- Add a new function to your Javascript, called showDate(), link it to your forms onsubmit event and verify that the link works (ie. add an alert that says "Yep, this was called").
- Have a quick read of the "Obtaining selected dates" section of the YUI documentation, but note that we know that only one date can be selected, so we can grab our date into a variable like this:
- var selected_date = cal1.getSelectedDates()[0]
- Use the above code in your showDate function to display the date using window.alert. You might need to use the getDate(), getMonth() and getFullYear() methods of the date object (ie. selected_date.getMonth() to get the month). See the W3Schools reference for the date object for more details.
Only if you're really keen:
- Add a new text field to your form with the label "Selected Date", and see if you can use the Calendar's own selectEvent to transfer the selected date to your new field (note: quite a lot of new learning if you've not used YUI events before!)
<!DOCTYPE HTML PUBLIC "-//W3C//DTD HTML 4.01//EN" "http://www.w3.org/TR/html4/strict.dtd">
<html lang="en">
  <head>
    <title>YUI Calendar control</title>

    <link rel="stylesheet" type="text/css" href="http://yui.yahooapis.com/2.3.0/build/calendar/assets/skins/sam/calendar.css">

    <!-- Dependencies -->
    <script type="text/javascript" src="http://yui.yahooapis.com/2.3.0/build/yahoo-dom-event/yahoo-dom-event.js"></script>

    <!-- Source file -->
    <script type="text/javascript" src="http://yui.yahooapis.com/2.3.0/build/calendar/calendar-min.js"></script>

    <script type="text/javascript">

      var cal1;
      function initMyEvents() {
        cal1 = new YAHOO.widget.Calendar("cal1","cal1Container");
        cal1.render();
      }

      window.onload = initMyEvents;

    </script>
  </head>
  <body class="yui-skin-sam">
   <h1>Yahoo! User Interface - Calendar control</h1>
   <p>This is an activity to test out the YUI calendar control</p>

   <form action="">
     <p>This form would have lots of other fields</p>
     <p>
       <label>
         Enter the title of your event:
         <input type="text" name="eventtitle" id="eventtitle">
       </label>
     </p>
     <p>
       <label>
         Select the event date:
         <input id="eventdate" type="text">
       </label>
     </p>
     <div id="cal1Container"></div>
     <p>
       <input type="submit" value="Submit event">
     </p>
   </form>
  </body>
</html>
Challenge 10: An intro to jQuery - Peekaboo revisited
The Yahoo! User Interface library that was used in the previous challenge has an incredible number of useful features, but this can also create a higher barrier to entry for some of us who just want to do a few simple things, like hide/unhide a form input!
Enter jQuery:
- jQuery is a fast, concise, JavaScript Library that simplifies how you traverse HTML documents, handle events, perform animations, and add Ajax interactions to your web pages. jQuery is designed to change the way that you write JavaScript.
So, let's get started! A good place to start is the tutorial Getting started with jQuery. It includes a downloadable starter kit and will work you through a hello-world example. After completing the first two sections (Setup and Hello jQuery), you're ready to start the first challenge, Peekaboo revisited!
- Copy and paste the following HTML page into a new file - notice that it's the same form from Challenge 1 - Peekaboo elements (and we're aiming for the same functionality too).
- Make sure that you've got the latest version of jQuery saved in the same folder as your file, with the filename jquery.js
- Read through the Javascript code to check that you know what it's intending to do,
- Test it out! Does it work as expected? What doesn't it do properly yet (think: "Oops, I didn't mean to check that")
- Now for the challenge, take a look at the jQuery Event documentation, and see if you can fix the problem you identified in the previous step.
<!DOCTYPE HTML PUBLIC "-//W3C//DTD HTML 4.01//EN" "http://www.w3.org/TR/html4/strict.dtd">
<html lang="en">
  <head>
    <title>Javascript challenge 10</title>
    <script type="text/javascript" src="jquery.js"></script>
    <script type="text/javascript">
      // Set up some code to be run when the document is ready:
      $(function(){

        // First, hide the whole email para straight away:
        $("p#emailpara").hide();

        // Then add a function that should be run each time the subscribe
        // checkbox is clicked:
        $("input#subscribe").click(function(){
          $("p#emailpara").show("slow");
        });
      });
    </script>

  </head>
  <body>
    <h1>Testing jQuery</h1>
    <form action="mailto:me@example.com" method="post">
      <fieldset>
        <legend>Email subscriptions</legend>

        <p id="subscribepara">
          <label>
            <input type="checkbox" name="subscribe" id="subscribe">
            Yes! I would like to receive the occasional newsletter via email
          </label>
        </p>

        <p id="emailpara">
          <label>
            Email Address:
            <input type="text" name="email" id="email">
          </label>
        </p>

      </fieldset>
    </form>
  </body>
</html>
Once you're done, take a look at the Javascript code that you've used in this challenge and compare it to your code for Challenge 1... which would you prefer to write?
Finally, revisit Challenge 4 above (better input validation), and have a go at rewriting your solution using jQuery!
HTML: What is HTML, Advanced HTML Tutorial, HTML Challenges, Lists and Tables, The Structure of HTML, Pen and Paper HTML activities
CSS: Learning Basic HTML and CSS, CSS challenges, Embedded CSS, Basic HTML and CSS Tutorial, Inline CSS, Develop cascading style sheets, CSS3 Animations
PHP: Simple functions in PHP, Dynamic websites, PHP challenges, Dynamic websites with PHP, Generating a receipt with PHP, Responding to HTML forms with PHP,
JavaScript: An Introduction to Programming with JavaScript, JavaScript Challenges, Getting to know JavaScript events, Getting to know the Document Object Model with JavaScript, JavaScript pen-n-paper activities, Web Programming Intro, Produce basic client side script for dynamic web pages
XML: XML challenges
Databases: Creating Database Tables
Projects: A small website project, A step-by-step web design project, Build a basic web page, Build a small website
Challenges: Web design, HTML, AJAX, CSS, JavaScript, PHP, XML, Information Architecture, Algorithms
Activities: Web design group learning activities, Pen and Paper HTML activities, A Web Design Quiz show, Ordering Tasks for a Web Project, Paired Bio Pages, Scoping a Small Project, Emerging Technologies Research Activities
Project management: An introduction to Project Management, Developing a Client Project
Design: Accessibility, Design Principles for Web Design, Design Suggestions
Testing: Testing Website performance, Website Performance Test Plan
Publishing: Getting Your Site On the Web
Certification and standards: Cert IV Website Qualifications in Australia, Australian Qualifications, Web design qualifications
Professional development: Contribute to personal skill development and learning, Useful Applications, Useful Books, Emerging Technologies, Using the Internet as a Learning Tool
Course meta-information: Web Design, About the web design learning project, New Structure, Sample Timetable
See also: Project Euler