Power Supply Testing/Tutorial on how to solder
< Power Supply TestingOverview
Soldering is very dangerous and should only be done after adequate preparation. Read this guide to avoid hurting yourself or other people and to make your project a success.
Preparation
Materials
You will need:
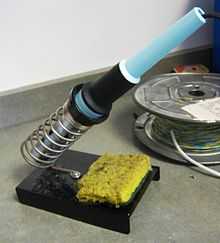
- Soldering iron & stand
- Sponge
- Solder wire
- Flat piece of wood (to protect work surface)
- Clamp or vice (to hold your project if it is small)
Check Your Equipment
- Make sure the iron's cord is not frayed or split anywhere.
- Check the tip of the iron. It should be shiny silver. If it appears black, that means the tip became carbonized due to misuse, and it won't solder very well at all.
Safety Warnings
- The soldering iron will become extremely hot. Do not touch the metal tip or anywhere near it. If you do touch it and get burned, get medical help immediately.
- If the solder wire contains lead, then the smoke produced by the iron will also contain lead. Do not inhale the smoke. Wear a mask to keep yourself safe.
- Whenever you aren't using the iron, put it back on its stand. If you leave it sitting around, it could roll away or fall and hurt someone.
- Make sure the iron's cord is out of the way of other people. If it is pulled, someone could get hurt.
- When melting the solder wire, do not hold it for longer than about five seconds or closer than 3-4 inches. The heat from the iron will conduct up the wire and it may burn your fingers.
Doing the Soldering
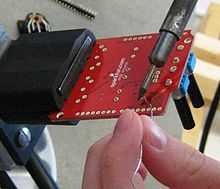
You need your project to stay steady. If your project is a small circuit board, for example, you need to clamp it down or fasten it somehow so it stays in place.
Step 1: Before you do anything else, wet the sponge! Squeeze enough water out so it's still soaked but isn't dripping everywhere.
Step 2: Clear your work space. Put the iron and its stand where your elbow won't hit it. Protect your work surface with the wooden board. If molten solder drips on your table, it will damage it.
Step 3: Plug the iron in. Wait a few minutes for it to get hot. You can tell it's ready if it makes a hissing sound when pressed onto the sponge.
Step 4: While you're waiting for it to heat up, cut about a foot of solder wire using wire clippers or strong scissors. Bunch up one end of the wire so it's easy to hold, leaving about 3-4 inches of straight wire. You can keep pulling more wire out of the bunch as you go.
Step 5: Hold the iron in your dominant hand and the bunched end of the solder wire in the other hand. There are a few different ways to solder depending on what kind of connection you're soldering:
- Circuit board/wire to wire: You can either:
- (a) place the end of the solder wire on top of the joint and press down with the iron tip or
- (b) push the end of the solder wire into the iron tip, creating a blob of solder, which you can then "paint" onto your joint. (Take care to avoid making the blob too big, or it will drip off of the iron.)
- Solder tabs: Orient your solder tab so that the hole is vertical. Poke the end of the solder wire up through the bottom, next to the lead you have already attached to the tab. Press down on the end of the solder wire with the tip of the iron, and it will cause the wire to melt and spread into a nice even lump.
IMPORTANT NOTES:
- If your solder wire becomes shorter than 5 inches, consider cutting a new piece. Holding the wire any closer to the iron may burn your fingers.
- If the tip of the iron becomes caked with solder or starts to turn a copper color, then pause what you're doing and wipe the tip on the sponge until it's shiny silver again.
Cleaning Up
- When you're done soldering, wipe the iron tip on the sponge repeatedly until it's clean and shiny again. Then immediately put it back on its stand, unplug it, and store it somewhere out of the way so it can cool down.
- Take the sponge and brush off any bits of solder that are stuck to it. Squeeze out the rest of the water.
- Wash your hands! You just touched metal containing lead, you don't want to eat that.