Web Design/HTML Challenges
< Web Design|
Web Design → HTML Challenges
|
Use the following HTML Challenges to hone your decision making skills... should I use an <h2> element or a <strong> element?
It's important while doing these challenges to not think about how the page will be displayed yet, but instead focus on creating meaningful mark-up!
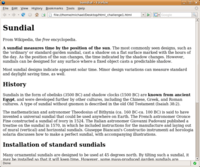
Challenge 1: Which heading to choose?
OK, let's get started! This first challenge builds on the skills you developed in What is HTML, helping you to decide when to use an <h2> heading and when to use an <h1> heading.
Copy-n-paste the following html into a new text-file (in Notepad or your preferred text editor) and save your file with the name html_challenge1.html.
Open your file in a web browser and compare it to the image displayed here (you can right-click on the image to open a larger version in another window or tab).
Your challenge is to add
- headings (<h1>, <h2>, <h3> etc.)
- paragraphs (<p>)
- emphasis and strong (<em> and <strong>)
so that your page looks like the one in the image!
<!DOCTYPE HTML PUBLIC "-//W3C//DTD HTML 4.01//EN" "http://www.w3.org/TR/html4/strict.dtd">
<html lang="en">
  <head>
    <title>Sundial</title>
  </head>
  <body>

   <h1> Sundial </h1>


    From Wikipedia, the free encyclopedia.


    <p>A sundial measures time by the position of the sun. The most commonly seen designs, such as the
    <em>'ordinary' </em>or standard garden sundial, cast a shadow on a flat <strong>surface</strong> marked with the hours of
    the day. As the position of the sun changes, the time indicated by the shadow changes. However,
    sundials can be designed for any surface where a fixed object casts a predictable shadow.

    Most sundial designs indicate apparent solar time. Minor design variations can measure standard
    and <strong>daylight saving time</strong>, as well.</p>

    <h2> History </h2>

    <p>Sundials in the form of obelisks (3500 BC) and shadow clocks (1500 BC) are known from ancient
    Egypt, and were developed further by other cultures, including the Chinese, Greek, and Roman
    cultures. A type of sundial without gnomon is described in the old Old Testament
    (Isaiah 38:2).

    The mathematician and astronomer Theodosius of Bithynia (ca. 160 BC-ca. 100 BC) is said to have
    invented a <strong>universal sundial </strong>that could be used <em>anywhere on Earth</em>. The French astronomer Oronce
    Fine constructed a sundial of ivory in 1524. The Italian astronomer Giovanni Padovani published
    a treatise on the sundial in 1570, in which he included instructions for the manufacture and
    laying out of mural (vertical) and horizontal sundials. Giuseppe Biancani's Constructio
    instrumenti ad horologia solaria discusses how to make a perfect sundial, with accompanying
    illustrations.</p>

    <h2> Installation of standard sundials <h2>

   <p> Many ornamental sundials are designed to be used at 45 degrees north. By tilting such a
    sundial, it may be installed so that it will <em>keep time</em>. However, some mass-produced garden
    sundials are inaccurate because of poor design and cannot be corrected. A sundial designed for
    one latitude can be adjusted for use at another latitude by tilting its base so that its style
    or gnomon is<strong> parallel</Strong> to the Earth's axis of <em>rotation</em>, so that it points at the north celestial
    pole in the northern hemisphere, or the south celestial pole in the southern hemisphere.

    A local standard time zone is nominally 15 degrees wide, but may be modified to follow
    geographic and political<em> boundaries</em>. A sundial can be rotated around its style or gnomon (which
    must remain pointed at the celestial pole) to adjust to the local time zone. In most cases, a
    rotation in the range of 7.5 degrees east to 23 degrees west suffices.

    To correct for daylight saving time, a face needs two sets of numerals or a correction table.
    An informal standard is to have numerals in hot colors for summer, and in cool colors for
    winter. <em>Rotating </em>the sundial will not work well because most sundials do not have equal hour
    angles.

    Ordinary sundials do not correct apparent solar time to clock time. There is a 15 minute
    variation through the year, known as the equation of time, because the Earth's orbit is
    slightly elliptical and its axis is tilted relative to the plane of its orbit. A quality
    sundial will include a <strong>permanently-mounted table</strong> or <strong>graph</strong> giving this correction for at least
    each month of the year. Some more-complex sundials have curved hour-lines, curved gnomons or
    other arrangements to directly display the clock time.</p>

  </body>
</html>
Note: Yes, it's true, a web browser will display the h1 heading very large, and the h6 heading quite small, and all the other headings in between! But don't get into the habit of selecting an h4 heading because it displays with the size that you're after! You can always modify the size of your elements using your stylesheet (more on that later).
The key is to use the headings to structure your information in a useful (and meaningful) way! For example, every page should only ever have one main heading - your h1 heading. An h2 heading should only ever be a sub-heading of your h1 heading. Similarly, an h3 heading should only ever be a sub-heading of an h2 heading etc.
Once you are happy with your work (and have checked it in your browser), read through Paragraphs and Headings tutorial over at Wikibooks and compare your markup! Make sure you chat about the decisions you made with someone around you if possible!
Once you're all finished, read through the following excellent snippets from HTML dog as a summary of what you've learned:
- Paragraphs and how to emphasize text!
- All about headings
Challenge 2: Hyperlinks
For help with this challenge, you can refer to the HTML Dog's Link Tutorial.
Local Link
Save your page as links.html and add a link to another page (if you already have an index.html page this would be a good candidate).
Global Links
Add some links to Google.com and this HTML challenges page (don't forget the http:// bit at the beginning! Try it without and see what happens)
Internal Links
Internal links let you link to parts of the same page, like the table of contents at the top of this page.
Create a longish page (use the Lipsum Generator to painlessly create a big block of text), add an identifier about halfway down the page, and put a link to it at the top of the page.
Now add another identifier to the top of the page, and add a 'Top of page' link at your halfway mark so you can quickly navigate from top to halfway and back again.
(For bonus points, make a link that goes straight to the Hyperlinks heading on this page! How can you find out what identifier you need to link to?)
Creating an email hyperlink

Add a hyperlink to your email address. When a visitor clicks on the link it should open up their email software with your email address filled in and the subject line set to say "Hello".
You'll have to search to find out how to do this one! What words are best to get the information you need? Hint!.
For merit points consider:
- why email links might not be such a good idea
- how to avoid some of the problems they create
Challenge 3: Tables for tabular data
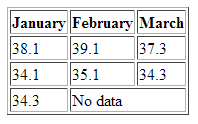
Use the HTML Dog intermediate tutorial on tables to re-create this table.
Notes:
- If you don't have a border, check the <table> tag for an attribute you may have missed.
- You shouldn't need to add any bold to get your heading looking like a heading.
- As always, validate your page to make sure you've got everything in the right place.
Challenge 4: Lists, lists and more lists
Numbers, bullets and definitions
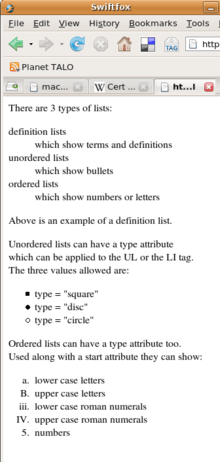
Re-create the html page shown here (click on the image to see it full size).
For this challenge, you might want to refer to Tizag's list tutorial.
There are 3 lists on the page: a definition list, an unordered list, and an odd looking ordered list. Hint: To re-create the ordered list you'll need to add a 'type' attribute to each LI tag. Note that adding this attribute will make your code not validate as HTML 4 Strict, but it can be replaced later when you start working with Cascading Style Sheets.
Nested lists

A 'nested' list is a list that contains another list. On the web, they're commonly used for indexes or tables of contents (such as the one at the top of his page!) or menus that show all the pages inside of a section of a website.
Try recreating the nested list to the right. Use your HTML validator software to check errors as you go along -- it's better to pick up problems early on, especially with how lists must be nested in others.
Hint: To recreate the nested list from the image, you'll need to use the 'type' attribute on the UL or OL tags. Like the previous list, adding this attribute will make your code invalid, but we can correct it later by using CSS instead.
Challenge 5: A simple form
For this challenge, you might want to refer to HTML Dog's Beginner tutorial for Forms.
Create a small online survey with four questions of your own. Your survey should first collect the participants details (name, address, gender, D.O.B., a password etc), followed by four questions to answer.
Ensure that your survey includes:
- Simple text inputs
- A password input.
- Select drop-down boxes (for State, or within your questions).
- Radio buttons and checkboxes (as part of your form design).
- A large text area for comments at the end.
- A submit button with your own text (such as "Send Survey")
- A reset button.
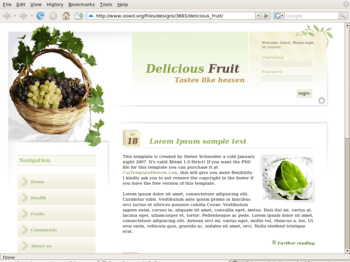
Challenge 6: Images
Worth 1024 Words
Find a copyright free image on Flickr using Flickr's Creative Commons section. Download the pic into an images directory and then write up a page that includes the image on the left hand side, along with a heading and some descriptive text (perhaps from Wikipedia). The text and heading should appear to the right of the image, and wrap around the picture. For bonus marks:
- have the picture link to the original image on flickr
- prevent the blue/purple border from appearing around the hyperlinked image
- add a 15 pixel margin around the picture using CSS
- add a drop shadow to the image using CSS (there's a few ways to do this; you may like to check out the box-shadow examples at CSS3.info)
- add an attribution for your image and text (a link back to the original photographer, author or source of your image and text)
- add some alt text to your image for accessibility. This will be read to people, so make sure it's accurate and descriptive
Save your code as images.html and link to your new page from your index page.
Creating an Image Map
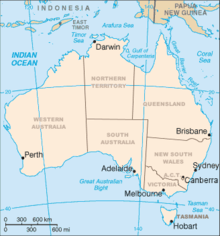
Using some free third party software of your choice such as MapEdit (or hand code it if you're really keen. You can find a tutorial on how to do that here), use the map of Australia (or your own country) as a graphical table-of-contents. When a user clicks on a state, they should be taken to a separate page just for that state.
You will need to create:
- An index.html containing your image map
- Links to pages in the wikipedia from at least two different states (e.g. NSW, Queensland) to demonstrate that you can link the image map.
- You should be able to explain how the html for the image map works.
- And of course, all your pages should validate.
Challenge 7: Some advanced table features
Tables can get quite a bit more stylish (and accessible) than the previous challenge! For some examples ranging from no-style to pretty tables, check out FluidMind's Styling tables with CSS.
Work through Veerle's CSS Styled Table tutorial, trying it out as you go (you'll need to download the provided images). To do this you will need to know how the basics of how to use CSS - see HTML Dog's Basic CSS tutorial for more information.
Once you've got your beautiful table working from the example,
- Open up your HTML Challenge 3 - Tables for tabular data and save it as challenge7.html.
- Add an extra column of data to your table.
- In this column add the missing city data (each row of data was for the three cities: Sydney, Melbourne and Adelaide)
- Add another row of data for Hobart, with the following temperatures: January: 24.8, February: 25.2, March: 19.8
- Apply the styles from your example to your own table (this should only require a few changes to your markup!)
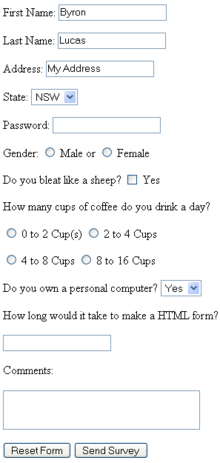
Challenge 8: An accessible form with style
Have a go at creating a new webpage that displays a form with the fields in the image. You might need to read through HTML Dog's Accessible forms tutorial for this challenge.
- Note that fieldsets are being used to group the form fields.
- Since we may not yet know how to process the information on a form, for the moment just use the form attribute action="mailto:my@emailaddy.com" to send yourself an email (modify with your own address).
- As always, ensure that your page validates!
- oh, and you'll need to add a submit button!
Once you have your form displaying, we'll take it one step further by adding some accessibility:
- Identify all the labels for your fields using the <label> element.
- Add access keys for your fields and test them!
HTML: What is HTML, Advanced HTML Tutorial, HTML Challenges, Lists and Tables, The Structure of HTML, Pen and Paper HTML activities
CSS: Learning Basic HTML and CSS, CSS challenges, Embedded CSS, Basic HTML and CSS Tutorial, Inline CSS, Develop cascading style sheets, CSS3 Animations
PHP: Simple functions in PHP, Dynamic websites, PHP challenges, Dynamic websites with PHP, Generating a receipt with PHP, Responding to HTML forms with PHP,
JavaScript: An Introduction to Programming with JavaScript, JavaScript Challenges, Getting to know JavaScript events, Getting to know the Document Object Model with JavaScript, JavaScript pen-n-paper activities, Web Programming Intro, Produce basic client side script for dynamic web pages
XML: XML challenges
Databases: Creating Database Tables
Projects: A small website project, A step-by-step web design project, Build a basic web page, Build a small website
Challenges: Web design, HTML, AJAX, CSS, JavaScript, PHP, XML, Information Architecture, Algorithms
Activities: Web design group learning activities, Pen and Paper HTML activities, A Web Design Quiz show, Ordering Tasks for a Web Project, Paired Bio Pages, Scoping a Small Project, Emerging Technologies Research Activities
Project management: An introduction to Project Management, Developing a Client Project
Design: Accessibility, Design Principles for Web Design, Design Suggestions
Testing: Testing Website performance, Website Performance Test Plan
Publishing: Getting Your Site On the Web
Certification and standards: Cert IV Website Qualifications in Australia, Australian Qualifications, Web design qualifications
Professional development: Contribute to personal skill development and learning, Useful Applications, Useful Books, Emerging Technologies, Using the Internet as a Learning Tool
Course meta-information: Web Design, About the web design learning project, New Structure, Sample Timetable