School Science/Lemon Battery
< School ScienceThe lemon battery is a simple type of electrical battery that is commonly made for school science projects because it illustrates a battery's main components. Typically, a piece of zinc metal and a piece of copper metal are inserted into a lemon. Everyday objects such as galvanized nails and copper pennies can be used for the zinc and for the copper. A single lemon is usually studied using an electrical meter. Several lemons can be wired together to form a more powerful battery that will power a light-emitting diode, a buzzer, or a digital clock.
The lemon battery is similar to the first electrical battery invented in 1800 by Alessandro Volta in Italy. Volta used brine (salt water) instead of lemon juice. The lemon battery is described in some textbooks in order to illustrate the chemical reactions that occur in batteries. The zinc and copper are called the electrodes of the battery, and the juice inside the lemon is called the electrolyte. There are many variations of the lemon battery that use different fruits (or liquids) as electrolytes and metals other than zinc and copper as electrodes.
This article contains instructions for making a lemon battery and using it to power a light-emitting diode. If you want to know more about the science and history of the lemon battery, you can get started with the article in Wikipedia.[1]
Materials and equipment
Here's the list of pieces you need to assemble before you can start your experiment. Many pupils will need the help, and money, of an adult to obtain them.
- Light emitting diode. These look like plastic pieces with 2 wires stuck into them. They are usually just called LEDs, which comes from the first letters of the three words Light Emitting Diode. When the right battery is hooked up, the LED will glow. A red one is good for the lemon battery experiment; there is another section of this article that discusses how to find an LED. While LEDs are a good choice for this experiment, some other ideas are given below in the section "Alternative devices".
- Lemons. You'll need 3 or 4. Any citrus fruit, like limes, grapefruits, or oranges, or even a potato will work.
- Zinc electrodes. You'll need 3 or 4. Most likely you'll use a piece of metal that's been coated with zinc. This is what the word "galvanized" means. A galvanized metal washer that's about one inch (2 – 3 cm) in diameter will work well. Galvanized roofing nails, galvanized screws and bolts, and even paper clips can also work. If you can find some zinc sheet, and some shears or tough scissors to cut it, that will work very well. Be careful if you do this; the edges of sheared metal sheets are sharp. If you can, file the edges to make them less sharp.
- Copper electrodes. You'll need 3 or 4. Copper or copper-coated pennies work well. You may find some good copper fittings in the plumbing section of a hardware store. Again, if you can find some copper sheet, and some shears or scissors to cut it, that will work. Again, be careful about sharp edges.
- Leads. You'll need 5 or 6. The easiest thing is to get hold of a packet of insulated lead wires with "alligator clips" on each end.
- Multimeter (optional). If you know how to use an electrical multimeter, it can be helpful in getting your battery to work.
There are some little photos of these components below. If you click on the photo, you can see it larger.
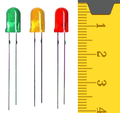 LEDs (light emitting diodes) of different colors. The color of the plastic that surrounds each diode isn't important, and some LEDs use clear plastic. There's a centimeter ruler at the right that tells you the plastic cases is are about 0.8 cm long.
 Lemons. Grapefruits, limes, oranges, and potatoes also work.
.jpg) Zinc electrodes (a collection of galvanized hardware). The flat, circular washers with holes in their center would be a good choice for a lemon cell.
Zinc electrodes (a collection of galvanized hardware). The flat, circular washers with holes in their center would be a good choice for a lemon cell. Copper electrodes (a collection of copper pennies).
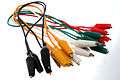 Lead wires (contents of a packet of insulated lead wires with alligator clips on the ends).
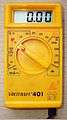 Multimeter (optional). The multimeter in the photo is set to its 20 V scale, which means 20 volts. For this experiment, you'd set it to read 2000 m, which means 2000 millivolts or 2.000 volts. To measure the current, you rotate the center switch to the scale that reads 200 mA, which means 200 milliamperes (or 0.200 amperes).
Making a single lemon cell
Make the first lemon cell. Your battery is going to have at least 3 lemon cells, but each cell is made the same way.
- Clean your electrodes carefully. Your goal is to get any dirt or grease off of them, and also to scrub away the thin "oxide" coatings on them. It should work fine if you clean them in the same way that you'd clean a pan in the kitchen to make it clean and shiny. Scrubbing with steel wool or with an abrasive sponge will work fine; if you are using a galvanized electrode, be careful not to rub off the zinc coating completely.
- Stick one zinc electrode into the lemon (or other fruit). You may need to use a small knife to cut a slit into the lemon. You want the electrode to go into the lemon as deeply as possible, but you'll need a little bit of the electrode to stick out of the fruit so you can attach a lead wire to it. Wiggle the electrode around a little to smash the membranes inside the fruit.
- Next, stick the copper electrode into the same lemon. You want this electrode to be close to the zinc electrode, but it must not touch the zinc inside the lemon. If they do touch, your cell will not work. As for the zinc electrode, you want to stick the copper electrode into the fruit as far as you can, and you want to wiggle it a bit to make sure the membranes near the electrode are broken.
(Optional) If you are using a multimeter, you can do the following tests to make sure your lemon cell is working.
- Hook up two alligator clips from your leads to the two electrodes. Connect the two clips to the leads of the multimeter.
- Measure the voltage from your lemon cell. It should read about 0.9 - 1.0 volts.
- Measure the current from your cell. You should read a few tenths of a milliampere. Some multimeters are not sensitive enough to measure currents less than one milliampere, in which case you'll just see 0.0 as the reading.
Making the lemon battery
When several lemon cells are wired together, the collection is called a battery. We usually call a single lemon cell a battery also. Most batteries that you may purchase to use in toys and electronics have just one cell inside.
- You need to make 3 lemon cells. If you're using a multimeter, make sure that each cell generates the correct voltage and the correct current.
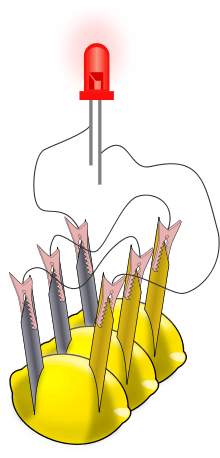
- Using two lead wires, connect the three cells together. Connect the zinc electrode on the first cell to the copper electrode on the second. Connect the zinc electrode on the second cell to the copper electrode on the third lemon. This is called a "series" connection; the three cells make up the lemon battery.
Connecting the LED
Connect a lead wire from the copper electrode of the first lemon cell to the longer lead wire from the LED. Connect a lead wire from the zinc electrode of the third cell to the shorter wire of the LED. You may need to gently pull the lead wires that come from the LED apart; the alligator clips on the ends of the two lead wires that connect your battery to the LED must not touch each other.
The LED should now light rather faintly if all the many details are correct. If you cannot see it glowing, turn down the room lights to make sure it is working. There's a guide to troubleshooting your setup below if it still doesn't work.
After the LED lights
If you've succeeded in getting your LED (or other device) to work, there are a few more experiments that you can try.
- What happens if you switch the two lead wires on the LED?
- What happens if you switch the two lead wires on the lemon in the middle?
- Stick a second zinc electrode into one of the lemons, but don't connect it to anything. Any effect on the LED?
- Now move the wire from the copper to the zinc. This lemon now has 2 zinc electrodes instead of one copper and one zinc. What happens?
If you are using a multimeter, you can record the voltage across the LED for each of these experiments to see if you understand it.
About LEDs
LEDs are made out of materials called semiconductors. The chips (integrated circuits) inside your electronic toys, television sets, and computers are made mostly out of silicon, which is one type of semiconductor. However, silicon doesn't work for LEDs. Instead they are made out of materials like "gallium phosphide" that glow much better than silicon. The three letters LED stand for Light Emitting Diode. Diodes are sandwiches with two or more layers of similar semiconductors. Diodes have the property that electrical current can flow only when the battery is hooked up correctly. If you hook up the battery backwards, no electrical current is flowing in the circuit, and the LED won't glow. Once the electrical current from your lemon battery is flowing through the diode, the flowing electricity can make some light. It's related to something called the "photoelectric effect". The color of the light is determined by the particular semiconductor in the diode. It might interest you that Albert Einstein, the great scientist who is best known for his theory of relativity, actually won the Nobel Prize in physics for his work on the photoelectric effect.
Troubleshooting
- A typical problem is that the electrodes or the bare metal parts of the lead wires are touching each other accidentally. The zinc and the copper electrode must not touch each other inside the fruit. The alligator clips must not touch each other where you connect them to the LED.
- The LED must be connected correctly. Trying switching the connections to the two wires that come out from the LED case.
- The connection of the three cells must be right. Each lemon has one zinc and one copper electrode. The wires that run from one lemon to another must run from a zinc electrode to a copper electrode. The illustration shows how this is done.
- Citrus fruit should be juicy inside. To break up the internal membranes of an unripe fruit, roll it while pushing down.
- Three lemons is the minimum number needed to light an LED. If you can make a fourth lemon cell and add it to your battery, you may be able to get the LED to light this way.
- The LED may be broken, or may not be the correct type. There is an LED selection guide below, but selecting the right LED is difficult for younger people. Get some help from an adult if you think LED selection is your problem.
LED selection guide
The section is mainly for people who know something about electrical circuits.
- Many LEDs can work. A red LED is usually used because red LEDs typically need lower voltages to glow than do orange, yellow, green, or blue LEDs. Some red LEDs work with voltages as low as 1.6 - 1.8 V; a very dim glow may be observed with 2 cells, but 3 cells are generally used. There are different types of red LEDs that glow at different wavelengths, and that need somewhat higher voltages.
- Some LED packages contain series resistors, and are designed to work with a 12 V battery. These packages will not work with a lemon battery, which provides a much lower voltage.
- The best LEDs for lemon batteries are designed to glow with a current of about 1 mA (at a voltage of 1.6 V). One example is: Avago Technologies part HLMP-D155, which is a red LED (637 nm wavelength) with a 1.6 V forward bias voltage.[2] An LED is included in some commercial kits for constructing lemon batteries.[3] In the US, science teachers often use parts from the Radio Shack company, which has many stores. A 1998 paper listed several products from this company, but most of them are no longer available.[4]
Alternative devices
In these instructions, we assumed that you will be using your lemon battery to make a light-emitting diode (an LED) glow. There are alternatives to an LED. Some low-power buzzers work,[4] and one is included with a commercial kit.[3] You can also connect the lemon battery to some digital clocks and calculators. If the device requires a 9 volt battery, it will not work with your lemon battery. For other devices, first remove the battery or batteries that are normally inside. Then, use the alligator clips from the lemon battery to connect to the terminals inside device. The copper electrode from the lemon battery needs to be connected to the battery terminal in the device that is marked +. The zinc electrode from the lemon battery needs to be connected to the terminal in the device that is marked -. Commercial "potato clock" and other battery science kits provide an inexpensive digital clock for the experiment.[5][3]
References
- ↑ "Lemon battery". Wikimedia Foundation. http://en.wikipedia.org/wiki/Lemon_battery.
- ↑ "HLMP-D150". Avago Technologies, Inc.. http://www.avagotech.com/docs/AV02-1562EN. Retrieved 2012-11-07.
- 1 2 3 "Enviro Battery". 4M Industrial Development Limited. http://www.4m-ind.com/product_view.php?id=19&page_no=1&type=1. Retrieved 2012-11-07. This kit furnishes electrodes that are coated with zinc. The coating is thin, and will be dissolved within a few hours of use.
- 1 2 Swartling, Daniel J.; Morgan, Charlotte (1998). "Lemon Cells Revisited—The Lemon-Powered Calculator". Journal of Chemical Education 75 (2): 181–182. doi:10.1021/ed075p181. http://www.wsanford.com/~wsanford/gr8ps/zz_old-files/green/wheres_the_juice/lemon_battery.pdf. Retrieved 2012-10-15.
- ↑ "The Amazing Two Potato Clock". Edmund Scientifics. http://www.scientificsonline.com/two-potato-clock.html. Retrieved 2012-11-26.