Robotics/Design Basics/Physical Design
< Robotics < Design BasicsGeneral Design Considerations
Designing a robot requires balance between size (mostly weight), motor power and battery power. These three elements are connected with each other (more battery power increases the weight of the robot and requires stronger motors) and finding the "perfect" balance requires a lot of tweaking and experimenting. Try to describe heavy components in output/mass (e.g. motors: torque/Kg; batteries: mAh/Kg) and pick the one that gives the highest value.
Using light materials brings down the weight significantly (aluminum instead of steel). Building a frame out of light metal and using plastic plates as surfaces would be a lot lighter than using metal plates. For small robots acrylic plastic is a good material to use and it is easy to work with.
There are other ways to build a robot than to cut and drill your own aluminum plates. Toys like Lego Technic and Meccano, although expensive, are an alternative when you don't have the ability to cut and drill your own parts. Especially Meccano (or better: the cheap imitations) can be useful even when you do make your own parts. There is something convenient about having a collection of parts with standard holes and sizes. Of course you would need to drill your own holes at the right distances and size, if you intend to add Meccano parts. The values can (most likely will) differ between different "brands" of imitations. So it's a good idea to buy a few boxes when they are on sale. Screws tend to be M5 (on the set I've seen so far this is the only value that is common. The hole spacing very rarely matches up).
Another kit that would be good to use is the Vex™ Robotic Design Kit from Radio Shack. The parts in this kit are all metal with holes predrilled every half an inch. That makes it easier to add to parts that you may already have. This kit gives you everything you need to get started with robots. If you do not want to buy the kit you could just buy the Vex™ Metal and Hardware Kit for Robotics Starter Kit.
When you start your design, first decide how big you want your robot to be. Don't think about exact sizes, compare it to the size of an object ("the size of a shoe box") will be sufficient. Exact values can be "calculated" after you've got your motors and batteries, as these have a large influence on the size and shape of the robot.
Make an estimate about the weight of the complete robot and pick your motors and wheels. Keep in mind you need high torque and low speed. A bare DC-motor has high speed and low torque, adding a gear reduction will solve this one. Motors with reduction gears are also available. The speed of your motor and the size of your wheels determine how fast your robot will be able to move.
For example: RB-35 is a motor with a 1:50 reduction. It makes 120 RPM or 2 rounds per second. Lets pick a wheel with a diameter of 20cm (radius R = 10cm). This wheel has a circumference of 2 x x R = 2 x 3.14 x 10 = 62.8cm. This means in one turn the wheel moves 62.8cm. When we mount this wheel on the motor it'll turn twice every second and therefore move 2 x 62.8cm = 125.6cm. So its speed would be 125.6cm/second or 1.256m/s.

In reality this speed is going to be a little lower as the motor turns 120RPM without a load. But even a 1 m/s is pretty fast for indoor robots. You'll probably use PWM or other methods to slow it down.
Pick your batteries. Make sure you have enough power to keep the motors and all the electronics running for a sufficient amount of time and keep some reserve for future additions. Compare the weight of the batteries and motors you've chosen to what you had planned. You might need to go over this part again (picking different motors and/or batteries).Keep in mind that your robot's body has a significant weight.
Platforms
Wheeled Platforms
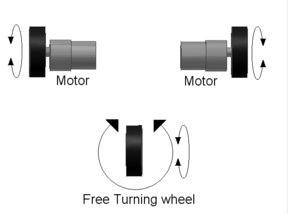
Wheeled platforms can have any number of wheels. Most common are 3, 4 and 6 wheeled vehicles (excluding wheels used for feedback). Other numbers are also possible, but can be hard to build, such as 1-wheeled or 2-wheeled robots, or have superfluous wheels which can make turning difficult or complex. Basically there are 2 types of wheels: powered wheels and unpowered wheels. The first are powered by the motors and are used to move the robot forwards (or backwards). Unpowered wheels are used to keep the robot in balance by providing a point of contact with the ground.
Turning
Turning can be accomplished in several different ways:
- Differential Steering (Tank-like Turning):
- Moves one wheel forward and the other backwards. The robot turns around within a small circle which center lies in between the 2 powered wheels.
- Move one wheel slower than the other, the robot turns in the direction of the slower wheel. How fast it turns depends on how large the difference between the 2 speeds is.
- Ackerman Steering: This is the same steering system as the one used in cars. It is relatively complicated to implement since the inner and outer wheels need to turn to different angles.
- Crab Drive: Each wheel can turn independently in crab drive steering. This can be very flexible, but requires complex mechanics which either turn the entire motor/gearbox/wheel assembly or transfer power from a statically mounted motor. The second option is much more difficult to build but may have advantages over the first.
- 3-wheeled platforms: These can come in a variety of forms, with the articulated wheel powered, or with the two fixed wheels powered, or a combination of the two. These are generally built for very specific purposes.
- Omnidirectional wheels: The omnidirectional wheels design is based upon the use of a series of free turning barrel-shaped rollers, which are mounted in a staggered pattern around the periphery of a larger diameter main wheel. For this you need 4 powered wheels. However these wheels allow movement in any direction without turning (including sideways and diagonal movement) and can turn the same way as in tanklike steering. Building these wheels is time-consuming, but it's a very powerful steering method. Also, inexpensive omnidirectional wheels are available commercially, often used in conveyors. One drawback, however, is the lack of sideways traction; if something is pushing the robot to the side, it relies on the strength of the motor or brakes to restrain it. Omnidirectional wheels used in place of caster wheels can provide quicker responses and can often roll over larger obstacles.
Tracked Platforms
Tracked platforms use tracks similar to tanks. This kind of propulsion is only useful on loose sand and mud, as concrete and carpet provide too much horizontal traction when turning and will strip the tracks off of their guides.
Walkers
Walkers are robots that use legs instead of wheels or tracks. These robots are harder to build than wheeled robots and can be a nice challenge for an experienced builder. Walkers are designed to imitate how animals (or humans) move.
2-Legged Walkers or Bipeds
This is the hardest type of walker. This type tries to imitate how humans walk. The biggest issue is balance.
Two-legged walkers are used for two main purposes: to imitate humans and to provide a great amount of force and traction. Taller walkers used to imitate humans are difficult to build, requiring many balancing circuits and devices, quick motions, and precise construction. Just like any human knows, these can also be knocked over, tripped, etc. Shorter, wider walkers can be used to move a large load. When using walkers, it is possible to use pneumatic systems, which can provide a much larger force than motors. However, turning with such a system is nearly impossible.
4-Legged Walkers
4 Legged walkers imitate 4 legged animals. Many of these designs end up moving one leg at a time, instead of the 2-legged movements typical of animals. It requires 3 legs to be on the ground to provide static balance. Dynamic balance moving 2 legs at a time provides faster and more fluid motion.
6-Legged Walkers or Hexapods
These walkers are imitations of insects. Many of these move 3-legs-at-a-time to provide static balance. Because half of the legs can be moved at one time without losing static balance, 6-legged walkers can actually be simpler to build than 4-legged.
Note: Static balance means the construction is at all time in balance. This means that if the robot would stop moving at any time it wouldn't fall over. In contrast there is Dynamic Balance. This means that the robot is only in balance when it completes its step. If it's stopped in the middle of its step it would fall over. Although this might sound like a bad thing, dynamic balance allows much faster and smoother movement, but requires sensors to sense balance. Animals and humans move with dynamic balance.
Whegs
There are various combinations of wheels and legs that are useful for varying terrain. For quick details see .
Ball Wheels
This means of propulsion is very similar to how a classic computer mouse works: A ball is mounted in a casing in such a way that it can freely rotate in any direction. Two wheels around the ball are mounted against this ball at an angle of 90° to each other, parallel to the ground. One wheel registers the up-down movements and the other the left-right movements.
A ball wheel uses the same setup but connects the internal wheels to motors. This way the ball can be made to rotate in any direction. A robot equipped with a ball wheel can move up-down and left-right, but can't rotate around its vertical axis. Using 3 ball wheels allows rotation as well.
Electronics
The electronics of a robot generally fall in 6 categories:
- Motor control: controls the movement of the motors, servos and such. Relays and PWM H-bridges fall under this category.
- Sensor reading: reads the sensors and provides this information to the controller.
- Communication: Provides a link between controller and an external PC, another robot, or a remote control.
- Controller: microcontroller board, processor board or logic board. This part makes decisions based on sensor input and the robot's program.
- Power management: parts that provide a fixed 5VDC, 12VDC or any other level coming from the batteries. Circuits that monitor the status of the batteries.
- Glue logic: Additional electronics that allow all the parts to be connected with each other. An example is a CMOS to TTL level converter.
Not all of these categories are present in all robots, nor does every circuit fall completely into one category. Many robots don't require a separate sensor board as a whole lot of sensors have built-in electronics which allow them to connect directly to a µcontroller/processor.
Some Tips
- Use low-power (or simply dimmer) LEDs. Always. This drastically reduces how much current your circuits consume. A normal LED consumes around 15 mA. A modern microcontroller consumes about the same. Disabling unneeded LEDs is advisable, but not always possible.
- Use CMOS ICs instead of classic TTL. Again this reduces current usage and allows a more relaxed supply voltage. But pay attention to their sensitivity for static electricity when soldering them.
- Use good quality IC-sockets (or better don't use IC-sockets at all). They're worth their price.
- Avoid using IC-sockets on sensitive circuits (high speed digital, clock signal and analog signals). The moving robot can shake those ICs loose over time. Using In-Circuit programmable microcontrollers removes the need to be able to unplug an IC.
- LEDs are very practical to make slow digital signals visible, adding them on some signal lines can be interesting for testing purposes, however, they do increase power consumption. Removing them when your circuit works correctly can make it more power efficient (replace LED with a wire, replace resistor with a higher value one).
- See if your microcontrollers can run with a lower clock speed. The higher the clock speed, the more they consume.
- Use your microcontrollers sleep functions whenever possible, disable any part that isn't required (e.g. on-chip ADC).
- Learn to make PCBs (Printed Circuit Boards). It's not that hard and it makes your electronics look more professional. Don't throw away your breadboard, PCBs aren't very practical for prototyping.
- If you're up to it: build your circuits in SMD components on PCBs. This reduces size, weight, and cost. However soldering SMD ICs isn't easy. SO-packages (Small Outline) aren't too hard for an experienced builder. Smaller packages are almost impossible to do by hand. Get good soldering tools before you attempt this. For many modern SMD microcontrollers are complete build and tested board available. These can be a solution for those who don't have the equipment, expertise and patience to solder these ICs themselves. These boards don't have to be large as the demo-boards most IC developers sell, e.g. the BasicStamp is such a board with the size of an IC.
- Buy a breadboard. They're invaluable for designing and testing circuits.
- If you intent to build your own electronic circuits, invest in a dual channel oscilloscope. Single channel is very restricting. Pick one with as high a bandwidth as you can afford. At least 4x the highest signal frequency you intend to use.
- A good variable power supply is very handy to test how your circuit operates at lower voltage levels (as happens when the batteries discharge).
- If you can choose between pull-up and pull-down resistors, pick the one that uses the lowest amount of power. If the circuits output is at +5V most of the time, use pull-up, if it's 0V use pull-down. Remember that such outputs consume power when the transistor is active (when it's inactive it consumes a small amount of power: a leak current through the resistor and through the input impedance of the next circuit).
- Use high value resistors as pull-up/pull-down. But keep in mind that high speed signal lines need lower value resistor in order to minimize signal distortion.
- Most electronic components on a robot will run on a 5V supply and need a 5V regulator. Use a regulator with low dropout to prevent the 5V supply from browning out.
Display
Very simple robots need only a few LEDs to show everything that it is "thinking".
When trying to debug more complex robot software, it is useful for the robot to display text. A few calculators and PDAs have a RS232 connector or some other simple way to connect to a robot.
Many robots have such a calculator or PDA or other display strapped to the top in order to show the humans what the microcontroller is "thinking", which is vastly more productive than trying to guess what's going on inside that little chip of silicon.
With large robots, sometimes a full-size laptop computer is strapped on top for such display purposes.
Mechanical Design
Balance
Everybody encounters balance every day. While walking, when putting down a glass of water or in so many other ways we have to keep a balance. Now in most of these cases you wouldn't need to think about it, but when designing your robot you'll have to keep an eye on this concept. For most designs, balance isn't hard to achieve, even without doing calculations on it. A few rules of thumb suffice. For more complex designs, e.g. a robot with an arm, you can get away with just some rules of thumb and some common sense, but there's no guarantee. Doing a simple calculation would make it clear if the robot is going to stay on its wheels or if it is going to tumble over and crush whatever it was trying to pick up.
If you're into walkers, you'll need to spend more attention to balance. The fewer amount of legs you have, the more important balance becomes.
Simple 4-Wheeled Robots
Achieving balance on this type of robot is pretty trivial. Keep the center of mass between the wheels (picture a rectangle between the centers of the wheels) and as low as possible. In practice it mean you should place the heavy components, e.g. the batteries, somewhat in the center of the robot and as low as possible.
Simple 3-Wheeled Robots
These designs are nearly as simple as 4-wheeled robots; the difference lies in that you need to keep the center of mass close to the center of the triangle formed by the wheels. If your robot is rectangular avoid placing weight at the two unsupported corners. These points are prone to making the robot tumble over.
Wheeled robots with an arm or gripper
For the working of an arm or a gripper, we need to take the help of a stepper motor in simple cases or use sensors in sophisticated cases.