Q3Map2
Q3Map2 has now been integrated with the GtkRadiant Project. Windows, Mac and Linux binaries for both 32-bit and 64-bit systems can be download from the project page. The Q3Map2 source code is now available through the GtkRadiant GitHub Repository.
Official Support Forum @Splashdamage
Current stable version is 2.5.17
Q3Map2 is a BSP compiler for games based on the id Tech 3 engine. It compiles .map files, which are editable with an editor, into .bsp files, which are binary files for the game and are not editable. It currently supports the following platforms:
- Nexuiz
- Open Arena
- Quake 3 Arena/Team Arena
- Quake Live
- Return to Castle Wolfenstien
- Soldier of Fortune II
- Star Trek Elite Force
- Star Wars Jedi Knight: Jedi Academy
- Star Wars Jedi Knight II: Jedi Outcast
- Tenebrae (Quake1 Engine Modification Project)
- Tremulous
- Urban Terror
- War§ow
- Wolfenstein: Enemy Territory
- World of Padman
- Xonotic
Q3Map2 was designed to replace the Q3Map.exe that comes with QERadiant, GtkRadiant and GMAX Tempest. However, there are significant enhancements that require a little twiddling to use, such as faster lighting and enhanced surface production.
Fun Facts:
- Q3Map2 started out as a bugfix for Q3Map, the original Quake 3 map compiler.
- The bicycle-riding, AIDS LifeCycle participant, wonder-coding superhero, ydnar is the man behind Q3Map2.
Usage
Q3Map2 is a command-line utility. In general, users make use of Q3Map2 in one of three ways:
- Using the bsp menu from within GtkRadiant (Wikibook)
- Writing their own batch file (or comparable shell script if on Linux)
- Downloading a Q3Map2 front end, such as Q3Map2Build, Q3Map2Toolz or Q3map2GUI
It should be noted that the default command lines given in the GtkRadiant bsp menu are by no means a complete showcase of the available Q3Map2 options and switches. You may edit the bsp menu command lines from the GtkRadiant preferences, but for total control of your Q3Map2 compile writing a batch file or using one of the front ends is probably a better idea.
Q3Map2 command lines generally follow the format:
"C:\path\to\Q3Map2.exe" [<general option>] [<major switch> [<minor switch> <minor switch>...]] "C:\path\to\maps\mapname.map"
Switches
General options
-connect <hostname/ip address>
- Enables output of Q3Map2 logging to a remote host. This switch allows all other (non-solitary) switches.
-info
- Analyzes a compiled bsp and outputs information to the screen or log. This switch is solitary, and allows for only the path to a compiled bsp (not .map, it should be noted) afterward.
-game <quake3|wolf|et|etut|ef|jk2|ja|sof2|tenebrae|qfusion>
- Enables support for games other than Quake III: Arena. This switch allows all other (non-solitary) switches.
-fs_game <mod name>
- Enables support for game mods other than the basic game defined in your -game switch. This switch allows all other (non-solitary) switches.
-fs_basepath <"C:\path\to\game\directory">
- Required in order for Q3Map2 to read assets directories of games other than Quake III: Arena. This switch allows all other (non-solitary) switches.
-convert [-format <ase|map|quake3|wolf|et|etut|ef|jk2|ja|sof2|tenebrae|qfusion>]
- Converts a compiled .bsp to another format. This switch is solitary, and allows for only the path to a compiled bsp (not .map, it should be noted) afterward.
- With no -format sub-switch, -convert converts a compiled .bsp to an .ase model. Q3Map2 -convert outputs mapname.ase to the "maps" directory.
- Other formats are available via the -format sub-switch:
- map "decompiles" a .bsp back to a .map (most entities are lost, as is texture alignment information). Q3Map2 -convert -format map outputs mapname_c.map in the "maps" directory.
- quake3 "cross-compiles" a .bsp from some other game's .bsp format (this "other" game is specified in the -game switch) to Quake III: Arena. For example, to cross-compile from Wolfenstein: Enemy Territory to Quake III: Arena, "-game et -convert -format quake3" would be used. This feature is still a work in progress, and should be treated as experimental for the time being; differences in surfaceparm bitflags can cause weirdness in cross-compiled .bsps. Q3Map2 -convert -format quake3 outputs mapname_c.bsp in the "maps" directory.
- the other game shortnames work similarly to quake3, but for their respective games instead.
-scale <N.N>
- Scales a compiled .bsp by the prescribed factor. For example, Q3Map2 -scale 0.25 will output a new .bsp that is 25% of the original .bsp's size, while Q3Map2 -scale 2.0 will output a new .bsp that is twice as large. Q3Map2 -scale outputs mapname_s.bsp in the "maps" directory. This switch is solitary, and allows for only the path to a compiled bsp (not .map, it should be noted) afterward.
-export
- Exports internal lightmaps from a compiled .bsp to external .tga images. This switch is solitary, and allows for only the path to a compiled bsp (not .map, it should be noted) afterward.
-import
- Imports external .tga lightmaps back into a compiled .bsp. Imported lightmaps will only work on the unmodified BSP they were exported from. This switch is solitary, and allows for only the path to a compiled bsp (not .map, it should be noted) afterward.
-exportents
- Exports entities from an existing BSP to a .ent file. Example usage: q3map2 -game quakelive -exportents -v mymap.bsp
-threads <number of threads Q3Map2 should use>
- Specifies a number of threads to use during compiling. On Windows, Q3Map2 automatically detects the number of CPUs present, and sets the threadcount accordingly. The -threads switch can be used to override this behavior.
- Linux users will need to manually set -threads in order to activate SMP support in Q3Map2.
-v
- Enables verbose mode. This is generally a good idea.
-rename
- Used to fix an issue with misc_model entities in SOF2. If your misc_models show up unlit and completely black, use the -rename switch.
Major switches
-bsp
- Compiles a .map file into a binary space partition (BSP) file for use with the Quake III: Arena engine. Also writes a .prt (portal information) file and a .srf (surface) file. It is not necessary to add -bsp to your command line; it is the default switch.
-vis
- Creates visibility sets based on the portal file.
-light
- Calculates lighting data. With no -light sub-switches enabled, less than desirable output will be achieved.
Minor switches
The three major switches (-bsp, -vis, and -light) all have many options that can be accessed via their respective minor switches. There are quite a few minor switches, so in the interest of readability the lists of minor switches have been organized on separate pages of the Q3Map2 wiki.
BSP phase minor switches
Q3Map2 BSP phase minor switches have their own page at Q3Map2/BSP
VIS phase minor switches
Q3Map2 VIS phase minor switches have their own page at Q3Map2/VIS
Light phase minor switches
Q3Map2 Light phase minor switches have their own page at Q3Map2/Light
Q3Map2-specific entities
_decal
- Specifies a decal to be projected. Should contain one or more patch meshes and target an info_null entity. The targetting line drawn between the center of the _decal entity and the targetted info_null is the axis and distance of projection. It helps to think of the _decal mesh as if it were a light gel, the info_null were the target of a spotlight, and that you were "shining" this decal onto map geometry.
_skybox
- The _skybox entity is a true miracle: It specifies the origin of a skybox (a wholly contained, seperate area of the map), similar to some games' portal skies. When compiled with Q3Map2, the skybox surfaces will be visible from any place where sky is normally visible. It will cast shadows on the normal parts of the map, and can be used with cloud layers and other effects. Please see the _skybox tutorial for usage info.
Q3Map2-specific entity keys
Q3Map2-specific entity keys have their own page at Q3Map2/Entity keys.
Specialized tutorials
A Good "Final" Compile
This command line is a good compile to start building off of when you want to produce a "final" compile of your map. It is by no means perfect for every map, but a good place to start tweaking based on your own maps particulars.
"C:\path\to\q3map2.exe" -meta -v "C:\path\to\mapname.map"
"C:\path\to\q3map2.exe" -vis -v "C:\path\to\mapname.map"
"C:\path\to\q3map2.exe" -light -fast -patchshadows -samples 3 -bounce 8 -gamma 2 -compensate 4 -dirty -v "C:\path\to\mapname.map"
Games with the r_overbrightbits value enabled by default (i.e. Quake III Arena) may want to use the -gamma and -compensate switches. Otherwise, remove from the compile settings above.
Creating an .ase model out of brushwork
- First, create the geometry for your model.
- Save this file as model.map (or whatever).
- Compile model.map with -v -meta -patchmeta in the bsp phase (if your curves look too "low-fi" add "-subdivisions 0" to the compile line. if you want it even more complex, increment the '-subdivisions' value). There is no need to run -vis or -light. You should now have model.bsp in your "maps" directory.
- Compile model.bsp (not model.map, it should be noted) with -convert. You should now have model.ase in your "maps" directory.
- Create a new .map and place a misc_model entity. Give this misc_model entity the key/value pair "model"/"maps/model.ase"
Here is an example of a batchfile that does both, bsp and convert compile:
"C:\path\to\q3map2.exe" -bsp -meta -patchmeta -game [game abbreviation] "C:\path\to\model.map"
"C:\path\to\q3map2.exe" -convert ase -game [game abbreviation] "C:\path\to\model.bsp"
Et voila! You've now got a misc_model created out of brushwork. Play with the "modelscale" and "angles" entity keys, and see why Q3Map2 .ase conversion is completely and totally great.
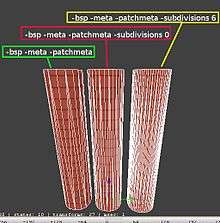
-subdivisions #
- Specifies the number of sub divisions to make in your geometry. Larger values increase triangulation and as such, can decrease performance.
For extra moxie, import model.map as a prefab to your new map. Select the "model" brushwork, and texture it with clip. Rotate these new clip brushes into place over your misc_model; the brush vertexes of these clip brushes will get screwed up a bit, but since the player can't see clip, you really can't tell in-game. It's lovely, and doesn't have any of the ill effects of Q3Map2 autoclipping.
_skybox tutorial
The _skybox entity "grabs" all the map geometry it can "see" via the normal entity flooding algorithm and assimilates it into the portal sky heap. This is an important concept to understand; if there is any leak between your "main" map and the separate area designated for the _skybox, your compile will take forever, only to produce a very borked .bsp. With that out of the way...
- Construct your map as normal, texturing your sky brushes with whatever sky shader you fancy.
- Seal your map off from the void (of course).
- Create a small box of sky brushes somewhere slightly removed from your "main" map. You could probably get away with drawing a 128x128x128 cube of your sky shader, then using the CSG "hollow" button.
- Place more geometry within this tiny skybox, but take care not to make it too complicated. Also: unless you compile with -patchmeta, patch meshes shouldn't go inside the _skybox area... you'll end up with MAX_PATCH_PLANES every time.
- Place a _skybox entity somewhere inside your tiny sky box. The location of the _skybox entity relative to the rest of the sky box geometry determines where the origin of the portal sky will be relative to the rest of your map... a little experimentation will show you how this works.
- Compile, and that's that. You've got a portal sky in Quake III: Arena!
Notes:
- The "_scale" key defines the _skybox scaling factor. Depending on what kind of portal sky you are going for, values between 64-256 seem to be pretty good. Picking a power of 2 to keep the _skybox geometry vertexes on the grid might be a good idea.
- The "angles" key can be used to put your _skybox geometry off-kilter and make players sea-sick.
- Deformvertexes shaders can be used on _skybox geometry, but the values you use must be scaled up by the same value you assigned to _scale, or else it won't look right.
- You must also scale down the texture coordinates on _skybox geometry, or else the textures you use will appear extremely stretched out.
Authors: see page history
Decompiling into a .map
Q3Map2 can decompile a .bsp into a .map. This procedure is by no means perfect, and you should never take anything from others maps, but decompiling is map is good to "see how it's done".
- Put the .bsp that you want to decompile into the same directory as q3map2.exe
- Open the command prompt and browse to the folder which contains the .bsp and q3map2.exe
- Type
q3map2 -game [game abbreviation] -convert -format map [name of the bsp file].bsp
So if the .bsp is called testmap.bsp and you use Jedi Academy, you use this:
q3map2 -game ja -convert -format map testmap.bsp
You should then find a .map in the same folder as q3map2.exe and the .bsp.