PyGTK For GUI Programming/First Steps
< PyGTK For GUI ProgrammingThis chapter aims to familiarize the reader with the basic classes and functions of the PyGTK module, and how to link them together. To start off, open an interactive Python shell (i.e. launch IDLE, or type `python` on the command line of a terminal), and enter the following (case matters):
1 import gtk
2
3 window = gtk.Window()
4 label = gtk.Label("Hello, world!")
5
6 window.add(label)
7
8 window.show_all()
|
If you enter the above code into a file and execute that file (by invoking the interpreter with the file as an argument or indirectly through some other IDE's) then it could happen that nothing seems to happen at all. This is because after the window.show_all() call the interpreter (and thus also the PyGTK application) is terminating. In order for this example to work in this context it is sufficient to append gtk.main(), see the Signals and Callbacks section for more detail.
| A bug in some versions of PyGTK causes IDLE to crash when using the `gtk` module. If you launch IDLE, start entering the lines above, and suddenly the IDLE window closes or disappears - usually when you hit [Enter] at the end of one of the lines - then you've been bitten by the bug! Open a command shell/terminal, type the "python" command, hit [Enter], and start the above script again. | |
| Technical Note: |
This snippet of code creates a window with the text "Hello, world!" inside (see screenshot).
- Line 1: This imports the gtk library so we can access the classes and functions required to build the GUI.
- Line 3: A new Window object is created and assigned to the variable window. Note that, by default, this does not immediately show the window on the screen - this is conventionally done after all the widgets have been added to the window.
- Line 4: A new gtk.Label widget is created. The first argument is the string to display in the label.
- Line 6: The add() method of the Window is one way of attaching the widget to it.
- Line 8: The show_all() method of the Window class calls the show() method on all its child widgets (the widgets that have been placed inside the window), and then on the containing window itself.
GTK Objects and Containers
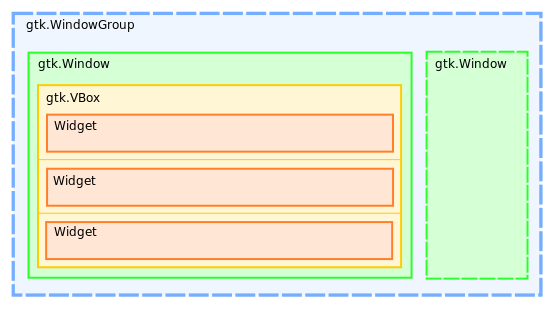
In the example code above, the gtk.Window() object self-evidently represents the GUI window, and the widget gtk.Label is added to the object with the add() method. The add method, however, only allows a single object to be added to the window. Since you often want to put multiple widgets into a window, some sort of container object, such as gtk.VBox, needs to be added instead. The gtk.VBox object can contain and organize multiple widgets into a Vertical column. Similarly, the gtk.HBox object is also available, organizing its child widgets into a Horizontal row. To create more sophisticated layouts, you can nest the container objects, i.e. have a gtk.HBox inside a gtk.VBox.
The use of these objects is demonstrated in the illustration on the right. The gtk.WindowGroup object is optional, but allows your application to display more than one gtk.Window. The chapter 'Multiple Windows' explains how to use this; for now, we will stick to a single window.
Here is an example of a simple PyGTK programme which utilizes the gtk.VBox and gtk.HBox objects to put multiple widgets on the screen - try typing this into the interactive Python or IDLE interpreter:
 1 import gtk
 2
 3 window = gtk.Window()
 4 entry = gtk.Entry()
 5 button_ok = gtk.Button("OK")
 6 button_cancel = gtk.Button("Cancel")
 7
 8 vbox = gtk.VBox()
 9 vbox.pack_start(entry)
10 hbox = gtk.HBox()
11 hbox.pack_start(button_ok)
12 hbox.pack_start(button_cancel)
13 vbox.pack_start(hbox)
14
15 window.add(vbox)
16 window.show_all()
|
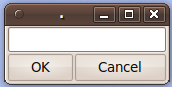
The result of the code above should be a window with an input box and two buttons:
- Line 3: A new gtk.Window object is created.
- Line 4: A new gtk.Entry object is created (the input box).
- Line 5 & 6: Two new gtk.Button objects are created, with the text as the first argument.
- Line 8: A new gtk.VBox object is created. This will later be added to the window, and will contain all the widgets in the window.
- Line 9: The .pack_start() method on a container adds the widget passed as its first parameter to the beginning of the container (at the top). Unlike the window's .add() method, this allows multiple widgets when called more than once. The .pack_end() method does the same thing, but start putting objects at the end of the container (at the bottom), so subsequent calls place the widget on top of the previous one.
- Line 10: Another container object is created.
- Line 11 & 12: The button widgets are added to this new hbox container with the .pack_start() method.
- Line 13: The hbox container is nested inside the vbox container by calling the .pack_start() method on the vbox container.
- Line 15: The vbox container is added to the window with the window's .add() method.
- Line 16: All the objects are shown, so you can now see the window on the screen.
Signals and Callbacks
In order to get your application to react to the GUI, you can tap into events which occur on widgets and tell PyGTK to run a function (known as a callback function) when that event happens. For example, when the user clicks on a button, the "clicked" event for that specific widget is emitted, and if you have connected it to a callback function that function is run.
To connect an event with a function, call the .connect() method on the widget that will emit the event. The syntax of this method is:
handler_id = widget.connect(event_name, callback_function[, function_data])
The return value to .connect() can be captured so the connection can be revoked.
- The event_name argument should be a string representing the name of the event to connect with. This varies between widgets; i.e. the gtk.Button widget emits a "clicked" event when, erm, clicked on.
- The callback_function should be a reference to the callback function you want PyGTK to run when event_name is emitted. Do not put the brackets () at the end of the name, and it doesn't need to be enclosed as a string.
- The optional function_data parameter may contain additional arguments to pass to the callback function.
The callback function should be in the form:
def callback_function(widget, callback_data=None)
The name of the function and its arguments can be called anything.
- The first argument, widget, is a reference to the widget object that emitted the signal.
- The second argument, callback_data, contains the callback_data specified as the last argument to the widget's connect() method, if supplied.
Finally, to make sure your events are dealt with, add the following code to the end of the application:
gtk.main()
The gtk.main() function listens for events and runs any callback functions that have been connected to them. This function stays running until the window is closed by the operating system's window manager, or gtk.main_quit() is run.
Below is a modified version of the sample code above, with a some callback functions defined and connected to button events.
 1 import gtk
 2
 3 # Define the callback functions first:
 4 def exit(widget, callback_data=None):
 5   window.hide_all()
 6   gtk.main_quit()
 7
 8 window = gtk.Window()
 9 entry = gtk.Entry()
10 button_ok = gtk.Button("OK")
11 button_cancel = gtk.Button("Cancel")
12
13 # Connect events to callback functions:
14 button_cancel.connect("clicked", exit)
15
16 vbox = gtk.VBox()
17 vbox.pack_start(entry)
18 hbox = gtk.HBox()
19 hbox.pack_start(button_ok)
20 hbox.pack_start(button_cancel)
21 vbox.pack_start(hbox)
22
23 window.add(vbox)
24 window.show_all()
25 # Put gtk.main() last so our callback functions are used.
26 gtk.main()
|
- Lines 4-6: This a callback function which closes the window with the .hide() method and stops the gtk.main() loop. Although the callback_data argument is not used, it is often helpful to include it in all the callback functions in case it is needed at some point.
- Line 14: The .connect() method captures the "clicked" event from the button_cancel widget and sends it to our exit() callback function we defined earlier.
- Line 26: The gtk.main() function starts the main loop which sends events/signals to the right callback functions.
Putting It All Together
The following code uses all of the methods discussed above to create a very simple GTK application that asks for your name and prints it to the console. Copy and save the following text in a file and run python example.py on the command line (replacing example.py with the name of the file you just created).
 1 #!/usr/bin/env python
 2 # -*- coding: utf-8 -*-
 3
 4 import pygtk
 5 pygtk.require('2.0')
 6
 7 import gtk
 8
 9
10 class Application():
11
12     def __init__(self):
13         self.window = gtk.Window()
14         self.window.set_title("Example GTK Application")
15
16         self.create_widgets()
17         self.connect_signals()
18
19         self.window.show_all()
20         gtk.main()
21
22
23     def create_widgets(self):
24         self.vbox = gtk.VBox(spacing=10)
25
26         self.hbox_1 = gtk.HBox(spacing=10)
27         self.label = gtk.Label("Your Name:")
28         self.hbox_1.pack_start(self.label)
29         self.entry = gtk.Entry()
30         self.hbox_1.pack_start(self.entry)
31
32         self.hbox_2 = gtk.HBox(spacing=10)
33         self.button_ok = gtk.Button("OK")
34         self.hbox_2.pack_start(self.button_ok)
35         self.button_exit = gtk.Button("Exit")
36         self.hbox_2.pack_start(self.button_exit)
37
38         self.vbox.pack_start(self.hbox_1)
39         self.vbox.pack_start(self.hbox_2)
40
41         self.window.add(self.vbox)
42
43
44     def connect_signals(self):
45         self.button_ok.connect("clicked", self.callback_ok)
46         self.button_exit.connect("clicked", self.callback_exit)
47
48
49     def callback_ok(self, widget, callback_data=None):
50         name = self.entry.get_text()
51         print name
52
53
54     def callback_exit(self, widget, callback_data=None):
55         gtk.main_quit()
56
57
58 if __name__ == "__main__":
59     app = Application()
|
This application is structured inside a single class, Application. This approach allows the names of the GTK widgets and other objects to reside in their own namespace, and also makes it possible to import the file in other scripts and let the programmer decide when to create and display the GUI.
- Lines 4 & 5: These two lines are required above the import gtk statement. They deal with all the initialization and version checking that the GTK+ toolkit needs to do before creating your GUI. Although we have omitted this in our earlier examples, you should still use it in your own programmes to avoid potential redrawing problems.
- Line 12: The __init__() method, which is called upon class construction, does the following to setup the application:
- Lines 13 & 14: Create a gtk.Window object and use its .set_title() method to tell GTK what string to display in the window's title bar.
- Line 16: Run the create_widgets() method which creates all of the containers and widgets, and packs the widgets inside the right containers.
- Line 17: Run the connect_signals() method which connects the "clicked" events on the buttons to a few callback methods.
- Lines 19 & 20: Recursively shows all the widgets inside the window, then runs the gtk.main() loop to respond to events.
- Line 49: This callback method, which is connected to the "clicked" event on our OK button, gets the text from out gtk.Entry widget with its get_text() method, and prints it to the console. Note that the difference between a callback function and a callback method (used here) is that the callback method has an additional argument at the beginning, self, because it is defined within a class and is therefore passed the properties and methods of that class by the python interpreter.
- Line 55: This callback method quits the application by stopping the gtk.main() loop. Note that it does not have to run the .hide_all() method on the window object because the window is destroyed as the application stops running.