LaTeX/Page Layout
< LaTeXLaTeX and the document class will normally take care of page layout issues for you. For submission to an academic publication, this entire topic will be out of your hands, as the publishers want to control the presentation. However, for your own documents, there are some obvious settings that you may wish to change: margins, page orientation and columns, to name but three. The purpose of this tutorial is to show you how to configure your pages.
We will often have to deal with TeX lengths in this chapter. You should have a look at Lengths for comprehensive details on the topic.
Two-sided documents
Documents can be either one- or two-sided. Articles are by default one-sided, books are two-sided. Two-sided documents differentiate the left (even) and right (odd) pages, whereas one-sided do not. The most notable effect can be seen in page margins. If you want to make the article class two-sided, use \documentclass[twoside]{article}.
Many commands and variables in LaTeX take this concept into account. They are referred to as even and odd. For one-sided document, only the odd commands and variables will be in effect.
Page dimensions
A page in LaTeX is defined by many internal parameters. Each parameter corresponds to the length of an element of the page, for example, \paperheight is the physical height of the page. Here you can see a diagram showing all the variables defining the page. All sizes are given in TeX points (pt), there are 72.27pt in an inch or 1pt ≈ 0.3515mm.
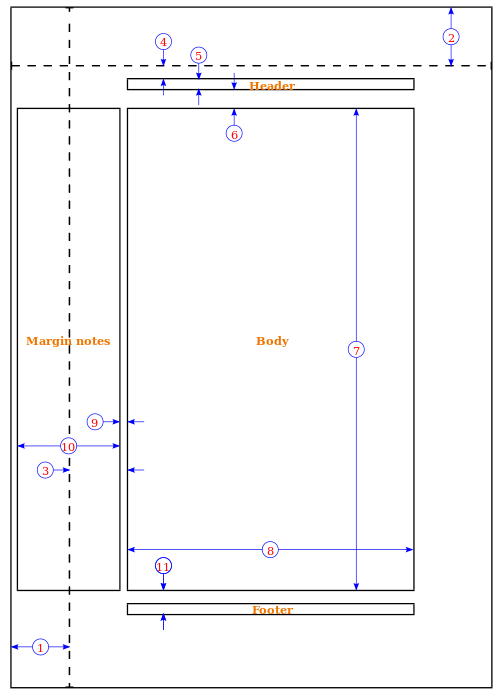
- one inch +
\hoffset - one inch +
\voffset -
\oddsidemargin= 31pt -
\topmargin= 20pt -
\headheight= 12pt -
\headsep= 25pt -
\textheight= 592pt -
\textwidth= 390pt -
\marginparsep= 10pt -
\marginparwidth= 35pt -
\footskip= 30pt
-
\marginparpush= 7pt (not shown) -
\hoffset= 0pt -
\voffset= 0pt -
\paperwidth= 597pt -
\paperheight= 845pt
The current details plus the layout shape can be printed from a LaTeX document itself. Use the layout package and the command of the same name: \usepackage{layout} ... \layout{}
To render a frame marking the margins of a document you are currently working on, add
\usepackage{showframe}
to the document.
Page size
It will not have been immediately obvious - because it doesn't really cause any serious problems - that the default page size for all standard document classes is US letter. This is shorter by 18 mm (about 3/4 inch), and slightly wider by 8 mm (about 1/4 inch), compared to A4 (which is the standard in almost all the rest of the world). While this is not a serious issue (most printers will print the document without any problems), it is possible to specify alternative sizes as class option. For A4 format:
\documentclass[a4paper]{article}
|
More size options with geometry
One of the most versatile packages for page layout is the geometry package. The immediate advantage of this package is that it lets you customize the page size even with classes that do not support the options. For instance, to set the page size, add the following to your preamble:
\usepackage[a4paper]{geometry}
|
The geometry package has many pre-defined page sizes, like a4paper, built in. Others include:
- a0paper, a1paper, ..., a6paper,
- b0paper, b1paper, ..., b6paper,
- letterpaper,
- legalpaper,
- executivepaper.
To explicitly change the paper dimensions using the geometry package, the paperwidth and paperheight options can be used. For example:
\usepackage[paperwidth=5.5in, paperheight=8.5in]{geometry}
|
Page size issues
If you intend to get a PDF in the end, there are basically three ways:
- TeX → PDF
pdflatex myfile # TeX → PDF
- TeX → DVI → PDF
latex myfile                  # TeX → DVI
dvipdf myfile                 # DVI → PDF
- TeX → DVI → PS → PDF
latex myfile                  # TeX → DVI
dvips myfile -o myfile.ps     # DVI → PS
ps2pdf myfile.ps myfile.pdf   # PS  → PDF
Sadly the PDF output page size may not be completely respectful of your settings. Some of these tools do not have the same interpretation of the DVI, PS and PDF specifications, and you may end up with a PDF which has not exactly the right size. Thankfully there is a solution to that: the \special command lets the user pass PostScript or PDF parameters, which can be used here to set the page size appropriately.
- For pdflatex to work fine, using the package geometry usually works.
- For the DVI and PS ways, the safest way to always get the right paper size in the end is to add
\documentclass[...,a4paper,...]{...}
\special{papersize=210mm,297mm}
|
to the tex file, and to append the appropriate parameters to the processors used during output generation:
dvips -t a4 ...
ps2pdf -sPAPERSIZE=a4 ... # On Windows: ps2pdf -sPAPERSIZE#a4 ... [1]
If you want US Letter instead, replace 210mm,297mm by 8.5in,11in and a4paper by letter. Also replace a4 by letter in command-line parameters.
Page size for tablets
Those who want to read on tablets or other handheld digital devices need to create documents without the extra whitespace. In order to create PDF documents with optimal handheld viewing, not only must the text field and margins be adjusted, so must the page size. If you are looking for a sensible dimension, consider following the paper size used by the Supreme Court of the United States, 441pt by 666pt (or 6.125 inches by 9.25 inches), which looks great on tablets. You could also use the Supreme Court's text field size of 297 pt by 513 pt, but this is too wide for fonts other than Century Schoolbook, the font required by the Supreme Court.
Margins
Readers used to perusing typical physical literature are probably wondering why there is so much white space surrounding the text. For example, on A4 paper a document will typically have 44 mm margin widths on the left and right of the page, leaving about 60% of the page width for text. The reason is improved readability. Studies have shown[2][3] that it's easier to read text when there are 60–70 characters per line—and it would seem that 66 is the optimal number. Therefore, the page margins are set to ensure optimal readability, and excessive margin white space is tolerated as a consequence. Sometimes, this white space is left in the inner margin with the assumption that the document will be bound.
If you wish to avoid excessive white space, rather than changing the margins, consider instead using a two-column (or more) layout. This approach is the one usually taken by print magazines because it provides both readable line lengths and good use of the page. Another option for reducing the amount of whitespace on the page without changing the margins is to increase the font size using the 12pt option to the document class.
If you wish to change the margins of your document, there are many ways to do so:
- One older approach is to use the fullpage package for somewhat standardized smaller margins (around an inch), but it creates lines of more than 100 characters per line at with the 10pt default font size (and about 90 if the 12pt documentclass option is used):
\usepackage{fullpage}
|
For even narrower margins, the fullpage package has a cm option (around 1.5cm), which results in about 120 characters per line at the 10pt default font size, about double what is considered readable:
\usepackage[cm]{fullpage}
|
- A more modern and flexible approach is to use the geometry package. This package allows you to specify the 4 margins without needing to remember the particular page dimensions commands. You can enter the measures in centimeters and inches as well. Use cm for centimeters and in for inches after each value (e.g. 1.0in or 2.54cm). Note that by default (i.e. without any options) this package already reduces the margins, so for a 'standard layout' you may not need to specify anything. These values are relative to the edge of paper (0in) and go inward. For example, this command provides more conventional margins, better using the vertical space of the page, without creating the dramatically long lines of the fullpage package (if the 11pt documentclass option is used, the line lengths are about 88 characters for letter-sized paper and slightly less when using a4paper).
\usepackage[top=1in, bottom=1.25in, left=1.25in, right=1.25in]{geometry}
|
It can also recreate the behavior of the fullpage package using
\usepackage[margin=1in]{geometry}
|
You can combine the margin options with the page size options seen in this paragraph.
- You should not use the a4wide package for a page with A4 document size with smaller margins. It is obsolete and buggy. Use geometry package instead like this:
\usepackage[a4paper,includeheadfoot,margin=2.54cm]{geometry}
|
- Edit individual page dimension variables described above, using the
\addtolengthand\setlengthcommands. See the Lengths chapter. For instance,
\setlength{\textwidth}{6.5in}
\addtolength{\voffset}{-5pt}
|
Odd and even margins
Using the geometry package, the options left and right are used for the inside and outside margins respectively. They also have aliases inner and outer. Thus, the easiest way to handle different margins for odd and even pages is to give the twoside option in the document class command and specify the margins as usually.
\documentclass[twoside]{report}
\usepackage[inner=4cm,outer=2cm]{geometry} %left=4cm,right=2cm would be equivalent
|
This will result in a value of 4cm on all inner margins (left margin for odd number pages and right margin for even pages) and 2cm margin on outer margins.
Setting the same value for the inner and outer for geometry will remove the difference between the margins. Another quick way to eliminate the difference in position between even and odd numbered pages would be setting the values to evensidemargin and oddsidemargin to the half of odd's default:
\setlength{\oddsidemargin}{15.5pt}
\setlength{\evensidemargin}{15.5pt}
|
By default, the value of evensidemargin is larger than oddsidemargin in the two-sided layout, as one could wish to write notes on the side of the page. The side for the large margin is chosen opposite to the side where pages are joined together.
See the Lengths.
Top margin above Chapter
The top margin above a chapter can be changed using the titlesec package. Example:
\usepackage{titlesec}
\titlespacing*{\chapter}{0pt}{-50pt}{20pt}
\titleformat{\chapter}[display]{\normalfont\huge\bfseries}{\chaptertitlename\ \thechapter}{20pt}{\Huge}
|
The command \titleformat must be used when the spacing of a chapter is changed. In case of a section this command can be omitted.
Page orientation
When you talk about changing page orientation, it usually means changing to landscape mode, since portrait is the default. We shall introduce two slightly different styles of changing orientation.
Change orientation of the whole document
The first is for when you want all of your document to be in landscape from the very beginning. There are various packages available to achieve this, but the one we prefer is the geometry package. All you need to do is call the package, with landscape as an option:
\usepackage[landscape]{geometry}
|
Although, if you intend to use geometry to set your paper size, don't add the \usepackage commands twice, simply string all the options together, separating with a comma:
\usepackage[a4paper,landscape]{geometry}
|
Using standard LaTeX classes, you can use the same class options:
\documentclass[a4paper,landscape]{article}
|
Change orientation of specific part
The second method is for when you are writing a document in portrait, but you have some contents, like a large diagram or table that would be displayed better on a landscape page. However, you still want the consistency of your headers and footers appearing the same place as the other pages.
The lscape package is for this very purpose. It supplies a landscape environment, and anything inside is basically rotated. No actual page dimensions are changed. This approach is more applicable to books or reports than to typical academic publications. Using pdflscape instead of lscape when generating a PDF document will make the page appear right side up when viewed: the single page that is in landscape format will be rotated, while the rest will be left in portrait orientation.
Also, to get a table to appear correctly centered on a landscaped page, one must place the tabular environment inside a table environment, which is itself inside the landscape environment. For instance it should look like this:
\usepackage{pdflscape}
% ...

\begin{landscape}
\begin{table}
\centering     % optional, probably makes it look better to have it centered on the page
\begin{tabular}{....}
% ...
\end{tabular}
\end{table}
\end{landscape}
|
For books (and in general documents using the twoside option), the landscape-environment unfortunately does not pay attention to the different layout of even and odd pages. The macro can be fixed using a few lines of extra code in the preamble[4].
Change orientation of floating environment
If you use the above code, you will see that the table is inserted where it is in the code. It will not be floated! To fix this you need the package rotating. See the Rotations chapter.
Margins, page size and rotation of a specific page
If you need to rotate the page so that the figure fits, the chances are good that you need to scale the margins and the font size too. Again, the geometry package comes in handy for specifying new margins for a single page only.
\usepackage{geometry}
\usepackage{pdflscape}
% ...

\newgeometry{margin=1cm}
\begin{landscape}
\thispagestyle{empty} %% Remove header and footer.

\begin{table}
\begin{center}
\footnotesize %% Smaller font size.

\begin{tabular}{....}
% ...
\end{tabular}

\end{center}
\end{table}

\end{landscape}
\restoregeometry
|
Note that order matters!
Page styles
Page styles in Latex terms refers not to page dimensions, but to the running headers and footers of a document. These headers typically contain document titles, chapter or section numbers/names, and page numbers.
Standard page styles
The possibilities of changing the headers in plain Latex are actually quite limited. There are two commands available: \pagestyle{''style''} will apply the specified style to the current and all subsequent pages, and \thispagestyle{''style''} will only affect the current page. The possible styles are:
| empty | Both header and footer are cleared |
| plain | Header is clear, but the footer contains the page number in the center. |
| headings | Footer is blank, header displays information according to document class (e.g., section name) and page number top right. |
| myheadings | Page number is top right, and it is possible to control the rest of the header. |
The commands \markright and \markboth can be used to set the content of the headings by hand. The following commands placed at the beginning of an article document will set the header of all pages (one-sided) to contain "John Smith" top left, "On page styles" centered and the page number top right:
\pagestyle{headings}
\markright{John Smith\hfill On page styles\hfill}
|
There are special commands containing details on the running page of the document.
\thepage | number of the current page |
\leftmark | current chapter name printed like "CHAPTER 3. THIS IS THE CHAPTER TITLE" |
\rightmark | current section name printed like "1.6. THIS IS THE SECTION TITLE" |
\chaptername | the name chapter in the current language. If this is English, it will display "Chapter" |
\thechapter | current chapter number |
\thesection | current section number |
Note that \leftmark and \rightmark convert the names to uppercase, whichever was the formatting of the text. If you want them to print the actual name of the chapter without converting it to uppercase use the following command:
\renewcommand{\chaptermark}[1]{ \markboth{#1}{} }
\renewcommand{\sectionmark}[1]{ \markright{#1}{} }
|
Now \leftmark and \rightmark will just print the name of the chapter and section, without number and without affecting the formatting. Note that these redefinitions must be inserted after the first call of \pagestyle{fancy}. The standard book formatting of the \chaptermark is:
\renewcommand{\chaptermark}[1]{\markboth{\MakeUppercase{\chaptername\ \thechapter.\ #1}}{}}
|
Watch out: if you provide long text in two different "parts" only in the footer or only in the header, you might see overlapping text.
Moreover, with the following commands you can define the thickness of the decorative lines on both the header and the footer:
\renewcommand{\headrulewidth}{0.5pt}
\renewcommand{\footrulewidth}{0pt}
|
The first line for the header, the second for the footer. Setting it to zero means that there will be no line.
Plain pages issue
An issue to look out for is that the major sectioning commands (\part, \chapter or \maketitle) specify a \thispagestyle{plain}. So, if you wish to suppress all styles by inserting a \pagestyle{empty} at the beginning of your document, then the style command at each section will override your initial rule, for those pages only. To achieve the intended result one can follow the new section commands with \thispagestyle{empty}. The \part command, however, cannot be fixed this way, because it sets the page style, but also advances to the next page, so that \thispagestyle{} cannot be applied to that page. Two solutions:
- simply write
\usepackage{nopageno}in the preamble. This package will make\pagestyle{plain}have the same effect as\pagestyle{empty}, effectively suppressing page numbering when it is used. - Use fancyhdr as described below.
The tricky problem when customizing headers and footers is to get things like running section and chapter names in there. Standard LaTeX accomplishes this with a two-stage approach. In the header and footer definition, you use the commands \rightmark and \leftmark to represent the current section and chapter heading, respectively. The values of these two commands are overwritten whenever a chapter or section command is processed. For ultimate flexibility, the \chapter command and its friends do not redefine \rightmark and \leftmark themselves. They call yet another command (\chaptermark, \sectionmark, or \subsectionmark) that is responsible for redefining \rightmark and \leftmark, except if they are starred -- in such a case, \markboth{Chapter/Section name}{} must be used inside the sectioning command if header and footer lines are to be updated.
Again, several packages provide a solution:
- an alternative one-stage mechanism is provided by the package titleps);
- fancyhdr will handle the process its own way.
Customizing with fancyhdr
To get better control over the headers, one can use the package fancyhdr written by Piet van Oostrum. It provides several commands that allow you to customize the header and footer lines of your document. For a more complete guide, the author of the package produced this documentation.
To begin, add the following lines to your preamble:
\usepackage{fancyhdr}
\setlength{\headheight}{15.2pt}
\pagestyle{fancy}
|
You can now observe a new style in your document.
The \headheight needs to be 13.6pt or more, otherwise you will get a warning and possibly formatting issues. Both the header and footer comprise three elements each according to its horizontal position (left, centre or right).
The styles supported by fancyhdr:
- the four LaTeX styles;
- fancy defines a new header for all pages but plain-style pages such as chapters and titlepage;
- fancyplain is the same, but for absolutely all pages.
Style customization
The styles can be customized with fancyhdr specific commands.
Those two styles may be configured directly, whereas for LaTeX styles you need to make a call to the \fancypagestyle command.
To set header and footer style, fancyhdr provides three interfaces. They all provide the same features, you just use them differently. Choose the one you like most.
- You can use the following six commands.
\lhead[<even output>]{<odd output>}
\chead[<even output>]{<odd output>}
\rhead[<even output>]{<odd output>}
|
\lfoot[<even output>]{<odd output>}
\cfoot[<even output>]{<odd output>}
\rfoot[<even output>]{<odd output>}
|
Hopefully, the behaviour of the above commands is fairly intuitive: if it has head in it, it affects the head etc, and obviously, l, c and r means left, centre and right respectively.
- You can also use the command
\fancyheadfor header and\fancyfootfor footer. They work in the same way, so we'll explain only the first one. The syntax is:
\fancyhead[selectors]{output you want}
|
You can use multiple selectors optionally separated by a comma. The selectors are the following:
| E | even page |
| O | odd page |
| L | left side |
| C | centered |
| R | right side |
so CE,RO will refer to the center of the even pages and to the right side of the odd pages.
-
\fancyhfis a merge of\fancyheadand\fancyfoot, hence the name. There are two additional selectors H and F to specify the header or the footer, respectively. If you omit the H and the F, it will set the fields for both.
These commands will only work for fancy and fancyplain. To customize LaTeX default style you need the \fancyplainstyle command. See below for examples.
For a clean customization, we recommend you start from scratch. To do so you should erase the current pagestyle. Providing empty values will make the field blank. So
\fancyhf{}
|
will just delete the current heading/footer configuration, so you can make your own.
Plain pages
There are two ways to change the style of plain pages like chapters and titlepage.
First you can use the fancyplain style. If you do so, you can use the command \fancyplain{...}{...} inside fancyhdr commands like \lhead{...}, etc.
When LaTeX wants to create a page with an empty style, it will insert the first argument of \fancyplain, in all the other cases it will use the second argument. For instance:
\pagestyle{fancyplain}
\fancyhf{}
\lhead{ \fancyplain{}{Author Name} }
\rhead{ \fancyplain{}{\today} }
\rfoot{ \fancyplain{}{\thepage} }
|
It has the same behavior of the previous code, but you will get empty header and footer in the title and at the beginning of chapters.
Alternatively you could redefine the plain style, for example to have a really plain page when you want. The command to use is \fancypagestyle{plain}{...} and the argument can contain all the commands explained before. An example is the following:
\pagestyle{fancy}

\fancypagestyle{plain}{ %
  \fancyhf{} % remove everything
  \renewcommand{\headrulewidth}{0pt} % remove lines as well
  \renewcommand{\footrulewidth}{0pt}
}
|
In that case you can use any style but fancyplain because it would override your redefinition.
Examples
For two-sided, it's common to mirror the style of opposite pages, you tend to think in terms of inner and outer. So, the same example as above for two-sided is:
\lhead[Author Name]{}
\rhead[]{Author Name}
\lhead[]{\today}
\rhead[\today]{}
\lfoot[\thepage]{}
\rfoot[]{\thepage}
|
This is effectively saying author name is top outer, today's date is top inner, and current page number is bottom outer. Using \fancyhf can make it shorter:
\fancyhf[HLE,HRO]{Author's Name}
\fancyhf[HRE,HLO]{\today}
\fancyhf[FLE,FRO]{\thepage}
|
Here is the complete code of a possible style you could use for a two-sided document:
\usepackage{fancyhdr}
\setlength{\headheight}{15pt}

\pagestyle{fancy}
\renewcommand{\chaptermark}[1]{ \markboth{#1}{} }
\renewcommand{\sectionmark}[1]{ \markright{#1} }

\fancyhf{}
\fancyhead[LE,RO]{\thepage}
\fancyhead[RE]{\textit{ \nouppercase{\leftmark}} }
\fancyhead[LO]{\textit{ \nouppercase{\rightmark}} }

\fancypagestyle{plain}{ %
  \fancyhf{} % remove everything
  \renewcommand{\headrulewidth}{0pt} % remove lines as well
  \renewcommand{\footrulewidth}{0pt}
}
|
Using \fancypagestyle one can additionally define multiple styles for one's document that are easy to switch between. Here's a somewhat complicated example for a two-sided book style:
\fancypagestyle{fancybook}{%
    \fancyhf{}%
    % Note the ## here. It's required because \fancypagestyle is making a macro (\ps@fancybook).
    % If we just wrote #1, TeX would think that it's the argument to \ps@fancybook, but
    % \ps@fancybook doesn't take any arguments, so TeX would complain with an error message.
    % You are not expected to understand this.
    \renewcommand*{\sectionmark}[1]{ \markright{\thesection\ ##1} }%
    \renewcommand*{\chaptermark}[1]{ \markboth{\chaptername\ \thechapter: ##1}{} }%
    % Increase the length of the header such that the folios
    % (typography jargon for page numbers) move into the margin
    \fancyhfoffset[LE]{6mm}% slightly less than 0.25in
    \fancyhfoffset[RO]{6mm}%
    % Put some space and a vertical bar between the folio and the rest of the header
    \fancyhead[LE]{\thepage\hskip3mm\vrule\hskip3mm\leftmark}%
    \fancyhead[RO]{\rightmark\hskip3mm\vrule\hskip3mm\thepage}%
}
|
Page n of m
Some people like to put the current page number in context with the whole document. LaTeX only provides access to the current page number. However, you can use the lastpage package to find the total number of pages, like this:
\usepackage{lastpage}
...
\cfoot{\thepage\ of \pageref{LastPage} }
|
Note the capital letters. Also, add a backslash after \thepage to ensure adequate space between the page number and 'of'. And recall, when using references, that you have to run LaTeX an extra time to resolve the cross-references.
Alternative packages
Other packages for page styles are scrpage2, very similar to fancyhdr, and titleps, which takes a one-stage approach, without having to use \leftmark or \rightmark.
Page background
The eso-pic package will let you print content in the background of every page or individual pages.
\usepackage{tikz} % for \gradientbox below.
\usepackage{eso-pic}

\newcommand{\gradientbox}[3]{%
  \begin{tikzpicture}
    \node[left color=#1,right color=#2] {#3};
  \end{tikzpicture}%
}

\AddToShipoutPicture*{%
  \AtPageLowerLeft{%
    \rotatebox{90}{
      \gradientbox{blue!20}{white}{%
        \begin{minipage}{\paperheight}%
          \hspace*{ \stretch{1} }\textcopyright~2013 \makeatletter\@author\makeatother.\hspace*{ \stretch{1} }
        \end{minipage}%
      }
    }%
  }%
}
|
The starred-version of the \AddToShipoutPicture command applies to the current page only.
Multi-column pages
Using the twocolumn optional class argument
Using a standard Latex document class, like article, you can simply pass the optional argument twocolumn to the document class: \documentclass[twocolumn]{article} which will give the desired effect.
While this approach is useful, it has limitations. The multicol package provides the following advantages:
- Can support up to ten columns.
- Implements a multicols environment, therefore, it is possible to mix the number of columns within a document.
- Additionally, the environment can be nested inside other environments, such as figure.
- multicol outputs balanced columns, whereby the columns on the final page will be of roughly equal length.
- Vertical rules between columns can be customised.
- Column environments can be easily customised locally or globally.
Using multicol package
The multicol package overcomes some of the shortcomings of twocolumn and provides the multicol environment. To create a typical two-column layout:
\begin{multicols}{2}
  lots of text
\end{multicols}
|
Floats are not fully supported by this environment. It can only cope if you use the starred forms of the float commands (e.g., \begin{figure*} ) which makes the float span all columns. This is not hugely problematic, since floats of the same width as a column may be too small, and you would probably want to span them anyway. See this section for a more detailed discussion.
The multicol package has two important parameters which can be set using \setlength:
-
\columnseprule, sets the width of the vertical rule between columns and defaults to 0pt -
\columnsep, sets the horizontal space between columns and the defaults to 10pt, which is quite narrow
To force a break in a column, the command \columnbreak is used.
Manual page formatting
There may be instances, especially in very long documents, such as books, that LaTeX will not get all page breaks looking as good as it could. It may, therefore, be necessary to manually tweak the page formatting. Of course, you should only do this at the very final stage of producing your document, once all the content is complete. LaTeX offers the following:
\newpage |
Ends the current page and starts a new one. |
\pagebreak[number] |
Breaks the current page at the point of the command. The optional number argument sets the priority in a scale from 0 to 4. |
\nopagebreak[number] |
Stops the page being broken at the point of the command. The optional number argument sets the priority in a scale from 0 to 4. |
\clearpage |
Ends the current page and causes any floats encountered in the input, but yet to appear, to be printed. |
Widows and orphans
In professional books, it's not desirable to have single lines at the beginning or end of a page. In typesetting such situations are called 'widows' and 'orphans'. Normally it is possible that widows and orphans appear in LaTeX documents. You can try to deal with them using manual page formatting, but there's also an automatic solution.
LaTeX has a parameter for 'penalty' for widows and orphans ('club lines' in LaTeX terminology). With the greater penalty LaTeX will try more to avoid widows and orphans. You can try to increase these penalties by putting following commands in your document preamble:
\widowpenalty=300
\clubpenalty=300
|
If this does not help, you can try increasing these values even more, to a maximum of 10000. However, it is not recommended to set this value too high, as setting it to 10000 forbids LaTeX from doing this altogether, which might result in strange behavior.
It also helps to have rubber band values for the space between paragraphs:
\setlength{\parskip}{3ex plus 2ex minus 2ex}
|
Alternatively, you can use the needspace package to reserve some lines and thus to prevent page breaking for those lines.
\needspace{5\baselineskip}
Some
text
on
5
lines.
|
Troubleshooting
A very useful troubleshooting and designing technique is to turn on the showframe option in the geometry package (which has the same effect as the showframe package described above). It draws bounding boxes around the major page elements, which can be helpful because the boundaries of various regions are usually invisible, and complicated by padding whitespace.
\usepackage[showframe]{geometry}
|
Notes and References
This page uses material from Andy Roberts' Getting to grips with LaTeX with permission from the author.