LaTeX/Linguistics
< LaTeXThere are a number of LaTeX packages available for writing linguistics papers. Various packages have been created for enumerated examples, syntactic trees, OT tableaux, feature matrices, IPA fonts, and many other applications. Some packages such as the tipa package are effectively standard within the field, while others will vary by author preference.
Some recommended packages:[1]
- Glosses: gb4e or Covington;
- IPA symbols: tipa;
- OT Tableaux: OTtablx;
- Syntactic trees: qtree + tree-dvips (for drawing arrows);
- Alternatively, xyling is very powerful but not as user friendly as qtree;
- The xy package itself has a steep learning curve, but allows a lot of control; for simplest trees use the xymatrix feature and arrows;
- tikz-qtree has the same syntax as qtree, but uses PGF/TikZ, which allows more options for drawing arrows, etc.
- Dependency trees and bubble parses:
- The TikZ-dependency package provides a high-level, convenient interface to draw dependency graphs. It is based on PGF/TikZ but does not require prior knowledge of TikZ in order to be used productively.
Enumerated examples
There are several commonly used packages for creating the kinds of numbered examples that are used in linguistics publications.
gb4e
The gb4e package[2] is called with:
\usepackage{gb4e}
IMPORTANT: If you use gb4e package, let it be the last \usepackage call in the document's preamble. Otherwise you may get exceeded parameter stack size error.
Examples for this package are placed within the exe environment, and each example is introduced with the \ex command.
\begin{exe}
	\ex This is an example.
\end{exe}
produces:
![]()
Multiple examples can be included within the environment, and each will have its own number.
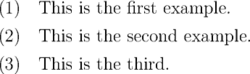
\begin{exe}
	\ex This is the first example.
	\ex This is the second example.
	\ex This is the third.
\end{exe}
produces:
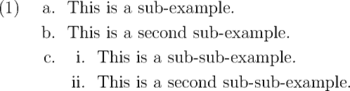
To create nested lists of examples, the xlist enviroment is used.
\begin{exe}
    \ex \begin{xlist}
        \ex This is a sub-example.
        \ex This is a second sub-example.
        \ex \begin{xlist}
            \ex This is a sub-sub-example.
            \ex This is a second sub-sub-example.
        \end{xlist}
    \end{xlist}
\end{exe}
produces:
For notating acceptability judgments, the \ex command can take an optional argument. When including a judgment marker, the corresponding sentence must be surrounded by braces.
\begin{exe}
	\ex This sentence is grammatical English.
	\ex[*] {This sentence English in ungrammatical is.}
\end{exe}
produces:
![]()
Referencing examples in text works as it does in normal LaTeX documents. See the labeling and cross-referencing section for more details.
\begin{exe}
	\ex\label{ex1} Godzilla destroyed the city.
	\ex\label{ex2} Godzilla roared.
\end{exe}
Sentence (\ref{ex1}) contains two arguments, but (\ref{ex2}) contains only one.
Further details can be found in the full documentation available here.
lingmacros
The lingmacros package[3] created by Emma Pease is an alternate method for example numbering. This package uses two main commands, \enumsentence and \eenumsentence. The former is used for singleton examples, while the latter command is used for nested examples.
\enumsentence{This is an example.}
![]()
\enumsentence{This is the first example.}
\enumsentence{This is the second example.}
\enumsentence{This is the third.}
Multiply nested examples make use of the normal LaTeX list environments.
\eenumsentence{\item This is a sub-example.
		\item This is a second sub-example.
		\item \begin{enumerate}
			\item This is sub-sub-example.
			\item This is a second sub-sub-example.
			\end{enumerate}
                 }
produces:
Full documentation can be found here.
Syntactic trees
Often, linguists will have to illustrate the syntactic structure of a sentence. One device for doing this is through syntactic trees. Unfortunately, trees look very different in different grammar formalisms, and different LaTeX packages are suited for different formalisms.
Constituent trees
While there are several packages for drawing syntactic trees available for LaTeX, this article focuses on the qtree and xyling packages.
qtree
Drawing trees with qtree is relatively straightforward. First, the qtree package has to be included in the document's preamble:
\usepackage{qtree}
A new tree is started using the \Tree command, each (sub-)tree is indicated by brackets [ ]. The root of a (sub-)tree is always preceded by a ., leaf nodes are simply expressed by their labels.
For example, the following code
\Tree [.S [.NP LaTeX ] [.VP [.V is ] [.NP fun ] ] ]
produces this syntactic tree as output:
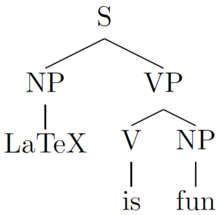
Note that the spaces before the closing brackets are mandatory.
By default, qtree centers syntactic trees on the page. This behaviour can be turned off by either specifying the behaviour when loading the package
\usepackage[nocenter]{qtree} % do not center trees
or via the command
\qtreecenterfalse % do not center trees from here on
anywhere in the document. The effect of the latter can be undone by using the command
\qtreecentertrue % center trees from here on
IMPORTANT: If you use gb4e package, let it be the last \usepackage call in the document's preamble. Otherwise you may get exceeded parameter stack size error.
tikz-qtree
Using the same syntax as qtree, tikz-qtree is another easy-to-use alternative for drawing syntactic trees.
For simple trees, tikz-qtree is completely interchangable with qtree. However, some of qtree's advanced features are implemented in a different way, or not at all. On the other hand, tikz-qtree provides other features such as controlling the direction of the tree's growth (top to bottom, left to right etc.) or different styles for edges.
To use the tikz-qtree package for drawing trees, put the following into the document's preamble:
\usepackage{tikz}
\usepackage{tikz-qtree}
The syntax of tikz-qtree and result when drawing a simple tree is the same as for qtree.
\Tree [.S [.NP LaTeX ] [.VP [.V is ] [.NP fun ] ] ]
Note that, other than for qtree, trees are not centered by default. To center them, put them into a centered environment:
\begin{center}
\Tree [.S [.NP LaTeX ] [.VP [.V is ] [.NP fun ] ] ]
\end{center}
For setting the style of trees, tikz-qtree provides the \tikzset command. For example, to make a tree grow from left to right instead of from top to bottom, use the following code:
\tikzset{grow'=right} % make trees grow from left to right
\tikzset{every tree node/.style={anchor=base west}} % allign nodes of the tree to the left (west)
\Tree [.S [.NP LaTeX ] [.VP [.V is ] [.NP fun ] ] ]
The above code changes the default orientation for all trees that are defined after \tikzset commands. To only change the direction of a single tree, it has to be put into a \tikzpicture environment:
\begin{tikzpicture} % all changes only affect trees within this environment
\tikzset{grow'=right} % make trees grow from left to right
\tikzset{every tree node/.style={anchor=base west}} % allign nodes of the tree to the left (west)
\Tree [.S [.NP LaTeX ] [.VP [.V is ] [.NP fun ] ] ]
\end{tikzpicture}
Dependency Trees
Dependency trees can take multiple visual forms. Commonly, they quite resemble phrase structure trees. Alternatively, they can be captured by brackets drawn above running text.
Two-dimensional Dependency Trees
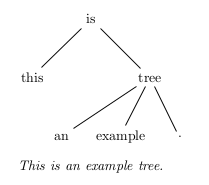
These can be either achieved using the fairly universal drawing package TikZ, like so:
% In the preamble:
\usepackage{tikz}

% In the document:
\begin{tikzpicture}
	\node (is-root) {is}
		[sibling distance=3cm]
		child { node {this} }
		child {
			node {tree}
				[sibling distance=1.5cm]
				child { node {an} }
				child { node {example} }
				child { node {.} }
				child[missing]
		};
	\path (is-root) +(0,-2.5\tikzleveldistance)
		node {\textit{This is an example tree.}};
\end{tikzpicture}
which gives you the following drawing:
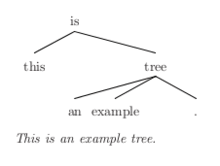
TikZ has the advantage that it allows for generating PDF directly from the LaTeX source, without need for any detour of compiling to DVI using latex, and then converting to PDF probably via PS using tools such as dvips and ps2pdf. Latter is the case of another package based on the package xy, namely xyling.
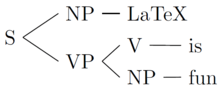
The code for a similar tree using xyling might look like:
% In the preamble:
\usepackage{xyling}

% In the document:
\Tree{	& \K{is}\B{dl}\B{drr} \\
        \K{this} &&& \K{tree}\B{dll}\B{dl}\B{dr} \\
        & \K{an} & \K{example} && \K{.} }

\medskip
\textit{This is an example tree.}
which gives you a drawing like this:
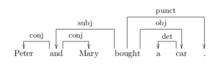
Dependency Trees as Brackets above Text
One way to typeset dependency brackets above running text is using the package xytree. It gives you fairly good control of how the brackets are typeset but requires compiling the LaTeX code to DVI (and perhaps converting to PDF using the tools dvips and ps2pdf later).
An example code:
% In the preamble:
\usepackage{xytree}

% In the document:
\xytext{
  \xybarnode{Peter} &~~~&
  \xybarnode{and}
    \xybarconnect(UL,U){-2}"_{\small conj}"
    \xybarconnect(UR,U){2}"^{\small conj}"
    &~~~&
  \xybarnode{Mary} &~~~&
  \xybarnode{bought}
    \xybarconnect[8](UL,U){-4}"_{\small subj}"
    \xybarconnect[13]{6}"^{\small punct}"
    \xybarconnect[8](UR,U){4}"^{\small obj}"
    &~~~&
  \xybarnode{a} &~~~&
  \xybarnode{car}
    \xybarconnect(UL,U){-2}"_{\small det}"
    &~~~&
  \xybarnode{.}
}
results in:
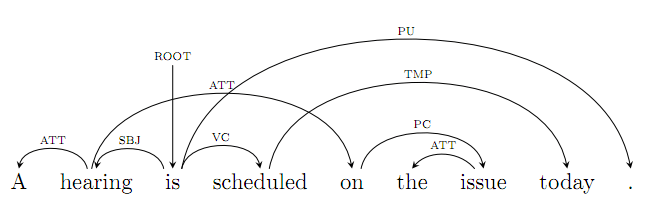
Dependency Trees using TikZ-dependency
The package provides high level commands to design and style dependency graphs. To draw a graph, you only need to create a dependency environment, write the text of the sentence within the deptext environment and use depedge commands to draw the edges. Global and local optional parameters can be used to style and fine tune the looks of the graph, as shown in the following example:
% In the preamble:
\usepackage{tikz-dependency}

% In the document:
\begin{dependency}[theme = simple]
   \begin{deptext}[column sep=1em]
      A \& hearing \& is \& scheduled \& on \& the \& issue \& today \& . \\
   \end{deptext}
   \deproot{3}{ROOT}
   \depedge{2}{1}{ATT}
   \depedge[edge start x offset=-6pt]{2}{5}{ATT}
   \depedge{3}{2}{SBJ}
   \depedge{3}{9}{PU}
   \depedge{3}{4}{VC}
   \depedge{4}{8}{TMP}
   \depedge{5}{7}{PC}
   \depedge[arc angle=50]{7}{6}{ATT}
\end{dependency}
This code snippet would produce the following result:
Glosses
Below, it is explained how to make glossed examples with different packages.
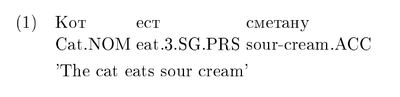
With gb4e
To create a glossed example, use the normal exe environment. But after the \ex tag, introduce the example and its gloss using \gll and the translation after it with \trans tag.
\begin{exe}
\ex
\gll Кот ест сметану\\
cat.NOM eat.3.SG.PRS sour-cream.ACC\\
\trans `The cat eats sour cream'
\end{exe}
The code will produce the following output:
Vertically aligned glosses are separated by spaces, so if it's necessary to include a space in part the gloss, simply enclose the connected parts inside braces.
\begin{exe}
\ex
\gll Pekka pel\"astyi karhusta.\\
     Pekka {became afraid} bear.ELA\\
\trans `Pekka became afraid because of the/a bear.'
\end{exe}
With lingmacros
The lingmacros package uses the \shortex command to introduce glossed examples inside the \enumsentence and \eenumsentence commands. This command takes four arguments and builds off the normal tabular environment. Its first argument specifies the number of columns in the gloss. The second and third arguments give the text and its gloss respectively, and items within each column are divided by the usual & tabular separator. The fourth argument is the translation.
\enumsentence{\shortex{3}
		{Pekka & pel\"astyi & karhu-sta.}
		{Pekka & became afraid & bear.ELA}
		{`Pekka became afraid because of the/a bear.'}
		}
IPA characters
The tipa package is the standard LaTeX package for International Phonetic Alphabet symbols.
\usepackage{tipa}
|
There are two methods for getting IPA symbols into a document. The first way is to use the IPA environment.
\begin{IPA}
text in IPA format here
\end{IPA}
|
This method is useful for long stretches of text that need to be in IPA. Alternatively, there is the \textipa command that will format the text in its argument into IPA. This command is similar to other font typesetting commands.
\textipa{text in IPA format here}
|
Basic symbols
The IPA format works by translating ASCII characters into corresponding IPA symbols. Lower case letters are rendered as usual,
\textipa{abcdefghijklmnopqrstuvwxyz}
|
|
however capital letters are rendered differently.
\textipa{ABCDEFGHIJKLMNOPQRSTUVWXYZ}
|
|
Punctuation marks that are normally used in LaTeX are also rendered faithfully in the IPA environment.
\textipa{! * + = ? . , / [ ] ( ) ` ' | ||}
|
|
Numerals and @ also have variants in the IPA environment.
\textipa{1234567890 @}
|
|
In addition, there are a number of special macros for representing symbols that don't have other associations, some of which are listed here. For a complete list see the official TIPA Manual[4].
The \; macro preceding a capital letter produces a small caps version of the letter.
\textipa{\;A \;B \;E \;G \;H \;I \;L \;R \;Y}
|
|
The \: macro produces retroflex symbols.
\textipa{\:d \:l \:n \:r \:s \:t \:z}
|
|
The \! macro produces implosive symbols and the bilabial click.
\textipa{\!b \!d \!g \!j \!G \!o}
|
|
XeLaTeX
Another way of inputting IPA symbols in a document is to use XeTeX as the compiler and insert the symbols directly, using a character map or an IPA keyboard.[5]
You can type [fəˈnɛtɪk] symbols in a straightforward manner.
|
Phonological rules
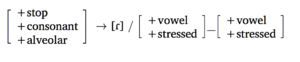
Typesetting phonological rules can be done with the help of the phonrule package.[6]
Following is an example of what you can achieve with the package:
\phonb{\phonfeat{+stop \\ +consonant \\ +alveolar} }{[ɾ]}{\phonfeat{+vowel \\ +stressed} }{\phonfeat{+vowel \\ +stressed} }
|
|
References
- ↑ LaTeX for Linguists presentation
- ↑ The gb4e package on CTAN
- ↑ The lingmacros package on CTAN
- ↑ TIPA manual
- ↑ For more information on IPA keyboards, see SIL .
- ↑ The package on CTAN.