iLife/iMovie HD/The iMovie HD Interface
< ILife < iMovie HDThe best way to start learning a new application is to take a quick look at its interface. This sub-chapter tells you what's what in the iMovie window. This is only an overview of the interface, functions of the interface will be covered in the appropriate chapter.
Opening iMovie
To open iMovie, click the iMovie icon in the Dock, or Applications folder. You will then be presented with the iMovie welcome window. If you'd like to see the iMovie interface, create a new project (settings explained in next chapter).
The iMovie Interface
The iMovie Window
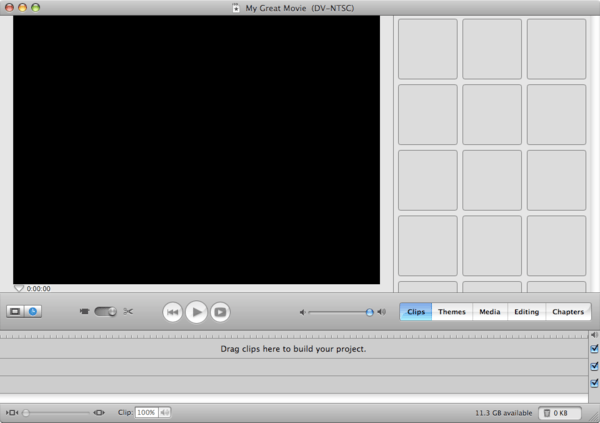
This is the iMovie HD 6 interface. The best way to get used to it is to play around with it, but here's a summary of what everything does:
- At the top is the name of your project, and the format it is being created in.
- The black area is where you view what you're working on.
- The area to the right of the black area changes to show different panels, but it is by default in Clip view.
- The buttons in the middle-left, of a clip and a clock, are for switching between timeline and clip view. Timeline view arranges the clips so that the visual length of a clip represents it's actual length. Timeline view is good for most editing. Clip view shows all clips as the same size visually, and is best for organizing.
- To the right of the timeline/clip view selector is the import/edit switch. When the switch is turned to the video camera, you can import video from your video camera. When it it turned towards the scissors, you can edit the clips.
- To the right of the edit/import switch are the play controls. The first play control (|<<), goes to the beginning of the movie.
- The second play control (>), plays the movie.
- The last play control (> with box), plays the movie in full screen.
- The volume control adjusts the playback volume of your entire project.
- The Clips/Themes/Media/Editing/Chapters buttons switch between said views. These views are explained later.
- The check marked boxes on the far right side of Timeline view toggle sound for that track of media.
- The slider on the bottom left adjusts the appearance of clip length.
- The clip volume level section in the bottom left adjusts the sound level of the selected clip.
- On the bottom right corner, the trash button and status, and available space on the current hard drive are displayed.
| |
NOTE: Many common functions in iMovie have a shortcut. Using shortcuts speeds up work, and makes it easier, too. To view iMovie shortcuts, go to Help > Keyboard Shortcuts |
The iMovie Menu bar
The iMovie menu bar works like any other OS X application's menu bar. Help, shortcuts, tutorials, and support are under the Help menu. The Share menu shows you options for exporting. The Edit and Advanced menus have options that are only found in iMovie, such as Edit > Split Video Clip at Playhead, so you should explore the menus. The Markers menu has options for creating bookmarks. Other menus are similar in function to other applications.
Preferences
Annoyed by that click every time you slide the playhead over a cut? Want to change the default frame rate? Check out iMovie's Preferences in iMovie > Preferences