Game Creation with XNA/3D Development/Camera and Lighting
< Game Creation with XNA < 3D DevelopmentCamera
Introduction
A camera is a very important component in a 3D world, because it represents the viewpoint of the user. At the beginning, two elementary things, the position and the looking direction of the camera must be defined, before XNA can render the content into your 3D world.
Basics
Coordinate Systems
You need to keep in mind that different graphic systems use different axis systems. XNA uses the right-handed system. X for right, Y for up and Z out of the screen. The conversion of one into another system is done by inverting any, but only one axis.
Degrees and Radians
| Degrees | PI |
|---|---|
| 45 degrees | 1/4 PI |
| 90 degrees | 1/2 PI |
| 180 degrees | PI |
| 270 degrees | 3/2 PI |
| 360 degrees | 2 PI |
The math helper functions MathHelper.ToDegree(radians) and MathHelper.ToRadians(degrees) can help you by the conversion.
Matrices and Spaces
Before any 3D geometry can be rendered, there must be 3 matrices set.
- World Matrix
 2D Transformation from Object/Model Space into the World Space
- Your model from Maya, 3ds Max, etc. consists of a bunch of vertex positions which are in relationship with the center of this object. To use this data, you need to convert it from the so called Object/Model Space into an object in World Space using the World Matrix.
Matrix worldTranslation=Matrix.CreateTranslation(new Vector3(x,y,z));
- With this function you create a matrix that transforms the position of the object into World Space by using a vector. After the transformation you can scale, rotate and translate your object. But remember that matrix multiplication is not commutative, you need to do this always in the S-R-T order in XNA.
- View Matrix
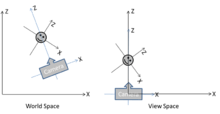 2D Transformation from World Space to View Space
- To watch your world from a certain point, the world must be transformed from its space into the View Space by using the View Matrix.
- Projection Matrix
- The viewed 3D Data which is actually seen, called view frustum, must be converted onto your 2D screen. The View Space must be transformed into the Screen Space by using the Projection Matrix.
Camera Set Up
If you want to visualize your 3D content for the user on a 2D Screen, you need to get a camera to work. You do this by using the above mentioned View and Projection Matrix which transforms the data for your needs.
The View Matrix
It saves the position and the looking direction of the camera – for this you have to set the Position, Target and Up vectors of your camera. You do this by using the Matrix.CreateLookAt method:
viewMatrix = Matrix.CreateLookAt(camPosition, camTarget, camUpVector);
The three arguments are vectors.
- The position vector is very simple to explain: It displays the position where your camera is located in your 3D world.
- The target vector is very simple to explain too: It displays the point where your camera is looking at in your 3D world.
- The up vector is important. Imagine that you hold a cell phone in your hands which is your camera. Automatically you got a position vector for it. The next step is to focus the target you want to photograph. Now you got concrete values for the position and the target vector, but there are still many ways to hold your cell phone by rotating it to its center. The position and target vectors stay the same but the picture you can take varies because of the rotation. This is the point why you need to declare which way is up. Only if these three vectors are set, you got an exclusive camera.
The whole code for this can look like this:
Matrix viewMatrix;
Vector3 camPosition = new Vector3(x,y,z);
Vector3 camTarget = new Vector3(x,y,z);
Vector3 camUpVector = new Vector3(x,y,z);

viewMatrix = Matrix.CreateLookAt(camPostion, camTarget, camUpVector);
The Projection Matrix
It saves the view frustum, everything from the 3D World that is seen through your camera and should be rendered on your 2D screen.
Take your camera as a point. Now create two rectangles/layers, a near one which is small and a far one which is bigger. Draw a line that starts at the camera point and connects each upper right corner of the rectangles/layers, after that do the same for the other three corners of both rectangles/layers. If you do this you get a pyramid which cone end is the camera point and the bottom is the bigger rectangle/layer. Everything between this is called Viewing volume. The space between the near and the far plane is called Frustum. All details in this View Frustum are going to be rendered on your 2D screen.
The method to create a Projection Matrix is called Matrix.CreatePerspectiveFieldOfView and should look like this:
projectionMatrix=Matrix.CreatePerspectiveFieldOfView(fieldOfView, aspectRatio, nearPlaneDistance, farPlaneDistance);
- fieldOfView specifies the field of view in y-direction (radian measure)
- aspectRatio is the relationship between View Space Width divided by View Space Height. The aspect ratio of the 2D screen which consist of the rendered 3D world.
- nearPlaneDistance is the distance between camera and near plane
- farPlaneDistance is the distance between camera and far plane
The near and far Planes are called clipping planes as well. Keep in mind that big objects in the front could block nearly the most of the 3D world behind, so with this plane they are clipped away. The same applies for very small objects in the far, maybe they are almost unseen, but they need to be rendered. If you want to save resources, clip them.
Notes
- The World Matrix calculates every data and their position you would like to render.
- The View Matrix will be calculated every time if there are changes in the position or direction depending on user input
- The Projection Matrix is only calculated when the aspect ratio of the window changes. So this is normally at the start of your game.
Lighting
Introduction
It seems to be pretty easy to light your scene. Attach your 3D objects in your world, use your set of matrices which are mentioned above, bring your lights into by defining their positions, and everything is done. But it isn’t that facile and without a correct set lighting your 3D scene won’t look very realistic.
Normals
Every 3D objects consists of triangles and these triangles must be lit correctly. To do this you need to specify a normal vector to each of it. Remember to set this accurate; a normal vector shout point out of an object, if it points into it, it won’t be lit right.
With the information of the light direction and the normal direction the graphic card can compute how much light needs to be “drawn” onto the triangles surface. If the light direction and the normal direction is perpendicular there is nothing to lit, the projection is 0. If the two vectors are parallel, the projection is max; the surface will be lit with full intensity.
Now you need an instance of the VertexPositionColorTexture class which should look like this:
dataVertices[0] = new VertexPositionNormalTexture(new Vector3(x,y,z), new Vector3(x,y,z), new Vector2(x,y));
- one Vector3 for the xyz position
- one Vector3 for the xyz surface normal
- one Vector2 for the uv texture coordinates
BasicEffect
If you want to use basic light effects, you can use the BasicEffect class from XNA. With this you can set up quickly your 3D world with lightning. The code for this can look like this:
BasicEffect basicEffect;
basicEffect = new BasicEffect(GraphicsDevice, null);
Set the variable and instantiate it
basicEffect.World = worldMatrix;
basicEffect.View = viewMatrix;
basicEffect.Projection = projectionMatrix;
basicEffect.TextureEnabled = true;
Set the World, View and Projection matrices which are mentioned above. If you use textures you need to enable them.
basicEffect.LightingEnabled = true;
basicEffect.AmbientLightColor = new Vector3(0.1f, 0.1f, 0.1f); ;
Enable the lightning settings and define a Ambient color so your objects are always lit with light.
basicEffect.DirectionalLight0.Direction = new Vector3(x,y,z);
basicEffect.DirectionalLight0.DiffuseColor = new Vector3(0, 0, 0.5f);
basicEffect.DirectionalLight0.Enabled = true;
…
You can define different light sources (up to three), set a direction and a color and enable them
And finally ...
effect.Begin();
foreach (EffectPass pass in basicEffect.CurrentTechnique.Passes)
{
   pass.Begin();
   …
   pass.End();
}
effect.End();
Author
Manissel681