GIMP/Toolbox
< GIMP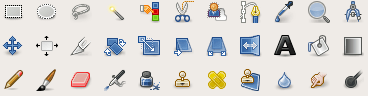
GIMP provides a comprehensive toolbox in order to quickly perform basic tasks. Toolbox is fully customizable, this means that you can add/remove any tool you want. Just go to "Windows > Dockable Dialogues > Tools", and select any tool you want.
By default not all tools are shown - GEGL operation tool and colour tools are omitted. All tools can also be accessed by opening the "Tools" menu. To switch the window to toolbox, you can use Ctrl + B. Note that shortcuts written here are the default values - you can change them any time you want in "Edit > Keyboard Shortcuts"
Tools
These tools are available by default in toolbox.
| Icon | Name | Shortcut | Description |
|---|---|---|---|
| Selection tools | |||
| Rectangle | R | Selects square or rectangular regions. | |
| Ellipse | E | Selects circular or elliptical regions. | |
| Free (Lasso) | F | Draw free-form selections. | |
| Fuzzy (Magic Wand) | U | Select continuous regions of colour. | |
| By Colour | Shift + O | Select all instances of a colour in an image. | |
| Scissors | I | Create paths to select shapes. | |
| Foreground | (none) | Select a region containing foreground objects. | |
| Brush tools | |||
| Bucket Fill | Shift + B | Fills an area with a colour or pattern. | |
| Blend (Gradient) | L | Fills an area with a gradient. | |
| Pencil | N | Paints hard-edged lines; that is, the pixels are not anti-aliased. | |
| Paintbrush | P | Paints soft- or fuzzy-edged lines; that is, the pixels are anti-aliased and/or feathered. | |
| Eraser | Shift + E | Erases pixels from a layer. | |
| Airbrush | A | Paint tool with variable pressure. | |
| Ink | K | Paints anti-aliased lines with a simulation of a nib. | |
| Clone | C | Copies pixels from one part of an image to another. | |
| Heal | H | Heals image irregularities. | |
| Perspective Clone | (none) | Clone from an image source after applying perspective transformation. | |
| Convolve (Blur/Sharpen) | Shift + U | Blurs or sharpens an image. | |
| Smudge | S | Spreads pixels in the direction of a "push". | |
| Dodge/Burn | Shift + D | Lightens or darkens an image's shadows, mid tones, or highlights. | |
| Transform tools | |||
| Move | M | Moves layers and selections. | |
| Align | Q | Align or arrange layers and/or other objects. | |
| Crop | Shift + C | Crops or clips the image. | |
| Rotate | Shift + R | Rotates the active layer, selection or path. | |
| Scale | Shift + T | Scales the active layer, selection or path. | |
| Shear | Shift + S | Shifts part of the image to some direction. | |
| Perspective | Shift + P | Changes the perspective of the active layer, selection or path. | |
| Flip | Shift + F | Flips layers and selections. | |
| Other tools | |||
| Path | B | Allows selecting and modifying paths. | |
| Colour Picker | O | Selects the colour of any image opened on your screen. | |
| Magnify (Zoom) | Z | Alters the zoom level of the image. | |
| Measure | Shift + M | Shows distances and angles. | |
| Text | T | Places text into your image. | |
There are also some other tools, hidden by default. These tools need to be accessed from the "Tools" menu, or by showing them in toolbox (Windows > Dockable Dialogues > Tools).
| Icon | Name | Shortcut | Description |
|---|---|---|---|
| Colour tools | |||
| Colour Balance | (none) | Modifies the colour balance of current selection or layer. | |
| Hue-Saturation | (none) | Adjusts hue, saturation and lightness. | |
| Colourize | (none) | Renders current selection or layer into a grey scale image seen through coloured glass. | |
| Brightness-Contrast | (none) | Adjusts brightness and contrast. | |
| Threshold | (none) | Transforms the current layer or selection into a black and white image. | |
| Levels | (none) | Changes the intensity range of the active layer or selection in every channel. | |
| Curves | (none) | Changes the colour, brightness, contrast or transparency of the active layer or path. | |
| Posterize | (none) | Reduces the number of colours. | |
| Desaturate | (none) | Converts all colour to the corresponding shades of grey. | |
| Other tools | |||
| GEGL operation | (none) | Executes a GEGL operation. | |
Tool options
By default, activating any tool will have the effect of showing its options under the toolbox. Each tool has its own set of settings and any changes to them are kept through the current session. There are also four buttons under any options.
-
 Save options to... - save options of the current tool
 -
 Restore options from... - restore options from saved file
 -
 Delete saved options... - delete saved options
 -
 Reset to default values - reset the settings to default values.
-
You can hide them by clicking on the arrow next to the tool name and deselecting Show Button Bar. You can also access these from the same menu under Tool Options Menu.
Colour, Indicator and Active Image area
Below the toolbox can be placed these three areas. This is set in "Edit > Preferences > Toolbox" and any of the three can be placed there.
Colour area
Shows current foreground and background colour. Clicking on either will bring up the colour editor dialogue.
Clicking on the symbol in the lower left corner resets the colour to their defaults. The D key has the same effect.
Clicking on the symbol in the upper right corner swaps the foreground and background colours. The X key has the same effect.
Indicator area
Shows currently selected brush, pattern or gradient. Clicking on any of these allows you to change it.
Active Image area
Displays a thumbnail of the active image. Clicking on it will bring the Images dialogue up, allowing you the select an image.