Blender 3D: Noob to Pro/Understanding the Camera
Real-World Cameras
Before discussing the camera in Blender, it helps to understand something about how cameras work in real life. We have become accustomed to so many of their quirks and limitations when looking at real photographs, that 3D software like Blender often expends a lot of effort to mimic those quirks.
When taking a photo with a real camera, a number of important factors come into play:
- the focus — because of the way lenses work, only objects within a certain distance range from the camera (the depth of field) will appear sharp in the image. Objects outside this range will begin to appear noticeably blurred, the blur getting worse the farther they are outside the focus range. The narrower the range of in-focus distances (the shallower the depth of field), the more quickly this blurring happens with objects outside it.
- the exposure time — how long the shutter remains open. The longer this is, the more light is captured, but also the more likely the image is to pick up motion blur from moving objects.
- the aperture — how wide the iris opening is. This is expressed, not as an actual distance measurement, but as a fraction of the focal length of the lens (loosely, distance between the lens and the image-capturing surface when the image is properly focused), written as f: thus, say, f/2.8 (“f over 2.8”, not “f 2.8”) is a larger number, hence representing a wider aperture, than f/8. A wider aperture increases the amount of light being captured without contributing to motion blur, but it reduces the depth of field. The extreme case of a pinhole camera has a very tiny aperture with infinite depth of field (no need to focus at all), but captures very little light, so it needs a very well-lit scene, a long exposure, or a very sensitive image-capturing surface.
- the sensitivity of the image-capturing surface to light. In the days of film cameras, we talked about film sensitivity (“fast” film being more sensitive to light than “slow” film). Nowadays, with digital cameras we talk about the gain of the light-amplification system. High-sensitivity film was more likely to produce a grainy image. In a somewhat similar manner, high light-amplification in a digital camera is more likely to produce a noisy-looking image under low-light conditions.
- the field of view — how much of the scene the camera can see at once. A wide-angle lens gives a wider field of view, but you have to be closer to objects to be able to see them, and there is greater perspective distortion. At the other extreme, a telephoto lens gives a very narrow field of view, but can take pictures of things from much further away. A wide-angle lens also has a shorter focal length than a narrow-angle one (remember that aperture is expressed as a ratio of the focal length f), therefore the telephoto lens is going to capture less light than the wide-angle one with the same aperture width. You may also have heard of the zoom lens, i.e. one with a variable focal length. It can be adjusted from a wide-angle mode to a telephoto mode.
As you can see, many of these different factors interact with each other. The brightness of the image can be affected by the exposure time, the aperture, the gain sensitivity and the focal length of the lens. Each of these have side-effects on the image in other ways.
Blender and other computer graphics software are, in principle, free of the problems of focus, exposure time, aperture, sensitivity and focal length. Nevertheless, it is common to want to introduce deliberate motion blur into an image, to give the impression of movement. Sometimes it is useful to introduce a deliberately shallow depth of field, blurring objects in the background in order to draw emphasis to the important part of the image, i.e that which is in focus.
Exposure (the total amount of light captured in the image) is also less of a problem in computer graphics than in real-world photography, because in computer graphics you always have total control over the amount and placement of lighting in the scene. Nevertheless, if you’re not careful, you can produce overexposed (bright parts losing detail by saturating to a solid, featureless white) or underexposed images (dark parts losing detail by becoming solid black).
The field of view issue arises from basic principles of geometry, and Blender’s camera is just as much subject to that as real cameras.
The Camera In Blender
Here we are going to concentrate on the important issue of field of view.
You can change the field of view in two ways - move the camera closer to or farther from the scene (called dollying in film/TV production parlance), or change the angle of the lens (zooming). You do the latter in the Object Data ![]() tab in the Properties window (the Camera has to be selected by RMB in Object Mode, or the required tab will not be visible).
tab in the Properties window (the Camera has to be selected by RMB in Object Mode, or the required tab will not be visible).
Perspective is the phenomenon where objects that are farther away from the viewer look smaller than those nearby. More than that, different parts of the same object may be at different distances from the eye, leading to a change in the apparent shape of the object called perspective distortion. The mathematical theory of perspective was worked out by Alhazen in the 11th century, and famously adopted by the Italian Renaissance painters four hundred years later.
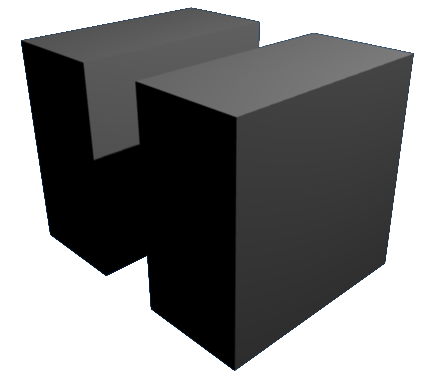
Here are two renders of the same scene with two different cameras, to illustrate the difference.
This one moves the camera closer but gives it a wider field of view:
This one moves the camera back, while narrowing its field of view, to try to give the scene the same overall size.
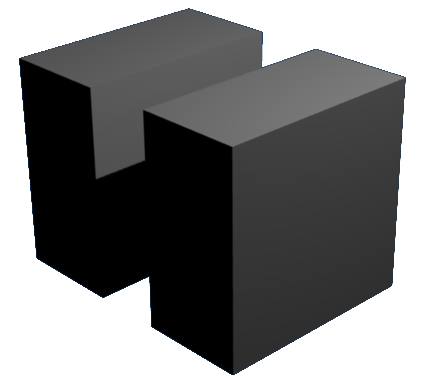
The latter is like using a “telephoto” lens with a real camera. Notice how the wider field of view gives you a greater perspective effect. The boxes are all cuboids, with parallel pairs of opposite faces joined by parallel edges, yet there is a noticeable angle between notionally-parallel edges in both images, which is more pronounced in the upper image. That is what perspective distortion is all about.
Specifying the Field of View
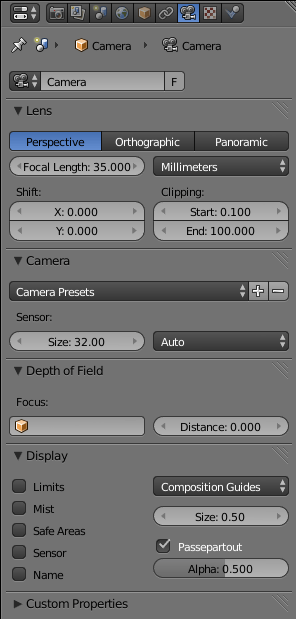
When you select a camera object, its settings become visible in the Camera Context ![]() in the Properties window, which should initially look something like at right.
in the Properties window, which should initially look something like at right.
Photographers are accustomed to working in terms of the focal length of the lens - longer means narrower field of view, shorter means wider field of view. But the field of view also depends on the size of the sensor (image capture area). Modern digital cameras typically have a smaller sensor size than the exposed film area in older 35mm film cameras. Thus, the focal length measurements have to be adjusted accordingly, in order to give the same field of view.
Blender allows you to work this way, by specifying the focal length in the “Lens” panel, and the sensor size in the “Camera” panel. It even offers a “Camera Presets” menu, which sets the sensor size for any of a range of well-known cameras.
Also, you might be doing compositing of your computer-generated imagery on top of an actual photograph. In which case, to make the results look realistic, you need to closely match the characteristics of the camera and lens that were used to take the photo. If you know the lens focal length and camera sensor size, it makes sense to be able to plug those values in directly.
But if you’re not doing photo compositing, but generating completely synthetic imagery, you might consider this a somewhat roundabout way of working. Why not specify the field of view directly as an angle?
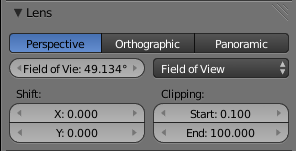
Blender allows for this as well. From the popup menu in the Lens panel that says “Millimeters”, select “Field of View” instead, and the Focal Length field will turn into a Field of View field, showing the angle in degrees directly. This is much easier to relate to the geometry of the scene!
| |
Relationship between the two: If the width of the sensor is d, the focal length of the lens is f, and the angle of view is θ, then they are related by . |

See Also
- Improving Blender Renders with Photography Techniques — another explanation covering similar ground.