Blender 3D: Noob to Pro/Procedural Textures
Procedural Textures
Texturing objects can be broken down into two categories: procedural and image texturing. Procedural texturing makes use of mathematical formulas to generate textures. This is nice because it can be used to make relatively nice looking textures without external images which are very temperamental where you put them. Procedural Textures are all stored in the .blend file. These textures are obviously generated within Blender itself. Image texturing uses images created or captured outside of Blender, either from an image manipulation program such as the Paint.NET, GIMP or Photoshop, or captured on a camera. We have already learned about image texturing, so let's move on to procedural texturing.
Current Procedural Textures
Blender currently supports many procedural textures, including: Clouds, Marble, Stucci, Wood, Magic, Blend, Noise, Musgrave, Voronoi and DistortedNoise.
A Simple Wood Texture
Let's define a simple wood texture:
- Start a new Blender document containing the default cube.
- Select the cube (and nothing else).
- In the Properties window, go to the World tab
 and turn on Environment Lighting (you can leave its default energy at 1.0).
 - Go to the Materials tab
 , and rename the default "Material" to "Wood Material". Alternatively, delete the default material using the X to the right of the name field and add a new material.
Let's add some color and texture. You can see the results at any time by pressing F12 to re-render the scene.
Start by painting cube a base color using the Wood Material's "diffuse" color:
- In the “Material” tab,
- Scroll down to the “Diffuse” properties panel and choose a darker brown color e.g. #A57E3F.
See http://en.wikipedia.org/wiki/HSL_and_HSV for where brown fits in the color wheel.
Next, let's add a texture to give the material some highlights.
- Switch to the “Texture” properties tab
 , and again rename the default "Tex" to "Wood Texture" or create a new texture. Notice at the very top of the "Texture" tab "Cube > Wood Material > Wood Texture"
 - Change the Type of the material to “Wood” using the pop-up menu.
The texture sample will show parallel alternating black and white bars that don’t look very woody at all. Never fear! The black regions will be the material's base "diffuse" color. The white regions are like "highlights" that will be painted over the base.
Let's make some improvements to the texture:
- While still in the “Textures” tab,
- Scroll to the “Wood” properties panel that appears, change the waveform from “Sine” to “Saw”.
- In the next row of buttons down, change the type from the default “Bands” to “Ring Noise”.
- Increase the Noise Size to 1.0.
Now the texture sample should show something resembling wavy tree-rings. If you hit F12 to render now, you will see these rings covering your cube, except a) the colour is wrong, and b) normal wood patterns aren't so nearly circular.
To make the pattern more elongated:
- Scroll to the “Mapping” properties panel,
- Change the Size X value to 2.0 and Y to 0.4. This squishes the pattern down along the X-axis, and stretches it out along the Y-axis, giving the elliptical tree-ring shapes you commonly see on wood planks and boards.
Hit F12 to render again, and the shape of the texture should be looking a lot more woody now.
The final step is to color the highlights in the texture:
- In the “Textures” tab,
- Scroll to the “Influence” properties panel further down,
- Click on the color swatch, and choose a nice brown colour.
For a nicer effect, I chose a very light brown e.g. #DEB887.
The result should look very woody indeed!
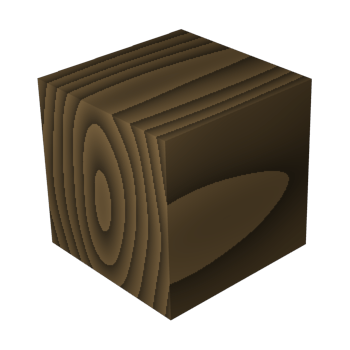
- Remember that you need to Render to see the wood grain on your object.