Blender 3D: Noob to Pro/Pipe joints
How to model pipe joints.
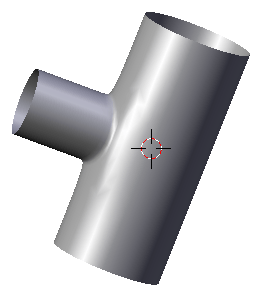
T joint
Start in top view, and delete the cube.

- Add a cylinder object (Add->Mesh->Cylinder)
- 16 Vertices, No Caps, Depth 4 (For recent versions of Blender create the cylinder then press F6 to get these options)
- Switch to front view (View->Front or NUM1).
The X axis now points to the right. We will work along the X axis from now on.
- Change to Edit mode (TAB).
- Create a Loop Cut in the middle of the cylinder (Ctrl-R).
Make sure that the 3D cursor is placed in the middle of the cylinder.
- Switch to right view (NUM3)
- Box select (BKEY) the 7 vertices at the front
- Rip the mesh with V.
tap on "Proportional editing" and set it to "connected" and select Falloff Type "inverse square".
- There will be 7 overlapping vertex pairs: 7 vertices linked to the top half of the tube, and 7 vertices linked to the bottom half of the tube.
- Either the upper middle vertex or the lower middle vertex should be selected. Depending on which set of vertices is now selected you will need to grab at the Z-axis by 1 (upper) or -1 (lower) make the circle that indicates how round your hole will be larger 'till you get a beautiful half circle.
- Once you have grabbed the first, deselect (AKEY), then select the other middle vertex
- grab at the Z-axis the selected vertex by +/- 1 BU. The pipe should now be straight again thanks to the rotations.
Set "proportional editing" off
- Box select the vertices of the gap and extrude "edges" along the X axis.
- Pivot -> Median Point (CTRL+,KEY)
- To flatten the front: scale at the X axis by factor 0. (S-X, 0).
- Use the Subsurf modifier in combination with Set Smooth, LoopCuts, and Crease to get a nice transition.
6 cylinder joint

Be in Object mode (have nothing else selected)
Add a cube.
Switch to Edit mode
Select all, then Subdivide the cube once (W, 1) (1).
Select the 12 vertices in the middle of the cube's edges.
Scale by factor 1.4142 (press S key and type in the factor with the keypad) (2).
Select all vertices, and Extrude "Individual Faces" (Alt+E -> individual faces) (3).
Select all vertices, and Remove Doubles.
Select the center vertex of each tube, and delete them to open the ends
Select the original vertices in the middle of the object and delete them (5).
Clean your mesh as described above.
3 cylinder joint

This is very similar to above, only the selection for scaling is different.
- Select the middle vertices at the edges where the cylinders shall come from. Additionally select the middle vertices at the faces that shall be kept free. You have to select 12+3=15 vertices.
- Scale your selection by 1.4142.
- Select the faces that shall be extruded.
- Extrude->Individual Faces (5)
- Select all, then Remove Doubles.
- Delete the inner vertices (6, 7).
- Select 3 vertices (which were middle of faces that were kept free) and 1 corner vertex in middle of the free faces (8).
- Make sure your 3D cursor is at the origin (and that you added the cube at the origin)
and switch to 3D Cursor Pivot (.KEY in v2.49b), then scale (SKEY), and type in 0.7071 (inverse of square root of 2, or Sin(45 degrees) or Cos(45 degrees)) and ENTER (9).
- Make sure you switch back to Median Point Pivot (SHIFT+,KEY) to straighten out pipe ends (10).
Clean your mesh as described above.
If your joint looks odd, it might be because of some edges in the mesh. Delete those by selecting it and delete (XKEY) edges (not vertices).
T joint with smaller diameter
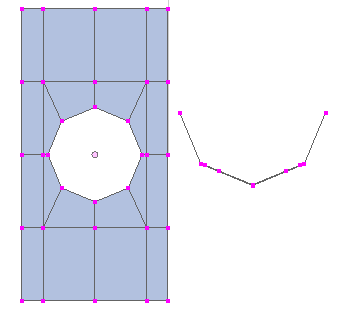
We're going to create a structure like in Fig. 4a and extrude the inner circle. To do that we place a circle with Retopo ("Snap during transform") on the cylinder and join both objects afterwards.
- Add->Mesh->Cylinder
- 8 vertices (of course you can use more vertices if you like)
- No Caps
- Depth 4
- Noob note: More vertices in your cylinder will mean more intuitive work and figuring [more loop cuts, face making, etc.] later on when retopo-ing. I suggest following the tutorial first, then try to do a more advanced model with more faces / vertices when you understand the tool. If you have trouble [as I did] getting really nice geometry, do a search for some tutorial videos. There are many really helpful ones.
- Add->Mesh->Circle (Noob note: To make sure you create these as separate objects, be in Object Mode (not Edit Mode).)
- 8 vertices
- No fill
- Rotate the circle by 90° at the Y axis (R->Y->90).
- Move the circle in front of the cylinder(G->X->2).
- Switch to side view (Num-3).
- Scale the circle to the diameter of the smaller cylinder.
(Noob note: I felt this was a little unclear. What the author means is, scale the circle down until it is the size of the diameter of the smaller cylinder you are going to create from it later by extrusion. You would be wise to scale it so it fits (straight backwards from view) inside the two closest faces of the cylinder as per Fig. 4a if you wish to follow the tutorial. )
- Switch to edit mode, select all vertices of the circle.
(Noob note: To recap: you should be in edit mode for the circle, with the all of it selected, with the cylinder object directly behind it in from your viewpoint in orthographic mode.) Make sure that you don't work in Wireframe view.
- Click on Snap during transform, that is the icon of the magnet in the 3D view header, select "Face" and after that a third box will appear, select there "closest". After that, push: "num3" and then "G key" and reposition it a little. After that you will see it lies perfectly around the cylinder.
(Noob note: What "retopo" (Snap during transform) does [in this case]; is project the selected topography of an object in edit mode directly backwards from your selected view point onto the topography of another [seperate] object. So you must be lined up view-wise for this to work. I've also found sometimes I must press the Enter key for the "Snap during transform" to take effect even if I've selected it with the LMB .)
If the vertices of the circle are not adjacent to the cylinder but have jumped to wrong places undo the last step (Ctrl-Z), deselect and reselect all vertices and try again. This does help (strangely). Snap during transform works with limited accuracy, if the vertices don't fit perfectly you have to move them by hand.
- Change to object mode, select additionally the cylinder and join both objects (Ctrl-J).
Now you work best in Wireframe view.
- Add three loop cuts (Ctrl-R->3)
- Delete the middle vertex.
- Connect the free vertices (F).
- Select the circle.
- Extrude and clean up.