Blender 3D: Noob to Pro/Multiple Materials Per Object
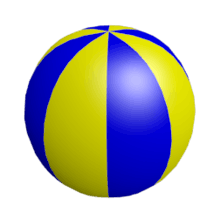
In this module, you'll create a beach ball with two alternating colours. Along the way, you'll learn how to apply multiple materials to a single object.
Many real-life objects have parts which are different colours, or are even made of different materials. One way to model such objects is to make each part a separate Blender object. However, Blender also allows you to assign different materials to parts of a single object.
Set the Scene
Begin by opening Blender and removing the default cube. Then select the lamp and change its type from 'Point' to 'Hemi' in the Light settings in the properties window (object data button), this has the advantage of it giving more light.

Now create a mesh for the beach ball:
- With the 3D View window active, press Shift + A ) and choose Add → Mesh → UV Sphere.
- In the "Add UV Sphere" panel in the bottom of the tool shelf, specify 8 segments and 4 rings.
- The initial result will be crude, but meshes with fewer vertices are easier to edit.
Make the mesh rounder and more organic using automatic subdivision:
- In the "Properties" editor, select the "Modifiers" context (wrench icon).
- Select "Add Modifier" and click Generate → Subdivision Surface.
- For the number of subdivisions, set both the 'View' and 'Render' count to 2.
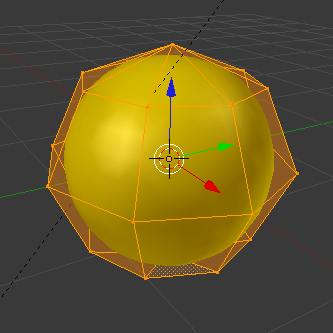
Get rid of that blocky look:
- Ensure you're in Object Mode.
- In the tool shelf, select the "Tools" tab.
- In the "Edit" panel of that tab, set the shading to Smooth.
The ball is now round, but a bit prolate. To make it more spherical, scale it by about 1.1 along the X and Y axes. To select the X-Y plane, you select ′not Z′, by using the key combination Shift + Z . The complete sequence is, then, S , Shift + Z , 1.1 .
Colorize Time
Now you're ready to begin adding colors to the object:
- Press Tab to put Blender into Edit mode.
- In the Properties editor, select the "Material" button
 .
. - Press "+ New".
- A new material appears in the material slot list, and several additional panels appear below to edit the created material.
- In the "Diffuse" panel, click on the default white diffuse color and change it to a nice yellow.
- At this point, the entire ball is yellow.
In the "Materials" panel click the "+" button (indicated by the red box in the picture, below) next to the material slot list to create a new blank slot. The "+ New" button will reappear (indicated by the blue box, in the picture below).
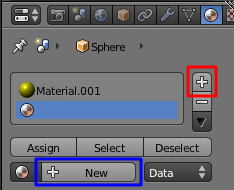
Click the "+ New" button and a new material will be created and assigned the empty slot in the materials slot list. Ensure that the new material is selected, then change the diffuse color to blue. Nothing will happen to the beach ball, yet.
Now make a single blue stripe on the ball:
- All the vertices should still be selected from before; make sure the 3D view is active, then hit A to deselect them.
- Switch to front view with NUM1 , and to "Face Select" mode with Ctrl + Tab then F .
- To avoid accidents, make sure that the "Limit selection to visible" option is enabled in the 3D View header bar.
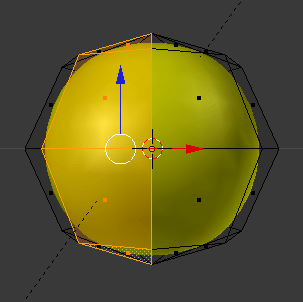
- Select a column of four faces that will make up one stripe of the beach ball (using SHIFT + RMB on each face):
- In the "Material" property window, select the blue material slot in the list, then click the "Assign" button.
Rotate the view (e.g. NUM6 ) so you can skip past a yellow stripe adjacent to the blue stripe, and select the second column that will become a blue stripe. Work your way around the ball to do this two more times. (Remember we made the sphere with 8 segments; four of these are yellow, and four are blue).
Now you see the benefit of making a sphere with only 4 rings: more rings would have meant more faces in each stripe, and more clicking to select them.