Blender 3D: Noob to Pro/Modeling a Gingerbread Man
In this tutorial you will learn how to make a simple gingerbread man. In a later tutorial you will be able to make an animation with this gingerbread man.
In this tutorial we will tie together everything we've talked about up to this point, including extruding, subdividing and rendering, and throw in basic lighting.
Modeling
First, start Blender. You should see the usual top view of a cube in the 3D window, surrounded by a grid 'floor'.
- Review— Zoom in or out with SCROLL or CTRL+MMB. Pan with SHIFT+SCROLL and CTRL+SCROLL. Make sure you are in orthographic view. Press NUM5 to toggle between orthographic view and perspective view. You can tell you're looking at an orthographic view while looking down from the top (NUM7) of the cube: wherever you pan the window, you never see any part of the cube except the top.
- Display editing controls in the buttons window by clicking on the Editing context button
 or by pressing F9.
Adding Vertices
- Select the cube by clicking RMB on it. (It may already be selected.) Remember, selected objects are outlined in pink.
- Switch from object mode to edit mode by pressing TAB, which toggles between object and edit modes. In edit mode, at first, you'll see colored dots at the vertices of the cube. Selected vertices are highlighted in yellow. Unselected vertices are pink. (You'll see the dots when editing in vertex select mode. In edge select or face select mode, you'll see colored edges and faces instead.)
- Select all vertices of the cube. Press AKEY once. If the vertices are yellow, you've selected all of them. If they are pink, you've deselected all of them. If necessary, press AKEY again so that all vertices are selected/yellow.
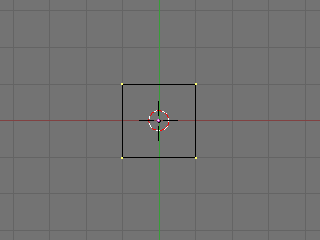
- Subdivide the faces of the cube, using any of the following methods. (All vertices of the cube should still be selected.)
- Click the Subdivide button in the Mesh Tools panel in the buttons window.
- With the mouse pointer in the 3D window –
- Press WKEY to display the Specials menu, then choose Subdivide.
- Press SPACE to display the toolbox, then choose Edit → Edges → Subdivide.
- Click the 3D window's Mesh menu, and choose Edges → Subdivide.
- Your cube now has more vertices. Subdividing edges adds vertices so you can create more complex shapes.
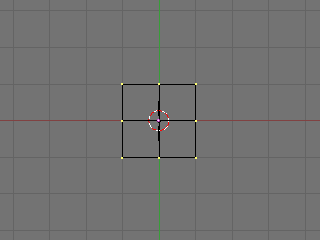
Selecting a Subset of Vertices
We'll select six vertices on the upper half of one side of our cube, where we'll extrude an arm.
- Deselect all vertices by pressing AKEY.
- View the cube from the front (NUM1).
- Select the six vertices on the top half of the left side of the cube (see below) using one of the following methods.
- Press BKEY and drag a rectangle around the top left and middle left vertices (viewing from the front).
- Press CKEY to see a circle around your mouse pointer. SCROLL to change the size of the circle. Position the circle around the top left and middle left vertices, together or one at a time, and click LMB. Click RMB to finish.
- Take a closer look at the selected vertices by viewing the model from a different angle (drag with MMB).
- If you find that you have only selected two vertices and not six, make sure the "Occlude Background Geometry" button is off. That button is the right-most of the selection mode buttons, below. (It's called "Limit selection to visible" in Blender 2.45 and earlier. It doesn't appear if Blender is drawing in wireframe style.) Try selecting the vertices again.
- If you still selected just two vertices, change to a wireframe drawing by pressing ZKEY, which toggles between wireframe and solid drawing types. Try selecting again.
- Yet another way to select the six vertices is to select the two faces they define. Click the Face Select button from the selection mode buttons (above), or press CTRL+TAB to display a Select Mode menu and choose Faces. Rotate the cube to view the left side and click RMB in the center of one of the two upper faces. Hold SHIFT and click RMB in the center of the other upper face.
Extruding Arms
- View from the front by pressing NUM1.
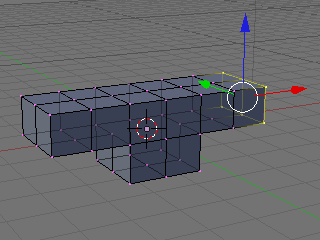
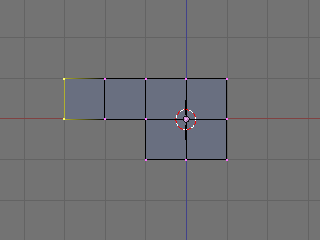
- Extrude the selected vertices/faces by pressing EKEY to display an Extrude menu, then choosing Region. Hold CTRL to snap your position to the grid, then move your mouse left to put the new vertices on the adjacent gray line of the grid one unit to the left. Click LMB.
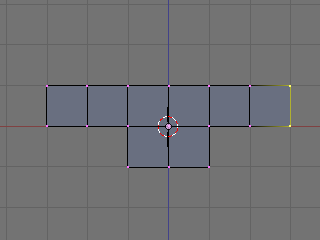
- Repeat so that your model looks like below (from front view, NUM1).
- Deselect all vertices/faces with AKEY.
- Perform the same extrusion on the right side of the cube, selecting six vertices and extruding twice as explained above.
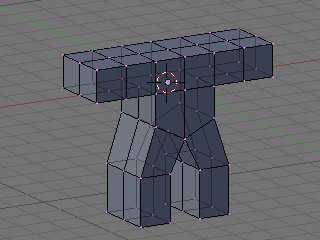
- The gingerbread man's arms are in place, as in the illustrations below.

Extruding Legs
- Make sure all vertices are unselected, using AKEY once or twice.
- View from the front (NUM1).
- Select the six vertices on the left half of the cube's bottom. Extrude them downward to a point in between the first and second heavier gray lines beneath the cube. (The gray lines in the grid represent Blender units.) Holding down CTRL, the extruded region may snap to the heavier gray lines—hold down CTRL+SHIFT and the region will snap to tenths of Blender units. Click LMB to finish.
- An alternative to positioning the extrusion with the mouse is simply typing the distance. Enter 1.5 to extrude 1 1/2 units out. On a Mac, enter the number 1, press fn with the key that is right under LKEY and MKEY on Azerty (the one with /:,), and press the number 5.
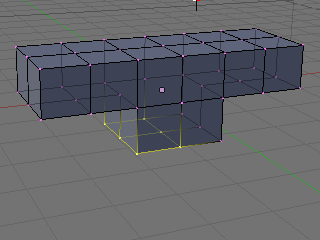
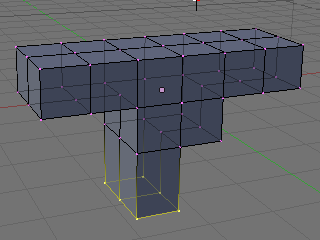
- Extrude the same region again, to the third gray line (1.5 again). It should look like this:
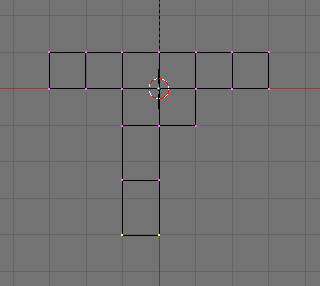
- Shift the lower leg to the outside as follows.
- Select the bottom 12 vertices of the leg (which look like 4 from front view), using BKEY.
- Grab the selection with GKEY. Press XKEY to limit movement to the x axis. Move the vertices to the left by half a square, holding CTRL or CTRL+SHIFT to snap to the grid, and click LMB.
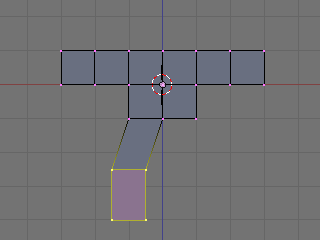
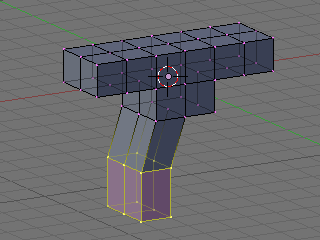
- Create a second leg on the right side, in the same fashion.
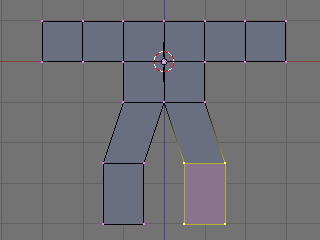
Dropping the Groin
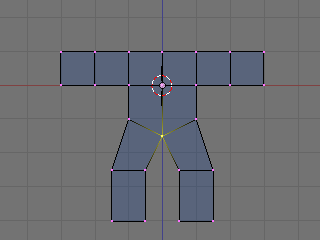
Lengthen the groin (where the two legs join):
- Deselect all vertices by pressing AKEY.
- Select the 3 vertices at the groin (which look like 1 from front view), using BKEY.
- Grab the vertices by pressing GKEY. Press ZKEY to limit movement to the z axis. Move the vertices down 1/2 of a square, or type -0.5 to specify the distance. (Older versions of Blender require NKEY before typing -0.5.)
Adding a Head
- Switch the 3D window from Edit mode back to Object mode by pressing TAB.
Noob Note: I found it easier to remain in edit mode while creating the cube as this makes the cube part of the original mesh. This allows you to add the subsurf to all parts at once.
- Click RMB on the object to select it then press SHIFT + SKEY and select Cursor → Selection. This will make sure the cube you'll add next will be near where you want it.
- Press SPACE and put your mouse on the mesh option and select cube. In others versions, you can also hit SPACE and , in the menu that comes up, choose Add → Mesh → Cube.
- Press GKEY and put your new cube about 1/3 of the way down the neck (to achieve this, you can press GKEY and ZKEY : enter 1.33).
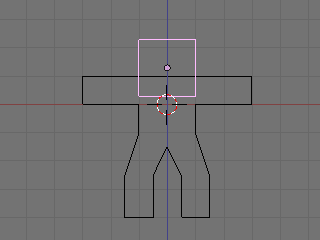
Now we will make it look more like a ginger bread man by making it thinner.
- Select all with AKEY.
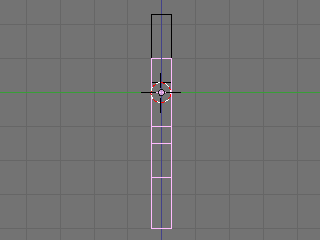
- Go to side view with NUM3.
- Press SKEY for scale and press YKEY for Y-axis and then move your mouse to the middle until it is about 0.3 (use CTRL for fixed values).
- Remember X-axis is the Red arrow/line, Y-axis is the Green one, and Z-axis is Blue (like RGB video mode).
- Use the MMB to spin the view around and examine your handiwork.
At this point, it doesn't look entirely like a gingerbread man, does it? It's a bit too ... chunky. For the last bit, we'll smooth it out.
- Make sure you've selected the body in object mode.
- Select the editing panel in the buttons window (or hit F9).
- In the Modifiers tab, Add a "Subsurf" modifier.
- Set the level of the subdivisions to 2, and the number of render levels to 3.
Noob question: When I add the cube for the head, it stops me from being able to edit the body - it will only select the head to apply subsurf to, even if the body looks like it's selected!
Answer: When you created the cube you made a second object. To select a different object, press tab to enter Object mode. Select the body. Then enter edit mode again if you want to edit the body.
- You can press the ZKEY to switch back and forth between wire-frame view and solid view.
- (Noob Note: Easiest way to really get a feel for what is going on in the 3d world is to split into four screens and setting each one to NUM7, NUM3, NUM1, and NUM0 to see all angles and what it will look like at render.)
Noob Question: How?
Answer: To split an area move the cursor to an area between two current areas (e.g. between the 3D view and the buttons), when you see the double ended arrow (used to move the divide) click RMB and select Split Area, you will then see a line appear dividing the area in two. Move this to where you want the divide and click LMB.
- In the 'Link and Materials' section, select 'Set Smooth'.
Noob question: Where? Assuming this refers to the 'Materials' section on the 'Properties' window, there is no 'Smooth' setting.
(Note that here I had the same problem as before, with superposed vertices. Select all vertices, then press WKEY and select Remove Doubles to clean your model. You will see that it will look much better after removing the extra vertices with Remove Doubles)
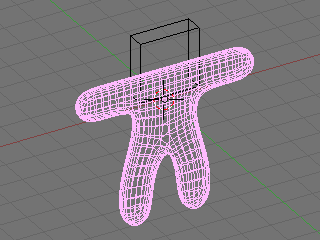
- Press the ZKEY to return to wire-frame view.
- Now repeat the process above to smooth the head.
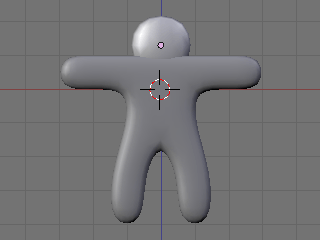
Looks a lot more like a gingerbread man now, doesn't it?
Camera Positioning and Rendering
This guide will show you how to intuitively get the best frame of your 3D scene with no effort!
- Press TAB for Object view mode.
- Press NUM0 to get the Camera View.
- Select the camera by clicking RMB on the outermost rectangle.
- Press GKEY and move your mouse to adjust the position of the camera (XKEY, YKEY, ZKEY and CTRL may be useful here).
- In addition, you can press NUM7 to get the Top View and press RKEY to rotate the camera to the best angle.
- After you are happy with the position, press F12 to render it.
If your render comes out a little dark, try moving the lamp closer to the gingerbread man.
Noob note: Another way to move around the camera is pressing SHIFT + FKEY after pressing NUM0 to enter Fly mode. The keys for fly mode appear in the header of the 3D view pane.
Noob note: Ctrl+Alt+NUM0 "teleports" the camera to your 3d view.
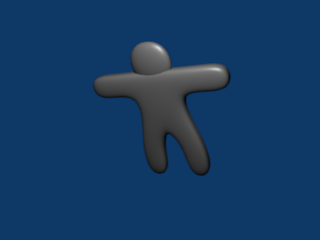
Noob Note: By pressing X, Y or Z twice you will use a local base of the space, with those it's much easier. For example if you are facing the Z axis from 45 degrees, and you want to go left 1 unit, using the global base, you will have to go 1.72 (around sqrt(2)) along X and the same along Y, instead moving by 1 in the local frame of reference.
Applying Textures
This builds on the previous guide: Modeling a Volcano.
Note: It seems that textures can only be applied to one object at a time, so this must be done twice (i.e. The head and body are two separate objects.) The settings that were chosen can successfully be applied to each object for a consistent result. Some settings can not be applied equally for consistent results.
N00b Note: if you join the 2 objects before applying the textures you do not have to do the process 2 times, just select the 2 objects, CTRL+J and the accept
- In "Object Mode," select the body (or the head.)
- Press F5 to open the shading panel or use the shading panel button.
- In the "Links and Pipeline" panel, under "Link to Object," click "Add New."
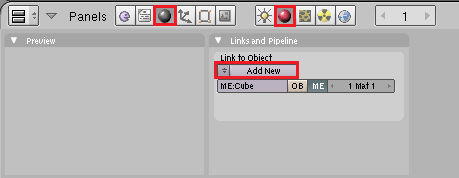
- Press F6 to open the "Texture Buttons" panel or use the textures button.
- In the "Texture" panel, click "Add New."
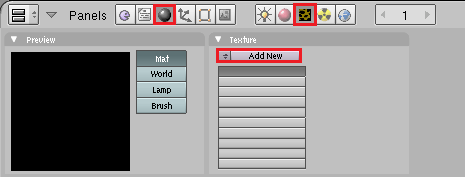
- Change the "Texture Type" to "Stucci."
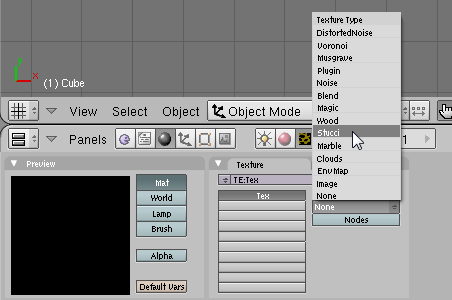
- In the new "Stucci" panel, change "Noise Size" to something near 0.025 and leave the "Turbulence" at 5.00.

Note: When finished with this section of the guide, come back to this panel and try different combinations of "Plastic," "Wall In," "Wall Out," and "Soft Noise" / "Hard Noise." Press F12 to render after each change to see the effect.
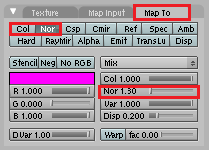
- Press F5 again or use the "Material" button directly on the left of the "Texture" button. Then look for the "Map To" panel.

- In the "Map To" panel, deselect "Col[or]" and select "Nor[mal]." and change the "Nor" Value to approximately 1.30.
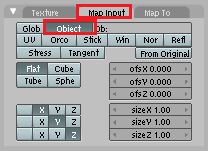
- In the "Map Input" panel, change the texture coordinates to "Object" by clicking the corresponding button.
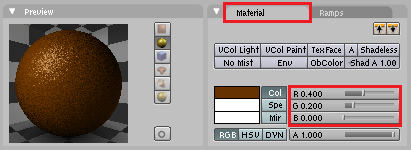
- In the "Material" panel, change the "R[ed]" slider to approximately 0.400 and the "G[reen]" slider to approximately half that, about 0.200. Blue can be set at 0.00.
Note: While it is true that textures can only be applied to one object at a time, textures as well as materials can be shared between objects. In this case it is best to let both the head and the body share the same material.
- To do this, simply select the object without the materials(head or body).
- Press F5 to open the shading panel or use the shading panel button.
- In the "Links and Pipeline" panel, under "Link to Object," click the arrow next to(left of) the "Add New" button.
- Select the brown material.
The steps in this section give a nicely textured, brown surface to the "Gingerbread."
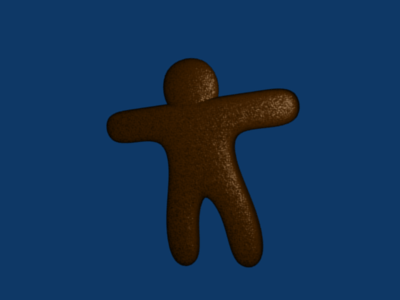
Now all you need to do is add eyes and gumdrop buttons!