Blender 3D: Noob to Pro/Making Fire
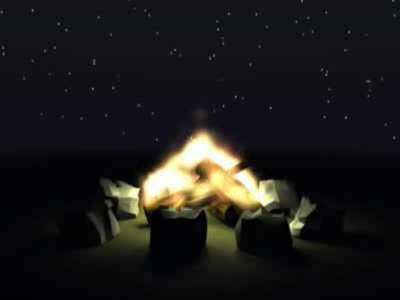
We're going to create a camp fire with a simple particle system. This tutorial is based on the method described in the Blender Manual. The result of this tutorial is shown in Fig. 1, the Blend-File is included at the bottom of this page.
If you need more realistic looking fire, you should use the method described in BlenderArt Magazine No. 16, though that method is more advanced and uses Compositing Nodes heavily.
The starting point of the tutorial is how fire behaves physically. The flames are made of hot gases. These accelerate upwards due to their lower density in contrast to the cooler air in the environment. Flames are in the middle hot and bright, to the outside they are darker.
The particle system
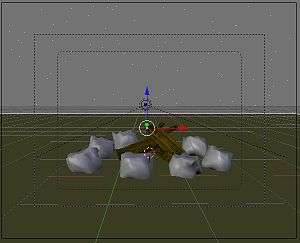
I've created the usual scene with some stones and a few pieces of wood (the wood is by courtesy of Teeth). (Fig. 2a).
| Noob note: I made the stones by adding an Icosphere of 3 subdivisions, and then used the proportional edit falloff (OKey) with the random falloff mode. And then subdivide and smooth. |
| Noob note 2: For the wood I used a modified Plane with an Image texture created with GIMP |
- Add a Plane in the middle of the stones.
This will become the particle emitter.
- Rename the Plane object to "Emitter".
If you use good names you will find it much easier to orientate yourself in your scene later. Having 100 objects named "Cube.something" will make it very difficult to quickly select a desired object.
- Subdivide the plane once in Edit mode.
- Change the shape of the plane, so that it's shape equals the base of the fire.
- Change to object mode.
- Change to the Particle buttons of the Object buttons.
- Create a particle systems (Add New in the Particle System panel - and make sure the plane is selected!).
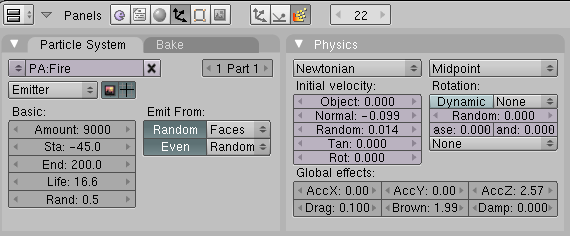
- Type: Emitter The plane emits the particles.
- Amount: 9000 The total amount of particles.
- Sta: -45 The simulation shall start before the rendering, to have a fully developed flame in the first frame.
- End: 200 The simulation shall last 200 frames - here: the particles are emitted till frame 200.
- Life: 16.6 I've adjusted the lifetime of the particles to their speed. Both parameters together regulate the height of the flame.
- Rand: 0.5 The lifetime is changed randomly.
- Emit from:
- Random
- Faces
- Even
- Random
This creates particles with a random distribution on the faces of the emitter object.
| |
Please note, that the particle simulation is only fully calculated if the bake parameters in the Bake panel match the positive lifetime of the particles. If you want to run the simulation longer than 250 frames, you have to increase the End frame in the Bake panel as well. This is independent whether you want to bake or not. |
The movement of the particles is controlled with particle physics. You set the Initial Velocity and let the physics do the rest.
- Normal: -0.099 The particles are emitted slightly against the direction of the face normal. This leads to a bit wider fire at the base.
- Random: 0.014 This creates a random start velocity as well in speed as in direction (you could use a texture to randomize only the speed, see the discussion page for that).
After you have given the particles an initial velocity they are moved by forces.
- AccZ: 2.57 A force in positive Z direction (upwards).
| |
As far as I can see AccZ does not exist in later versions(2.69 in my case); the alternative appears to be to set the Physics to Fluid and set a positive Buoyancy (something around 0.75 looks reasonable). |
- Drag: 0.1 Air drag decelerates the particles.
- Brown: 1.99 Random movement simulates agitated air movement.
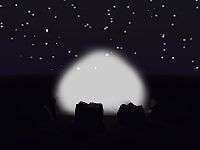
The particle system is finished. Until now is doesn't look like much (see the white Blob in Fig. 2c). Therefore the emitter will get a material, this material will be animated.
Material
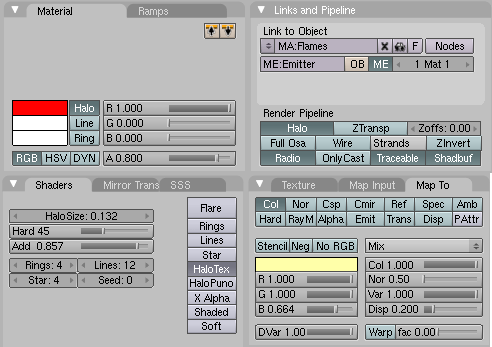
- Create a new material for the emitter, call the material Flames.
- Activate the Halo button in the Links and Pipeline panel. Else we couldn't set the particle parameters. The particles would be rendered with the default Halo values.
- Halo color: 1/0/0 (red)
- Alpha: 0.8 The particles shall always be a bit transparent.
- HaloSize: 0.132 I wanted many, but fairly small particles.
- Hard: 45 The transition from fully transparent to fully opaque.
- Add: 0.875 Several Halos over each other combine their power. This makes the fire in the center really bright.
- HaloTex: A Halo can bear an individual texture, but only the texture in the first texture slot is evaluated.
To give the Halo a bit more structure, give it a texture:
- Add a new texture in the first texture slot.
- Map To:
- Col
- Color: Bright yellow (1/1/0.664)
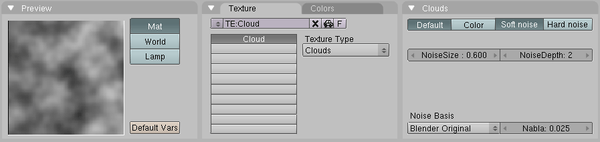
- Use an adjusted Clouds texture with a NoiseSize of 0.6.
Animation of the particle material

The particles "pop" into life and vanish suddenly. We should change that. Therefore we're going to animate the Alpha value of the particles.
- Make sure the material buttons are visible in the buttons window.
- Change to frame 21, move the mouse cursor over the button window and press I->Alpha. This is going to be the maximum visibility of the particles.
- Change to frame 1. Change the Alpha value to 0 and insert the next key.
- Change to frame 100. Change the Alpha value to 0 again and insert the third key.
If you want to see the IPO curve in the IPO Editor window you must change the IPO Type selector in the window header from Object to Material.
| |
Note: An animation of particle material is mapped from the first 100 frames to the lifetime of the particles. I.e. if the material is faded out during the first 100 frames (the ipo curve is 100 frames long) the particle will be faded out during it's own lifetime, no matter how long that is. This holds true however only for Point visualization of particles, not for object visualization. |
The Alpha value therefore changes during the individual lifetime of each particle from 0 to 0.8 and back to 0 (Fig. 3c).
| |
Note: In Blender 2.6, IPO curves no longer exist. Select the graph editor view to get the same capabilities. Also note that in the texture settings from the previous section you need to enable (and set to 1) the Alpha setting in the "influence" section, otherwise the Alpha animation will be applied to the particle system as a whole not to the individual particles. |
Rendering
Our particle animation is finished.
- Change the end frame in the Anim panel of the rendering Buttons to 200 and click on Anim.
Note: If after rendering your particles are too small, such that the fire doesn't look realistic, try increasing the Halo size slightly. I used 0.300 instead of 0.132
To actually let the fire glow you have to use one or more lamps and animate them as well. But that would be part of another tutorial ...