Blender 3D: Noob to Pro/Billboard Animation
Billboard visualization of particles - and especially their animation - is one of the more arcane concepts in Blender. We're going to shed some light on this. Billboard visualization is extremely powerful, everything that can be done with a halo can also be done with a billboard. But billboards are real objects, they are seen by raytracing, they appear behind transparent objects, they may have an arbitrary form and receive light and shadows. They are a bit more difficult to set up and take more render time and resources.
Billboards are aligned square planes. If you move an aligned billboard in a circle around an object, the billboards always faces the center of the object. The size of the billboard is set with the Size of the particle.
Texturing billboards is done by using uv coordinates that are generated automatically for them.
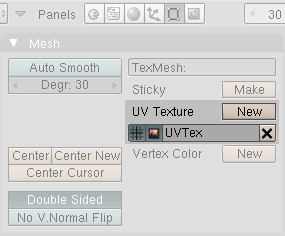
- The main thing to understand is that if the object doesn't have any UV Layers, you need to create at least one in the objects Editing buttons for any of these to work (Img. 1a).
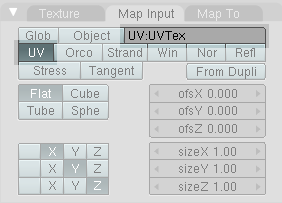
- Moreover, material should be set to UV coordinates in the Map Input panel (Img. 1b).
 |
 |
Splitting a texture
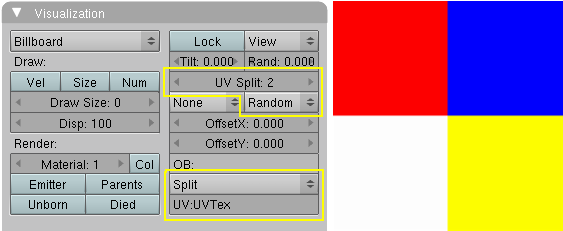
The simplest thing we can do is to give every billboard its own fraction of an image texture. We're going to use a simple image (Img. 2a, right hand side) and split this in four parts (UV Split = 2, horizontally and vertically).
- Create the UV coordinates (simply click on New next to UV Texture in the Mesh panel).
- Create a particle system.
- Activate Billboard visualization.
- Set UV Split to 2.
- Offset: Random to randomly choose one of the images sections. None would give only the first of the four fields, so all billboards would be red, linear would first use red, then blue, then white and then yellow repeatedly.
- Set UV Channel to Split. This creates the necessary UV coordinates, that are stored in the UV layer. If you use another UV channel, you need a second (or third) UV layer to store the coordinates (see below for an example).
- Fill in the field UV with the name of the coordinate set (here "UVTex").
- Now create a material for the particle emitter.
- Add a texture if not there already.
- Set Map Input to UV. If you only have one active UV layer this is used by default, but if you want to continue this tutorial you have to fill in the name of the UV set also (i.e. "UVTex").
- Load the texture as Image texture.
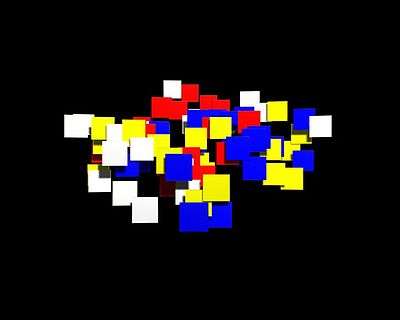
Now every billboard gets a random section of the texture (see Img. 2b).
Animating Alpha in relative particle time
Now we're going to combine the texture split effect with an animation of the billboard alpha. This is done in relative particle time, i.e. in the lifetime of each particle.
Billboard time is setup completely different than particle time.
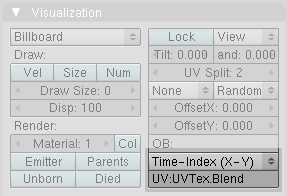
- Create a new UV layer (the second one). Name it "UVTex.Blend". Naming is not important here as long as it is unique.
- Select the UV channel Time-Index (X-Y) in the Visualization panel of the particle system. Fill in the name of the newly created UV layer "UVTex.Blend". This creates an additional set of UV coordinates in this UV layer.
Now both UV layers with different UV coordinates will be used. The material settings:
- Activate RayTransp and TraShadow.
- Add a second texture to your material.
- Map Input also UV, but now use the UV layer "UVTex.Blend".
- Map To:
- Invert Alpha and Invert Spec
- No RGB (since we're going to use a colorband texture)
- DVar = 0 to set Alpha to zero where the colorband is black.
This is one of the possible combinations for using a texture to make a material transparent (Img. 3b), there are several other methods that work as well.

The texture is really the most important thing here.
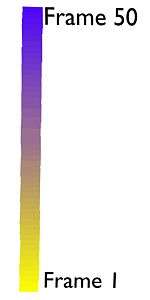
- Use a linear Blend texture.
- Activate Colorband for full control.
| |
The left hand side of the colorband if the first frame of the particle life time. The right hand side is the last frame of the particle life time. |
- Adjust the colorband to your liking.
I've mapped the texture so, that "white" means full opacity, black full transparency.

See this animation for the result of the combined textures.
Animating billboard color
I will show here a second example for animating with a billboard texture, because this is so important. We're going to change the color during the lifetime of the billboard, but you can animate every property that way that can be influenced by a texture. Additionally you can animate the material itself, this is done in absolute time for billboards. So you can mix relative and absolute time animations.
- Open a new file.
- Remove the cube and add a plane.
- Add an UV layer to the plane
- Add a particle system with Billboard visualization and UV Channel Time-Index. Fill in the name of the UV layer.
The particle life time is 50 frames.
- Add a material to your plane.
- Basis color Yellow.
- Use a linear blend texture. If you would use a color band here, you could create an even more colorful animation.
- Map Input UV
- Fill in the name of the UV layer.
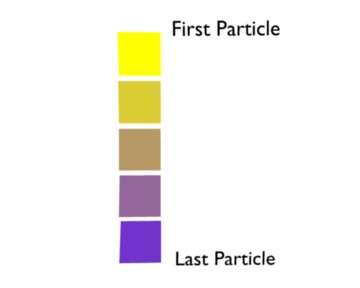
- Map To Col. I've used a dark blue color here.
Now the linear blend texture sets the amount of blue color that is mixed to the basis color of the material.
- At the left hand side the blend texture has a value of 0, so zero blue is mixed to the base color in the first frame of the particle lifetime.
- At the right hand side the blend texture has a value of 1, so 100% blue is mixed to the base color in the last frame of the particle lifetime.
Changing the starting color of a billboard
If you flip the Blend texture, you get a different effect. Now every Billboard gets another starting color, but keeps that color during it's lifetime.
Have I mentioned that you may use multiple textures on a billboard, combining all effects?