Arimaa/Introduction to Strategy/Trap Control
< Arimaa < Introduction to StrategyTrap Ownership
To own a trap square is to be safe from capture in it, and further to be able to capture opposing pieces in it. At the beginning of the game each player owns the two nearest trap squares, called home traps. The most basic offensive strategy is to go hunting with the lone elephant to dislodge an opposing piece towards one's home traps, in hopes of capturing that piece.
A more ambitious offensive strategy is to try to gain ownership of one of the enemy's home traps, most often with an elephant and horse. It raises the stakes to try to invade enemy territory in this fashion; if the opposing elephant doesn't defend (making the position a contest in elephant mobility), the result will be a race position.
An enemy trap usually has plenty of enemy pieces nearby, which can be captured in quick succession, as opposed to the laborious process of repeatedly prying loose a single enemy piece and dragging it all the way to a home trap for capture. An equally important benefit of owning an enemy trap is that if the opposing pieces scatter, it leaves a hole through which a friendly rabbit can march to the goal. Threatening to own an opposing trap is quite forcing; it limits the opponent's options to immediate defense or sharp counter-attack.
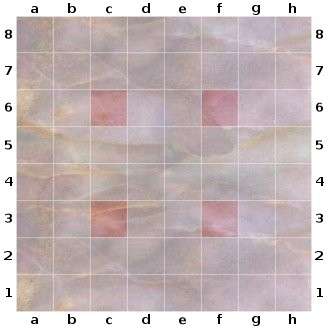
| |||||||||||||||||||||||||||||||||||||||||||||||||||||||||||||||||||||||||
| The traps c3, f3, and f6 are all deadlocked. | |||||||||||||||||||||||||||||||||||||||||||||||||||||||||||||||||||||||||
Deadlocked Traps
A trap is deadlocked when the strongest adjacent gold piece is equal to the strongest adjacent silver piece. At a deadlocked trap, neither player can hope to capture anything, ever, because the other player's strong piece keeps the trap safe. In the diagram at right, from this game, each player has an elephant next to the f6 trap, and both players have a camel near c3 and a horse near f3. A tie for strongest will never force a capture; you have to have the strongest piece next to a trap to own it.
Nothing can break an elephant deadlock except the voluntary departure of one of the elephants. A camel deadlock, in contrast, can be broken by the arrival of an elephant, and a horse deadlock can be broken by the arrival of an elephant or camel. At right Gold immediately moved his camel to e4 in order to re-establish ownership of the f3 trap.
Each trap that becomes deadlocked beyond the first trap adds a layer of strategic decision. In addition to maneuvering locally for mobility around each trap, there is a global question of which strong pieces to allocate to which quadrant. Crossing from one quadrant to another creates critical tactical timing questions of the form, "If I take ownership of that trap, will I gain enough to compensate for losing ownership of the trap I am leaving?"
| |||||||||||||||||||||||||||||||||||||||||||||||||||||||||||||||||||||||||
| Gold to move can profit by abandoning the f6 trap | |||||||||||||||||||||||||||||||||||||||||||||||||||||||||||||||||||||||||
If at any point an elephant can gain more on a different front than it stands to lose by abandoning its current front, then it should switch quadrants. For example, in the position at left (from this game) the elephants are deadlocked around the f6 trap, and the camels are deadlocked around the c6 trap. Gold faces the loss of a horse if he moves his elephant west, but if the elephant moves to c5 pushing the silver camel to c4, and Silver uses two steps of its next turn to capture the gold horse, Gold can then immediately take the silver camel in c3, and return his elephant to c5, having gained a camel and temporary control of the c6 trap in exchange for a horse.
When a deadlock is broken by the arrival of a stronger piece, the stronger side will almost always be able to own the trap. If there had been a mobility fight at that trap before the stronger piece arrived, that will only affect the timing of the captures. For example, if a camel is pinned in a camel deadlock, and the opposing elephant arrives, it will capture the framed piece on the first turn and the pinned camel the second turn. In contrast, if a camel is pinned in a camel deadlock and a friendly elephant arrives, it will first relieve the pin then extract the framed piece from the trap, then gain ownership of the trap, and then start capturing. The end result is the same, but the amount of time taken can be important.
Contested Traps
A trap is contested when one player has the strongest adjacent piece but the other has several weaker pieces to protect one another from capture and unfreeze one another when taken hostage. Momentarily neither player can make a capture, but the player with the strongest local piece is guaranteed safety, and may be able to eventually own the trap if the attack is supported with at least one additional piece.
| |||||||||||||||||||||||||||||||||||||||||||||||||||||||||||||||||||||||||
| The players are contesting all four traps | |||||||||||||||||||||||||||||||||||||||||||||||||||||||||||||||||||||||||
In this game, diagrammed at right, the players are contesting all four traps. Until one player can establish total control of some trap, no captures will be possible by either player. Nevertheless, this is a somewhat less stable situation than when multiple traps are deadlocked, because at each trap the player with the strongest piece can fight to own it. Whoever gets ownership of a trap first will start capturing pieces, quickly gaining a huge advantage.
This is a positional race, as opposed to a capturing race or goal race. Whichever player is going to lose the race to own a trap will be obliged to globally re-allocate forces before disaster strikes. Yet each re-allocation presents new opportunities to the opponent. For example, if the silver elephant took ownership of f6 at right, the gold camel would cross and take ownership of c3, a poor exchange for Silver. It would perhaps be wiser for a silver dog to assist the silver elephant in owning f3, although that would make the gold horse near f6 all the more potent a threat.
Losing control
To attack opposing traps entails the risk of exposing pieces which can be taken hostage or framed. On the other hand, it is a significant advantage to own at least one trap when the opponent owns none. A player who owns no traps can't make any captures at all. In particular there is not even the strategic threat of dragging a piece across the board to a place it can be captured, because there is no such place.
| |||||||||||||||||||||||||||||||||||||||||||||||||||||||||||||||||||||||||
| Gold has total control of no traps, and is thus unable to even threaten captures | |||||||||||||||||||||||||||||||||||||||||||||||||||||||||||||||||||||||||
In the position at left (from this game), Silver has deadlocked both of Gold's home traps. It is tempting for Gold to target the exposed silver camel on b3, since camel hostages are valuable, but in this context we see that camel hostages are merely part of a larger strategy of trap control. One takes a camel hostage because it allows one to eventually own a trap the other player can't contest. A camel hostage is useless if it isn't part of a grand trap ownership plan.
In the diagrammed position it is most important for the gold camel to re-assert ownership of f3. Silver has stuck his neck out so far that Gold has no need (and no time!) to try to secure a more subtle positional advantage. The game will hinge on whether Silver can maintain shared control of both c3 and f3. If Silver can pull it off, then any positional advantages Gold accrues will be worthless, but if Gold regains total control of at least one home trap, Silver can hardly escape without some advanced piece being captured.
In modern Arimaa theory, one player often willingly concedes the disadvantage of a frame or hostage for the advantage of deadlocking the elephants around an opposing trap, with a long-range view to contesting the other opposing trap as well. The deadlock can then be tightened by rabbit advancement. The tighter a deadlock becomes, the greater the compulsion on the defender to contest one or both opposing traps in response. Such struggles are quite different from race games where each elephant is massacring pieces in the enemy camp. On the contrary, in a trap-control game it is possible that neither player will make any captures until one player has already gained a decisive positional advantage.