Arimaa/Introduction to Strategy/Other Hostages
< Arimaa < Introduction to StrategyPartial Freedom
As long as an elephant is not blockaded, it retains a theoretical freedom to roam the board. There are, however, fine distinctions in exactly how free a free elephant is. A whole spectrum of positional features may limit an elephant's ability to switch its field of operation. Extreme contraints include guarding against an imminent goal, or guarding against the capture of a camel hostage. The range runs all the way down to minor constraints such as guarding against a rabbit being captured, or even guarding against a small positional disadvantage the opponent might create in the elephant's absence.
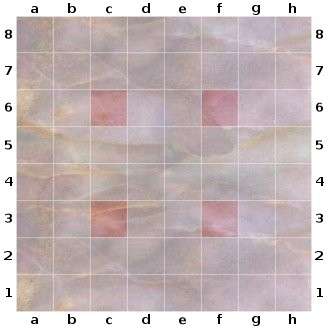
At the start of each game, both elephants are free, but differences in elephant mobility soon emerge. Some observers are astonished that tiny advantages in Arimaa seem to snowball; it is easy to underestimate how a more mobile elephant can pose increasingly tricky defensive puzzles for a less mobile elephant to solve. As the game progresses, one or both elephants tend to become more and more committed to the defense of a particular trap. When an elephant finally can't leave a trap without its army suffering captures in that trap, that elephant has lost mobility in a clearly identifiable sense.
| |||||||||||||||||||||||||||||||||||||||||||||||||||||||||||||||||||||||||
| The gold elephant is nearer the center than the silver elephant (from this game). | |||||||||||||||||||||||||||||||||||||||||||||||||||||||||||||||||||||||||
Elephants can only hostage camels
An elephant holding a camel hostage is only one example of a whole class of positions where a frozen piece is held in danger of capture, committing the opponent to defense. However, not all such positions are effective. Suppose, for example, that an elephant holds a horse hostage instead. This commits the opposing elephant to defense, true, but who has the strongest free piece? The defending elephant can't leave without losing a horse, but the hostage-holding elephant often can't leave either, because the newly-freed horse would cooperate with the formerly-defending elephant to wreak havoc at that trap.
In this diagram, Silver is holding a hostage, but neither elephant wishes to leave the northeast trap square. Indeed, it is the gold elephant which has the greater mobility because it is two steps closer to the center, and is thus a greater threat to the silver camel than the silver elephant is a threat to the gold camel. Since the gold camel has more freedom of movement, Gold may be able to make progress in this position despite having a horse held hostage. Essentially, the inactivity of the gold horse is insufficient compensation for the decentralisation of the silver elephant and for Silver's poor alignment.
Sometimes such a hostage can be converted to a frame, or passed off to the silver camel, freeing the silver elephant. It is not usually a good idea to hold a horse hostage with the elephant for more than a few moves, especially when both camels are still on the board.
Horse hostages
| |||||||||||||||||||||||||||||||||
| |||||||||||||||||||||||||||||||||
| |||||||||||||||||||||||||||||||||
The right piece to hold a horse hostage is a camel. Ideally this ties the opposing elephant to defence, while the friendly elephant is free to roam. However, the situation is often unstable because the "defending" elephant can attack the hostage-holding camel, freeing the hostage horse, and possibly creating offensive threats. This means that the "free" elephant must work as quickly as possible for concrete gain, before the hostage situation collapses. A good horse hostage can be worth more than a camel hostage, but this depends on the hostage-taker's ability to make quick threats.
These diagrams illustrate different positions for a horse-by-camel hostage. In the first diagram, the gold piece on a4 is necessary for the hostage to be effective: pulling the camel would b4 would be a waste of time as it could simply return. It may take Silver several moves to break this hostage, which will probably allow Gold to take a large advantage on the rest of board. Note that the b2 cat allows capture of the hostage in case the silver elephant goes to b4. Also, Gold should not occupy d3, as then Silver could move the elephant to b4, and capture would require that the camel move to c4, where it would be threatened in c6.
Without the horse on a4, the hostage would be weak. The silver elephant could pull the gold camel to b4 in three steps (returning to c4 after the pull) with the final step used to move the silver horse to b3. This would immediately threaten the f2 rabbit with capture; also there would be the option of flipping the gold camel to c5 on the following turn, with a threat in c6. If Silver had time for these maneuvers, the hostage would in fact be an advantage for Silver.
The second diagram is a similar position, but with the horse on b2 rather than a3. This means that the horse can immediately join the trap control fight if the camel is dislodged—for instance, here Silver is threatening to capture the camel by false protection. On the other hand, Gold can respond by pushing the horse to b1, after which it remains trapped.
In the third diagram, the silver elephant has no easy way to approach the gold camel. As long as Gold retains control of the b3 square, the hostage is fairly secure. This can be the strongest type of horse hostage, provided there are enough pieces to maintain it.
In all of these cases, the side defending the hostage should consider bringing more pieces into the local fight. For instance, in the last example Silver would have a strong position if she could bring a horse to b3, dislodging the silver dog. In the first, the silver camel might be able to attack the a4 horse, which would weaken the hostage pattern.
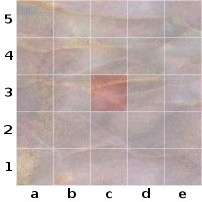
| |||||||||||||||||||||||||||||||||||||||||||||||||||||||||||||||||||||||||
| In this game, the gold dog would be most valuable as a hostage if held by a horse. | |||||||||||||||||||||||||||||||||||||||||||||||||||||||||||||||||||||||||
Cat and Dog Hostages
A smaller piece may also make a valuable hostage. In this example, Silver has an advantage due to the gold dog held hostage by the silver camel. The silver elephant is a free piece, which will try to pull something to capture in the f6 trap. The Gold elephant will be overloaded if it must simultaneously defend c6 and f6.
However, the situation is less than ideal for Silver, for two reasons. First, the silver cat on c6 means that the hostage dog isn't threatened with one-turn capture. If the gold elephant leaves, it will take five steps for Silver to capture the hostage dog, giving the gold elephant that much more mobility. Second, the gold rabbit on h5 gives the gold camel more freedom to advance without fear of being taken hostage by the silver elephant. Silver would like to send his elephant after the gold camel, but in practice will probably have to try to capture the h5-rabbit before this is feasible.
In general, the advantage of a small piece hostage over a horse hostage is twofold. First, the smaller piece can be held hostage by a horse, sparing both the friendly elephant and the friendly camel for other duty. Second, it is easier to frame a small piece than to frame a horse. In the diagrammed position, Silver would have a greater advantage if the c7-camel were swapped with the g6-horse. Then the silver camel could defend the f6 trap while the silver elephant either hunted for a second piece to drag for capture, or assisted in framing the hostage dog. As it stands, the silver elephant can't help frame the c8-dog, because of the damage the gold camel would do in the mean time.