Adventist Youth Honors Answer Book/Recreation/Horsemanship
< Adventist Youth Honors Answer Book < Recreation| Horsemanship | ||
|---|---|---|
| Recreation General Conference See also Horsemanship - Advanced |
Skill Level 1 |  |
| Year of Introduction: 1961 | ||
Contents
1. Label on an outline drawing of a horse, or point out on a live horse a minimum of 15 different parts of a horse.
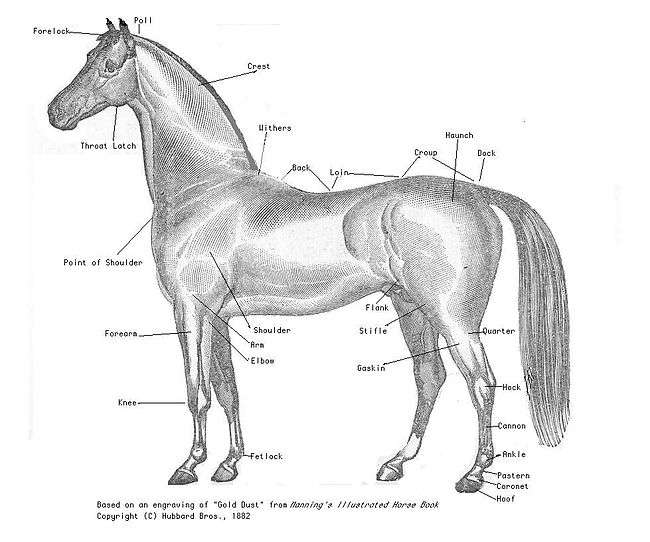
Parts of a horse
2. Label on an outline drawing or point out on a real saddle and bridle: Western— minimum of 10 parts of the saddle and 6 parts of the bridle; English—minimum of 9 parts of the saddle and 7 parts of the bridle.
Western
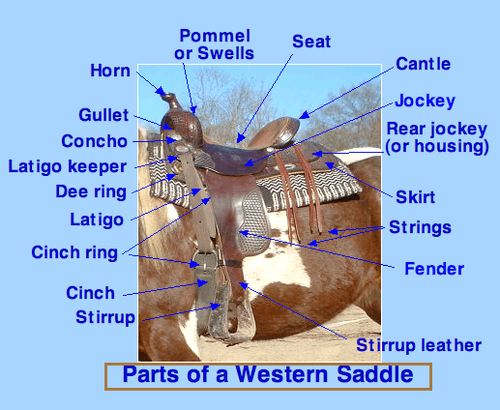
Western Saddle
- Fork
- Gullet
- Latigo holder (or latigo keeper)
- Latigo
- Front jockey
- Front rigging dee
- Fender
- Hobble strap
- Stirrup leather
- Stirrup
- Front cinch
- Cinch connecting strap
- Flank billet
- Saddle strings
- Horn
- Seat
- Back jockey
- Kirt
- Cantle
- Seat jockey
Western bridal
- crown piece
- brow band
- throat latch
- cheek pieces
- cavesson
- curb
- bit
- reins
English
- Tree
- Pannels
- Gullet
- Seat
- Pommel
- Cantle
- Waist
- Jockey
- Knee roll
- Thigh roll
- Billet
- Stirrup
- Sweat flap
English bridal
- crown piece
- brow band
- throat latch
- cheek pieces
- nose band
- chin strap
- bit
- reins
3. Demonstrate and explain the purpose of safety equipment while riding and working around horses—riding helmet and boots (or hard soled shoes with a heel).
- Helmet
- Protection of the head. If rider falls from horse, or struck by horse, a helmet will provide some protection if it properly worn. Rider must not be careless around the horse though.
- Boot
- Smooth bottom with heel. In the case the horse bolts and riders' foot slides forward in the stirrup, the heel of the boot will catch and reduce the chance his or her foot could be caught in the stirrup. If a rider falls and his or her foot catches in the stirrup, serious injury or death can result.
- Long pants
- It is also a good idea to wear long pants when riding. This protects the rider from chafing against the saddle, and from scrapes and scratches from trees and bushes along the trail.
4. Demonstrate and explain a minimum of 5 rules to safely approach and lead a horse.
- Never approach a horse from the backside. A horse can not see you from straight behind and may startle and kick you. Approach from the side or front. Be sure it knows that you are there. If in a stall, knock on some wood softly or whistle, to let him know that you are there.
- Stand to the left side of the horse's head when leading - at the shoulder is too far back. Keep an arms distance away so the horse doesn't step on you.
- If the rope has a chain on the end, hold the rope below the chain. If you were to hold the chain and the horse pulls it through your hand, it can injure your hand. Hold the extra rope in the left hand, figure-eight style. Do not coil or loop the rope around your hand, you don't want to get tangled if the horse bolts.
- When turning right, lean or push into the horse, so it can't step on you as easily. To stop, pull back.
- Avoid excessively long lead ropes, you can become entangled in an emergency.
- Use a quick release knot when tying the horse. Never tie below the horses' withers. Tie to objects that are strong enough to hold if the horse pulls back.
5. Demonstrate and explain a minimum of 5 safety rules for working around horses.
- Never go around the back, unless you are at least 3 feet away, or you are very close with your hand on the horse's flank.
- Don't ride when there's lightning, because some horses can be spooked easily.
- Do not run around the horse.
- Don't wrap the reins or lead rope around your hands because the horse may run and your hands can easily be hurt, or you could be dragged and seriously injured.
- Never go under the neck of a horse.
- Don't ride a horse in the barn.
- Never sit or kneel while grooming, the horse could step on you.
- If your horse bolts, pull hard on one rein to turn it in a circle until the circle is small and the horse stops.
- Always use a quick release knot or a panic snap to tie your horse so you can release it quickly if needed.
- Always wear shoes with a heel while riding. No flip flops, or open-toed shoes. Boots are recommended.
10. Demonstrate and explain 5 trail safety rules, including the following:
b. Use correct spacing.
when spacing, look between the horse's ears and you should be able to see the lower legs of the horse in front of you. If not, you are too close.
c. Do not let your horse eat along the trail.
Your horse will be distracted if you let him eat. He needs to pay attention to your signals, and under your control at all times. Also, the bit will get messy if you let him eat. You don't know what plants may be growing along the trail, they might make your horse sick.
d. Never move faster than a walk on paved surfaces.
Pavement can be very slippery, so your horse could fall if you let him trot or canter.
This article is issued from Wikibooks. The text is licensed under Creative Commons - Attribution - Sharealike. Additional terms may apply for the media files.